使用GitKraken与Buddy部署Jamstack
This guide is based on part 2 of the webinar that we did in collaboration with our friends at GitKraken. In the previous installment, together with Dwayne McDaniel, Developer Evangelist at GitKraken, we discussed the basics behind setting up and managing your NextJS site, from the initial theme cloning to a final production deployment on Netlify.
Let's have a look at the topics we discussed so far:
- The basics of NextJS and Tailwind CSS
- How GitKraken makes it easy to manage your git projects
- Creating a basic pipeline that builds your site and uploads it to a server
With the groundwork laid, let's dive deeper into the topic and see how we can expand this pipeline to make it a truly robust deployment machine!
Testing NextJS with Buddy CI
Nowadays, there's an abundance of excellent tools for testing - and that's a fact. You can pick and choose tools that are flexible and powerful enough to put your code through the paces. There's just one problem with that.
You have to set up and configure each of these tools, which can take a lot of time.
Luckily, Buddy gives you great actions for testing that are ready to use in a matter of minutes. Let's start adding these actions to the basic pipeline we prepared in the previous installment of the webinar:
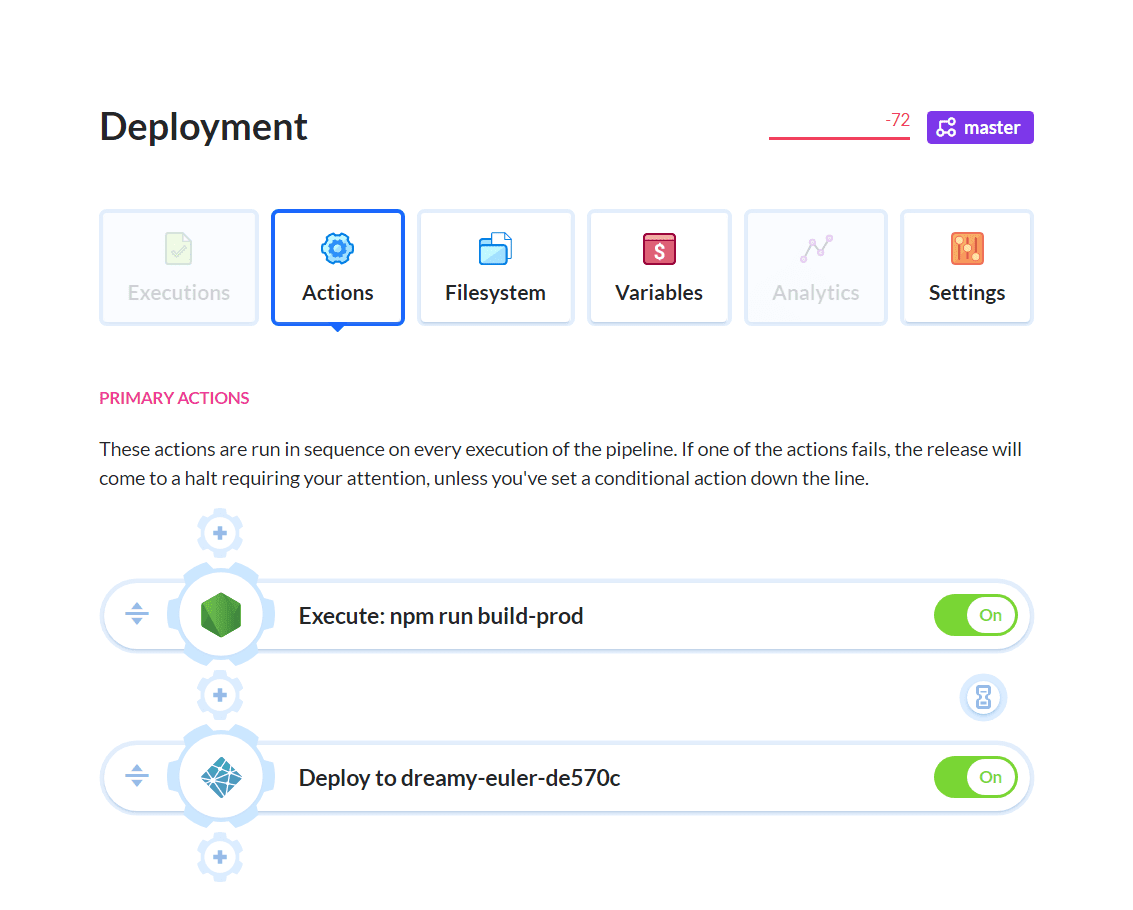
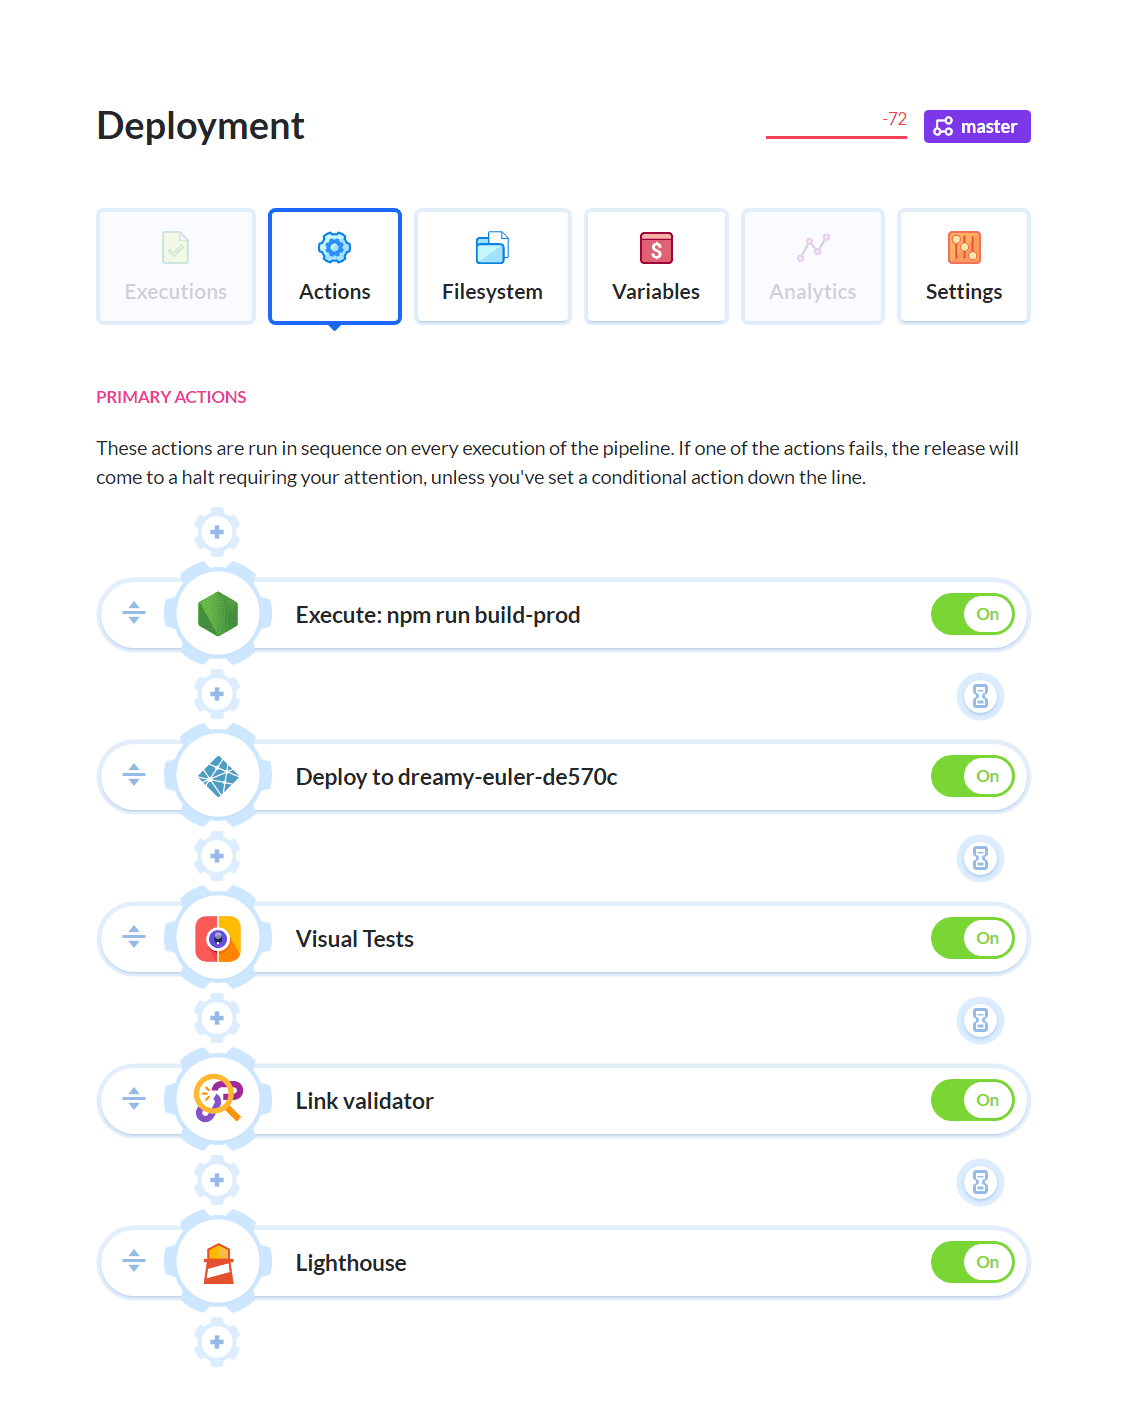
You can start testing your site automatically by adding these 3 actions to your pipeline, right after deploying to Netlify:
- Visual tests which help you ensure that everything looks just right
- Link validator which makes sure that none of the links on your site return these embarrassing
404or500code errors - Lighthouse which analyzes the website and lets you know if your recent changes influenced the Lighthouse score, which is vital for positioning and SEO
Here's what the pipeline looks like with the newly added actions:
This is how you boost the quality of your deployments with just a couple of clicks. Thanks to the tests we added to the deployment pipeline, we can be sure that most of the bugs and errors that normally go unnoticed will be caught by the automated tests.
Preview website on Apache sandbox
Although we've added some great tests to our pipeline, let's be critical and point out one important thing: the tests run after the site is deployed, which means that we'll know about errors only after they've gone live along with the deployed website.
This isn't a perfect solution, is it? Fortunately, Buddy lets you improve this setup by allowing you to check your changes without having to deploy them to the target server.
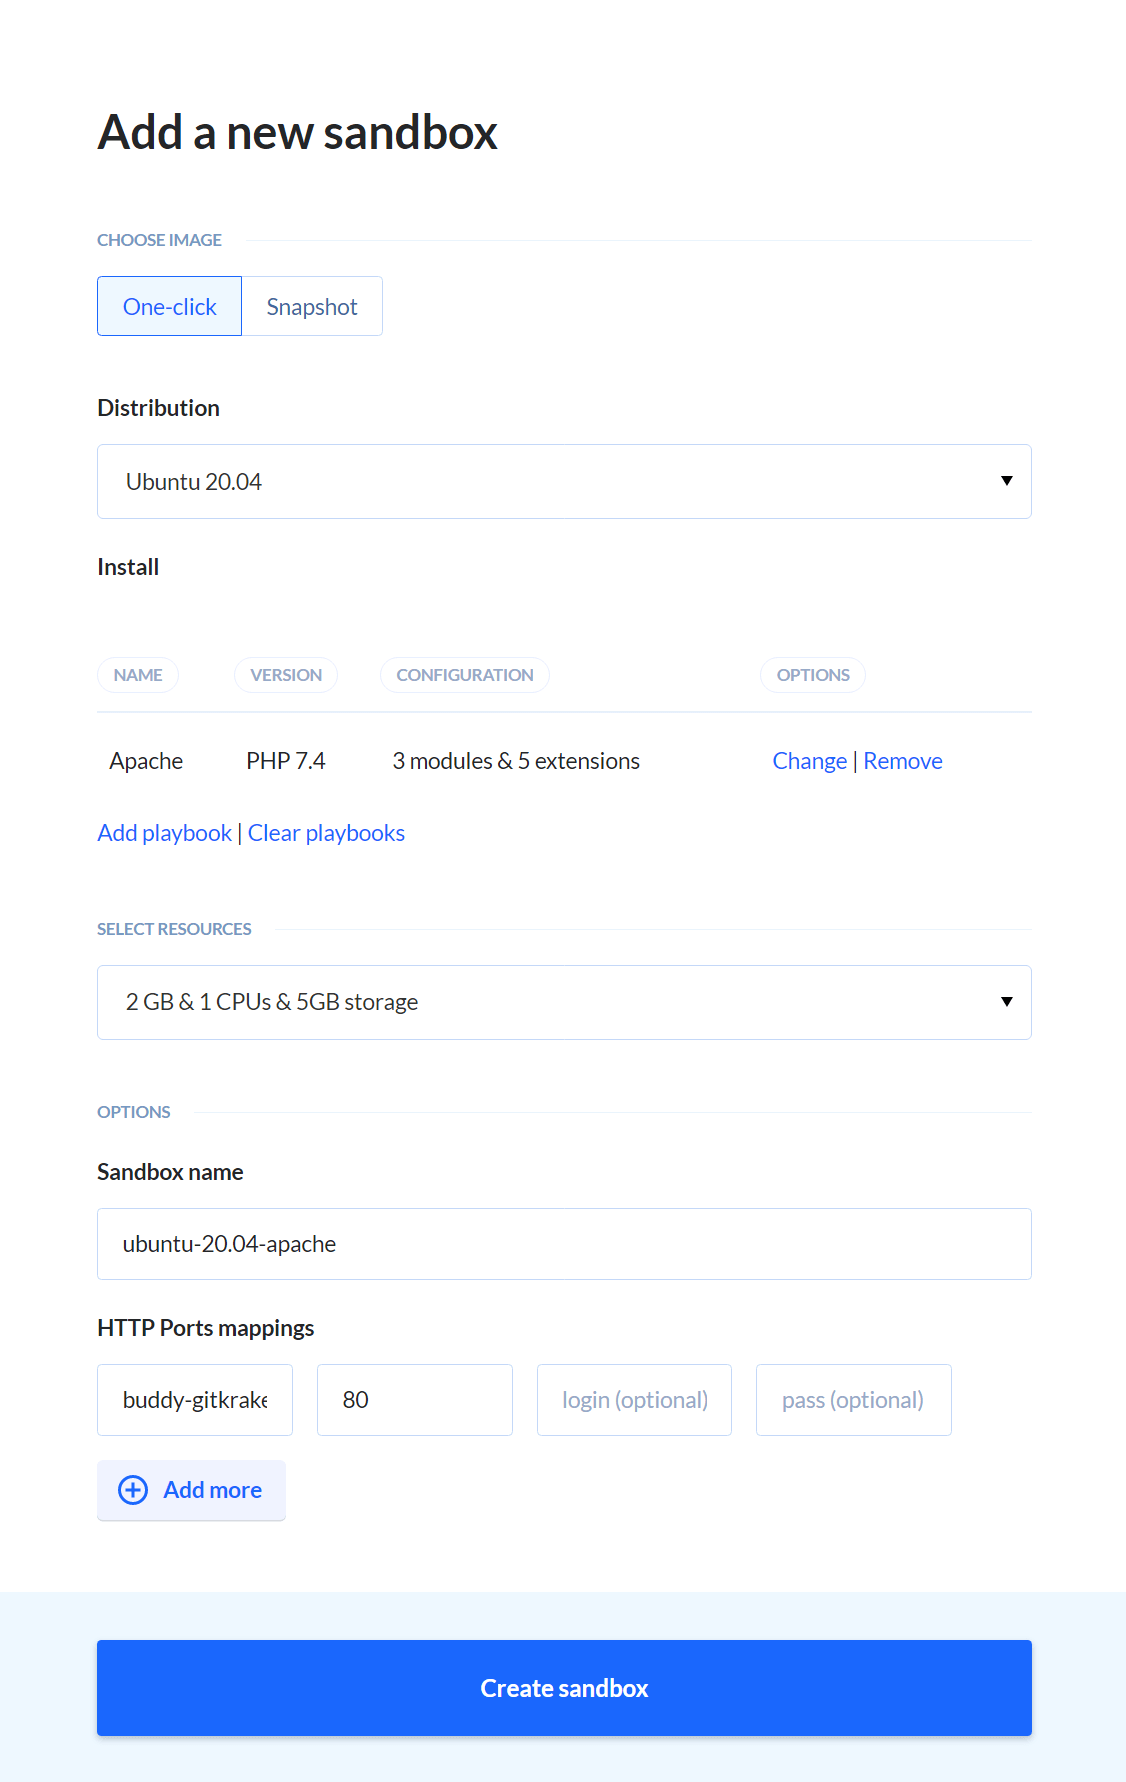
To do that, we'll deploy to a staging environment first using a feature unique to Buddy called Sandboxes. Then, we'll run all tests on this deployment, and only if all of them pass we'll allow the site to be deployed to production.
Using Sandboxes, we won't have to worry about setting up a separate staging server which we'll use in this setup. Sandboxes allow you to do just that - create staging servers that live in your Buddy account and are tied to specific pipelines.
Let's make this happen by creating a new Sandbox with the Apache playbook:
Deployment to Netlify
Now that the Sandbox is prepared, it's time to adjust the pipeline to make good use of it. Make sure to deploy your site to the Sandbox server first and change all relevant URLs in test actions to point to the new staging server.
Move the Netlify action to the very end of the actions chain - this way your site will be deployed to the target server only if all of the tests pass.
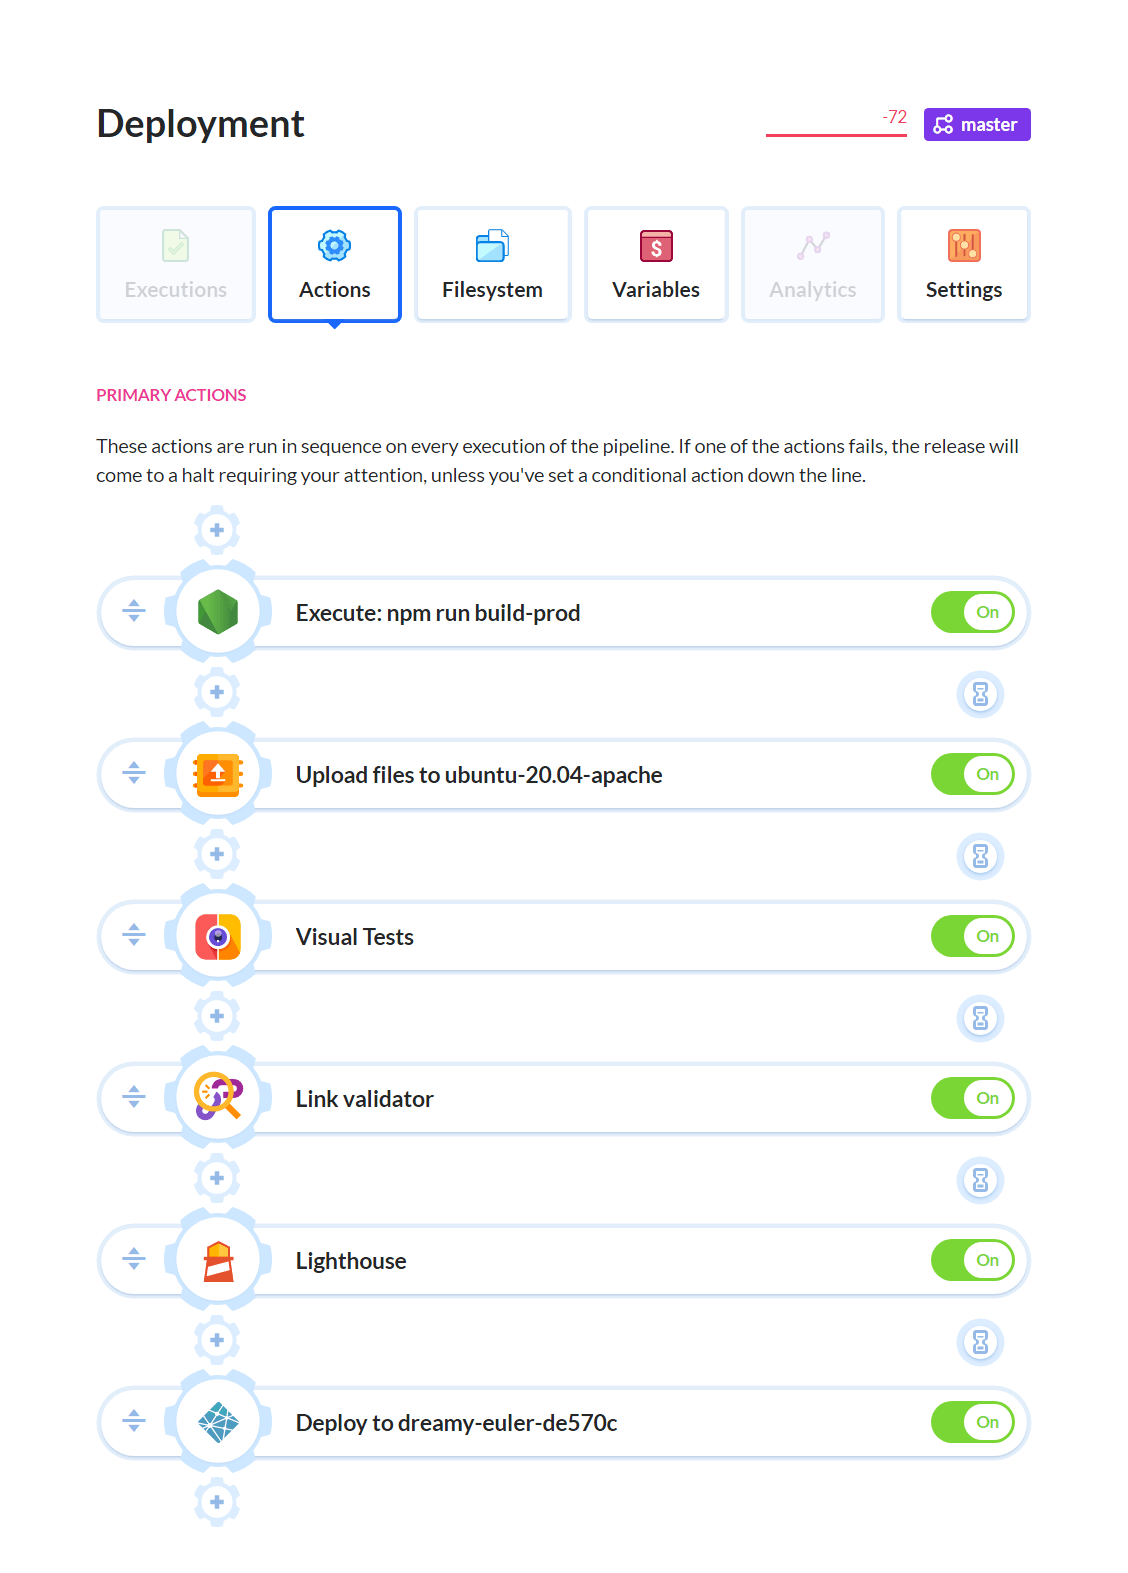
Once the application is built, Buddy uploads it to the staging server. There the app is tested, and when everything is fine, the code is deployed to production.
With your pipeline set up like this, you won't have to worry about any errors getting through to your live site anymore.
E2E testing with Cypress.io
Last but not least, let's look at adding simple E2E tests using Cypress.io.
End-to-end (E2E) tests are the closest you can get to testing the app manually. You create them by writing test scenarios that include steps that replicate interactions of regular users, for example:
- Open the home page.
- Go to the "About" page.
- Click the "Send" button.
- See if an error message is displayed.
For our website, we decided to create an E2E test that check if the "About" page exists and if it returns a 404 code error. All of that is done with this simple code snippet:
it("About page", () => {
  cy.log(`Visiting /about/`);
  cy.visit("/about/");
});
This is a simple, yet powerful test, but it's just the tip of the iceberg. End-to-end tests allow you to see the behavior of your app in very complex scenarios, which I highly recommend.
If you want to harness the power of E2E testing, read this guide to learn more and hit the ground running.