如何在Node.js应用上运行Mocha/Chai测试
Creating a Hello World website with Node.js
Mocha is a relatively fast and straightforward JavaScript test framework hosted on GitHub. It's one of the simplest test suites for Node.js available, and allows for fairly accurate reporting, asynchronous tests, test coverage reports and, most importantly, can use any assertion library. THe best library to pair Mocha with would be Chai. It's a BDD/TDD library that works very well with this tool.
Before we run our Mocha express tests, however, we shall begin with creating a simple Node.js application. The latter part of this guide covers writing, running, and automating tests with Buddy.
If you already know how to write Mocha/Chai tests, you can jump forward to to the Automation part.
Install Node.js
If you've never worked with Node.js before, start with installing the npm manager: nodejs.org/en/download/package-manager
Install NPM and Mocha
Create a directory for the application:
mkdir myapp && cd myapp
Now initalize npm. We'll use it to create a package.json with the Mocha framework:
npm init
When asked for the details of the application provide the following:
- name:
hello-world - entry point:
app.js - test command:
./node_modules/.bin/mochaWe shall use this framework to test the application
You can confirm the rest of the values with enter.
Create Hello World with Express framework
To build the app, we'll use Express Node.js web application framework:
npm install express --save
Using --save adds this package to package.json where all dependencies are stored
TableMain of Hello World
With everything installed, we can create an app.js file with a simple HTTP server that will serve our Hello World website:
//Load express module with `require` directive
var express = require('express')
var app = express()

//Define request response in root URL (/)
app.get('/', function (req, res) {
  res.send('Hello World')
})

//Launch listening server on port 8080
app.listen(8080, function () {
  console.log('App listening on port 8080!')
})
Run the app
The application is ready to launch:
$ node app.js
Go to http://localhost:8080/ in your browser to view it.
Configuring unit tests with Mocha and Chai
Every application requires testing before the deployment to the server, especially a welcome site that determines the first impression. In this example we shall use Mocha as the test running framework, and Chai as the assertion library.
Install Mocha and Chai
Let's add Mocha and Chai packages to the package.json:
npm install mocha chai --save-dev
Add a test file
Time to define our first test. We shall keep all testing files in a separate /test directory (orndung muss sein):
mkdir test
Now, add the first testing file:
touch test/test-pages.js
The test verfies the content of the websit. For that, we need an HTTP client: https://npm.io/package/request
npm install request --save-dev
The file should look like this now:
var expect  = require('chai').expect;
var request = require('request');

it('Main page content', function(done) {
    request('http://localhost:8080' , function(error, response, body) {
        expect(body).to.equal('Hello World');
        done();
    });
});
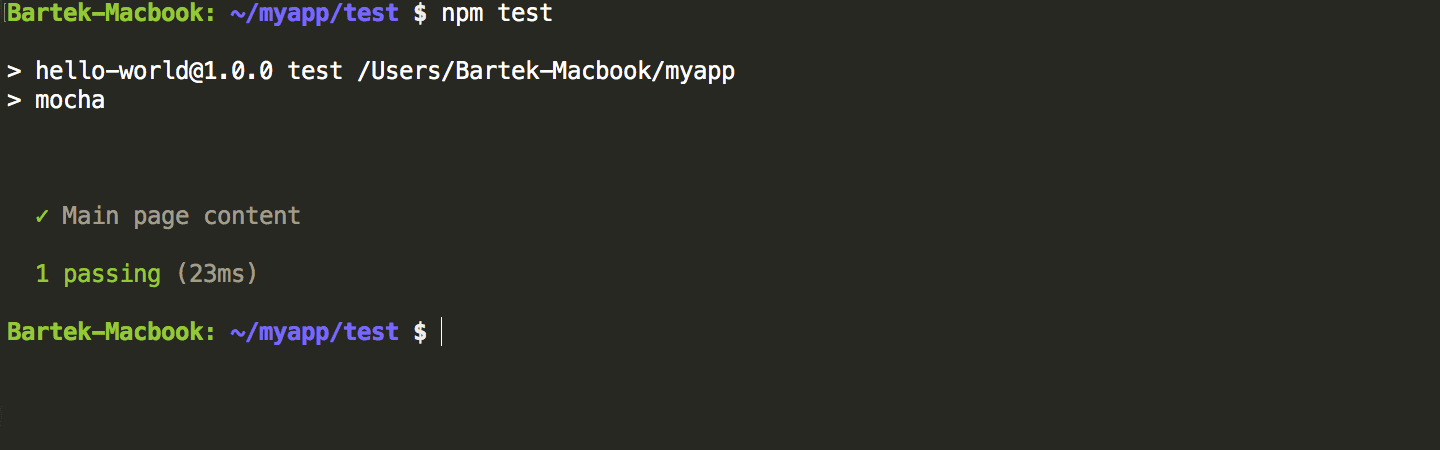
Run the file to trigger the tests:
npm test
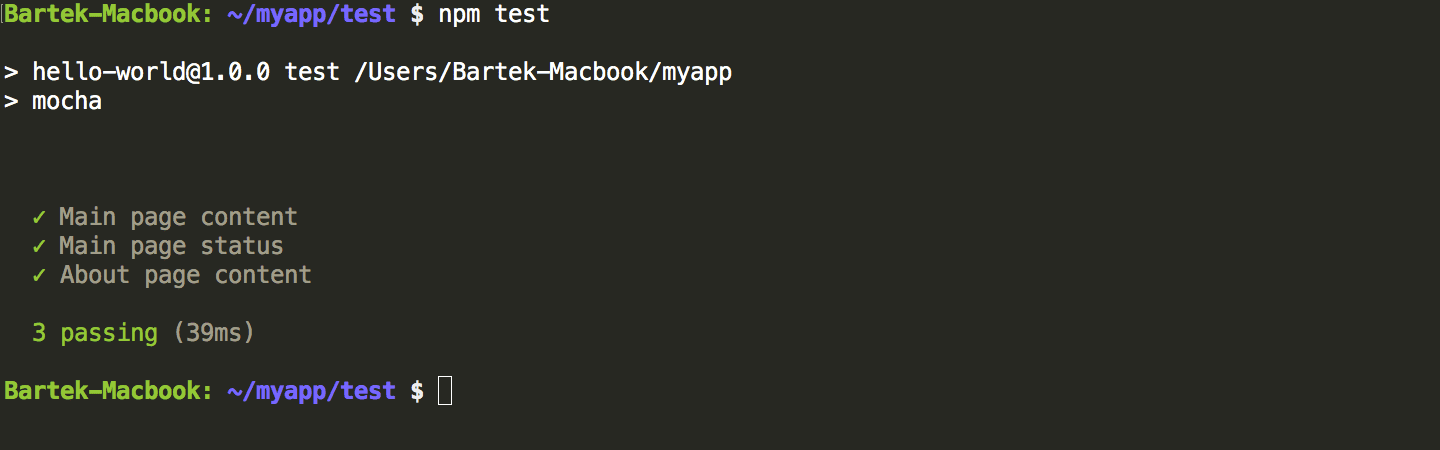
Let's add some more tests that will check the status of the homepage and /about page:
var expect  = require('chai').expect;
var request = require('request');

it('Main page content', function(done) {
    request('http://localhost:8080' , function(error, response, body) {
        expect(body).to.equal('Hello World');
        done();
    });
});

it('Main page status', function(done) {
    request('http://localhost:8080' , function(error, response, body) {
        expect(response.statusCode).to.equal(200);
        done();
    });
});

it('About page content', function(done) {
    request('http://localhost:8080/about' , function(error, response, body) {
        expect(response.statusCode).to.equal(404);
        done();
    });
});
Run npm test again and see the results. The /about page is not ready yet so it will return a 404:
Grouping tests
A very useful feature in Mocha is describe(), a function that allows you to better control your tests by grouping them:
var expect  = require('chai').expect;
var request = require('request');

describe('Status and content', function() {
    describe ('Main page', function() {
        it('status', function(done){
            request('http://localhost:8080/', function(error, response, body) {
                expect(response.statusCode).to.equal(200);
                done();
            });
        });

        it('content', function(done) {
            request('http://localhost:8080/' , function(error, response, body) {
                expect(body).to.equal('Hello World');
                done();
            });
        });
    });

    describe ('About page', function() {
        it('status', function(done){
            request('http://localhost:8080/about', function(error, response, body) {
                expect(response.statusCode).to.equal(404);
                done();
            });
        });

    });
});
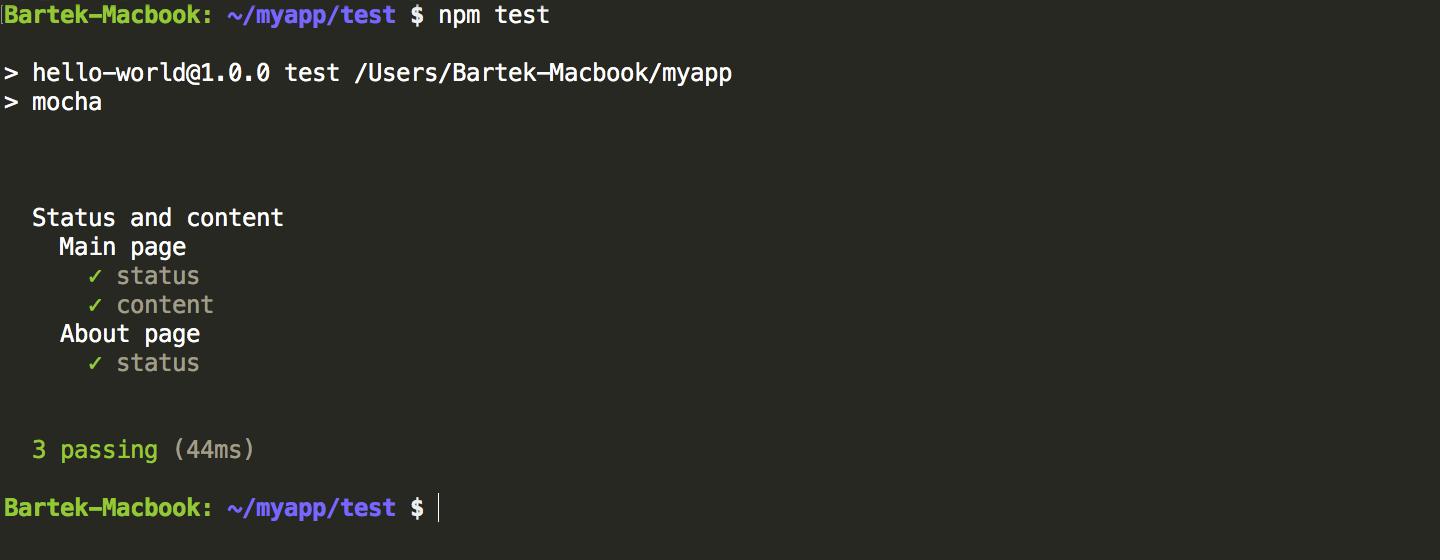
Run npm test yet again to see how the results are different:
Automating Mocha and Chai tests
As we mention in every single guide, all changes to code should be tested for errors. This is what Continuous Integration is all about: making sure that your code is verified and prepared for deployment to production.
Version control
The application code, including package.json should first be put under version control. You shouldn't, however, add node_modules under version control because dependencies are, well, independent from the project:
git init
echo 'node_modules' > .gitignore
git add *
git commit -m 'my first commit'
Now, if you want to cooperate on a project with other developers (and automate your tests!) you need to add a remote location on Git hosting service and push the code to it. Create a new project in Buddy, GitHub or Bitbucket, copy the URL of the remote, and push the project:
git remote add origin  URL
git push origin --all
Continuous Integration with Buddy
With your project under version control, you can use Buddy to streamline the testing process down to a single push to the repository:
- Create a free account with Buddy
- Select the Git provider with your Node.js project
- Create a new pipeline and set it to automatic mode (on push)
- Add Node.js action (
npm installandnpm testare already entered) - (Optional) Add SFTP action to automatically upload your app to the server
- (Optional) Add Slack action in the 'On failure' section at the bottom for automatic Slack notification in case some of the tests have failed
From now on, every time you'll make a push to the selected branch, Buddy will automatically test and deploy your application + let you know in case something goes wrong. Of course, you can choose any other type of upload or notification. Here's the whole process summed up in one awesome video:
Got questions regarding this article? Want to drop us some feedback? Contact us via LiveChat or send us an email to support@buddy.works. Haven't started your Buddy adventure yet? Simply register for the trial version and have a look at Buddy.