如何使用Buddy CI/CD交付Golang项目
Buddy是一个使用持续集成、交付和部署的工具,它利用Git设置流水线以自动化存储仓任务时提供舒适和可定制的体验。
Buddy的流水线由开发人员定义的一组操作组成,这些操作按特定顺序运行,可以在执行Git推送时手动或自动执行。拥有可视化使初学者和DevOps专业人员可以在尽可能短的时间内轻松设置功能齐全的流水线。
在本文中,我们将为 Golang 应用程序设置一个持续交付流水线。流水线将帮助我们实现两个目的:
- 通过提供标准化的开发反馈循环加快开发流程
- 通过降低人为错误的风险来更安全地实施部署


我们将通过构建一个流水线来实现这一点,该流水线首先测试应用程序,然后构建一个Docker容器镜像(如果测试成功)。 然后将拉取Docker镜像并在DigitalOcean Droplet上运行。我们还将通过Slack和电子邮件向从事该项目的成员发送包含最新构建状态的通知。
第一步: 开始设置
要继续学习本教程,请确保您已安装以下工具:
- Golang – 以便您可以在本地运行和测试应用程序
- DigitalOcean CLI – 可以设置流水线所需的所有DigitalOcean资源(也可以使用GUI完成)
- Docker – 安装在本地开发人员机器上以容器化和运行我们的应用程序
测试应用
在此文,我们将使用托托管在GitHub上的现有项目,以便更轻松地实践教程。
该应用程序是一个非常基本的HTTP服务器,使用标准的 net/http Golang库和两个GET端点以显示一些硬编码文本。
如果您想改用自己的应用程序也没关系,但请记住,操作中的某些命令和目录可能会发生变化。
让我们首先从Github克隆应用程序并在本地运行:
git clone https://github.com/buddy-works/learning-go.git
cd learning-go/beginner-programs/HttpServer/
现在可以使用 go run 命令启动应用程序:
go run main.go
现在您可以在localhost:8080访问应用程序。您应该会看到一个显示“Hello World!”的基本网页。
Docker化应用
要将应用程序部署为容器,我们需要创建一个包含Docker镜像定义的Dockerfile。
我已将Dockerfile包含在HttpServer项目的根目录中。 以下是内容:
FROM golang:1.15.0

# Set the Current Working Directory inside the container
WORKDIR /app

RUN export GO111MODULE=on

# Copy go mod and sum files
COPY go.mod go.sum ./

# Download all dependencies. Dependencies will be cached if the go.mod and go.sum files are not changed
RUN go mod download

COPY . .

# Build the application
RUN go build -o main .

# Expose port 8080 to the outside world
EXPOSE 8080

# Command to run the executable
CMD ["./main"]
文件中的每一行都相当于构建Docker镜像过程中的一个步骤。让我们来逐个看看:
- 第一行使用
FROM关键词定义容器启动的基础镜像,然后是想要的镜像和版本(在本例中为官方Golang镜像的1.15.0版本)。 - 之后,我们使用
WORKDIR关键词设置当前工作目录,并通过将GO111MODULE变量设置为on来启用Go模块。 COPY关键词允许我们将文件从主机系统复制到容器中。 在此,我们使用它将go.mod和go.sum文件复制到容器中,以便我们可以使用go mod download命令安装所有需要的依赖项。- 安装完所有依赖项后,我们可以继续将剩余文件复制到容器中并使用
go build命令构建应用程序。这将为我们提供一个可执行文件,我们可以使用CMD关键词执行该文件。
运行Docker镜像
现在可以使用以下命令构建和运行Docker镜像:
docker build -t httpserver .
docker run -p 8080:8080 httpserver
build 命令将通过执行我们在Dockerfile中定义的步骤来创建Docker镜像。-t 标志用于给Docker镜像一个特定的标签。成功构建镜像后,可以使用run命令启动容器。-p 标志用于将容器的8080端口发布到主机的8080端口
机器。在浏览器中打开 http://localhost:8080 并验证应用程序是否正常运行。
第二步: 设置DigitalOcean
在我们开始构建CI/CD流水线之前,让我们先设置所需的DigitalOcean资源并安装必要的工具。要创建资源,我们将使用DigitalOcean CLI,也称为doctl。
启动终端并使用 doctl auth init 命令向CLI验证。
使用下面的命令创建一个Droplet来托管我们的应用程序。我们使用的是DigitaloOean Docker镜像,因为我们将在本教程的最后一步使用Docker部署应用程序。
doctl compute droplet create buddy-golang --region fra1 --image docker-18-04 --size s-1vcpu-2gb
通过检查当前状态等待Droplet就绪:
doctl compute droplet list buddy-golang
创建Droplet后,在系统上安装Golang。为此,您可以按照DigitalOcean安装指南进行操作。
第三步: 持续集成流水线
现在我们已经设置了所有资源,是时候创建一个流水线了,该流水线将在我们对代码库/存储仓进行更改时自动测试、构建和部署我们的应用程序。
项目配置
登录到您的Buddy帐户并新建一个项目,选择GitHub作为Git托管服务提供商,并选择learning-go作为存储仓:

流水线配置
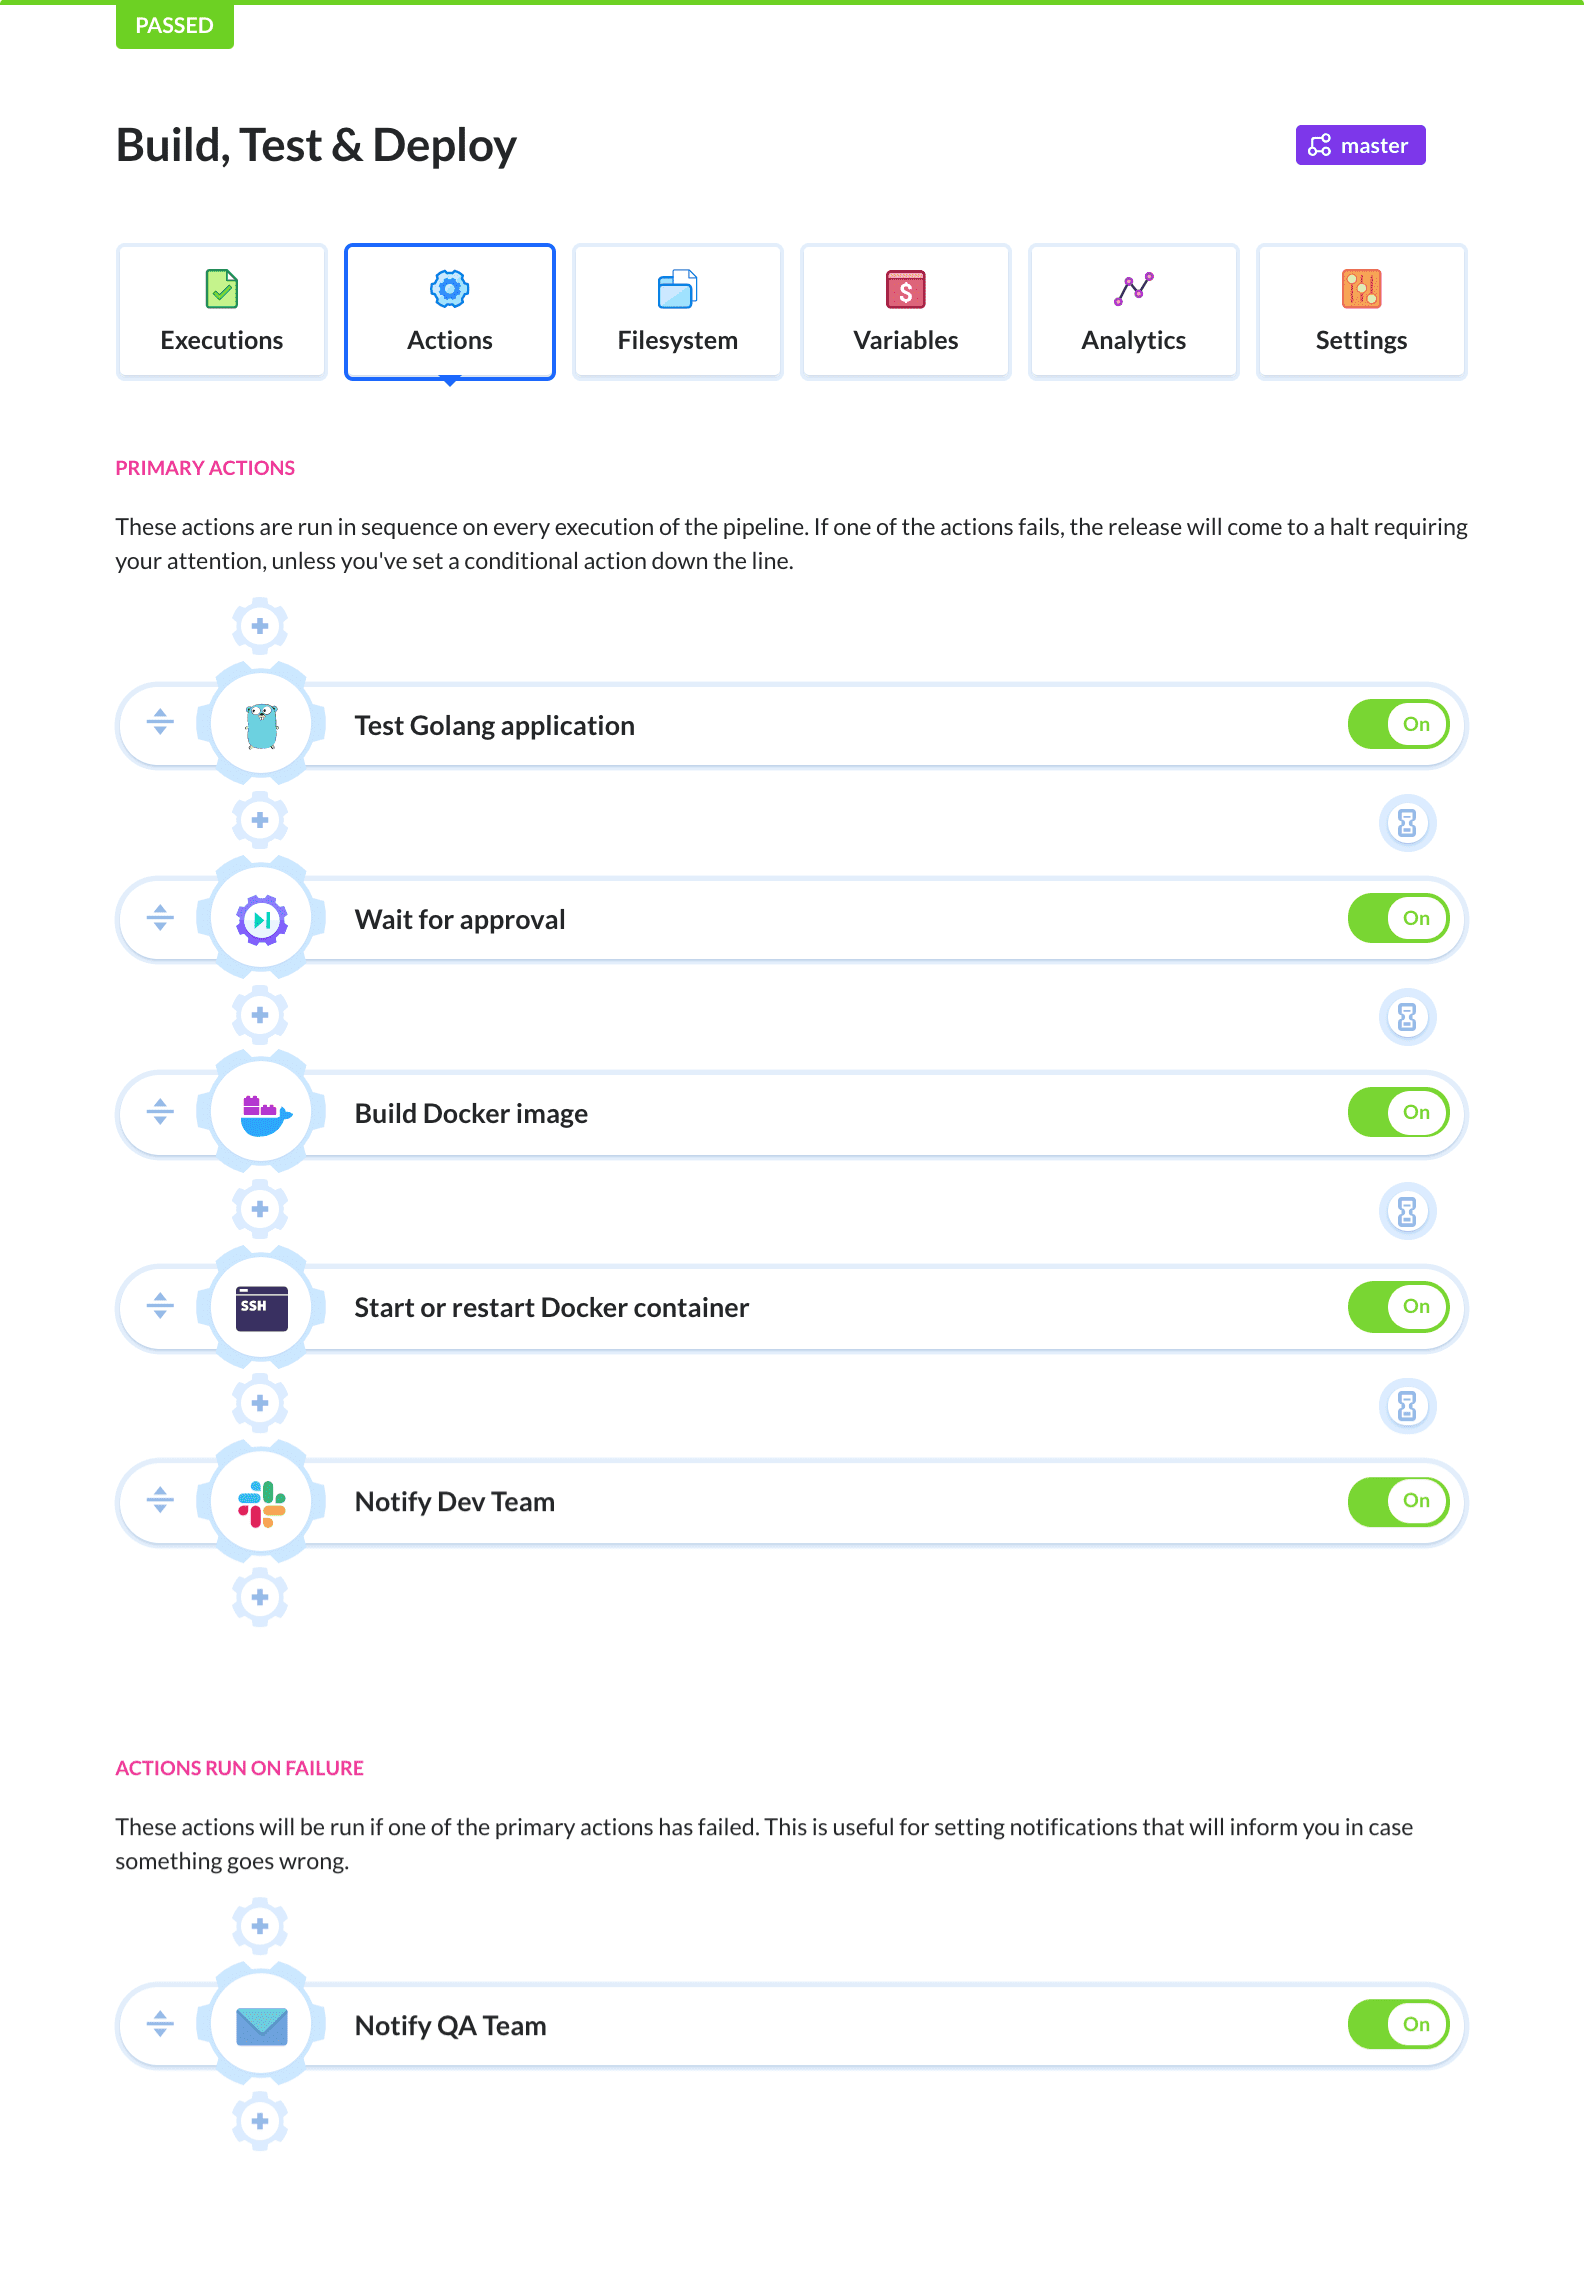
向项目添加一个新流水线并将触发器设置为事件以在将某些内容推送到Github存储仓时执行该流水线。第二步是选择要部署Buddy的分支。当涉及到名称时,您可以根据需要调用流水线:

在下一个页面上,您可以选择将添加到流水线的第一个操作。由于我们有一个用Go编写的应用程序,并且想要使用Golang工具对其进行测试和构建,我们需要添加 Go操作:

在操作"运行"标签页中添加以下命令:
# 下载依赖
go mod download

# 执行Golang测试文件
go test ./... -v
下面是它在操作中的样子:

让我们来看看这两个命令:
go mod download命令用于安装应用程序所需的所有依赖项。go test ./... -v命令运行目录中的所有 Golang 测试并打印结果。-v标志,也就是verbose,用于更详细地打印测试结果,使它们在失败时更容易调试。
接下来,您需要在“缓存”窗口中选择操作的工作目录。如果您正在使用示例应用程序,目录应该是/src/github.com/TannerGabriel/learning-go/beginner-programs/HttpServer。
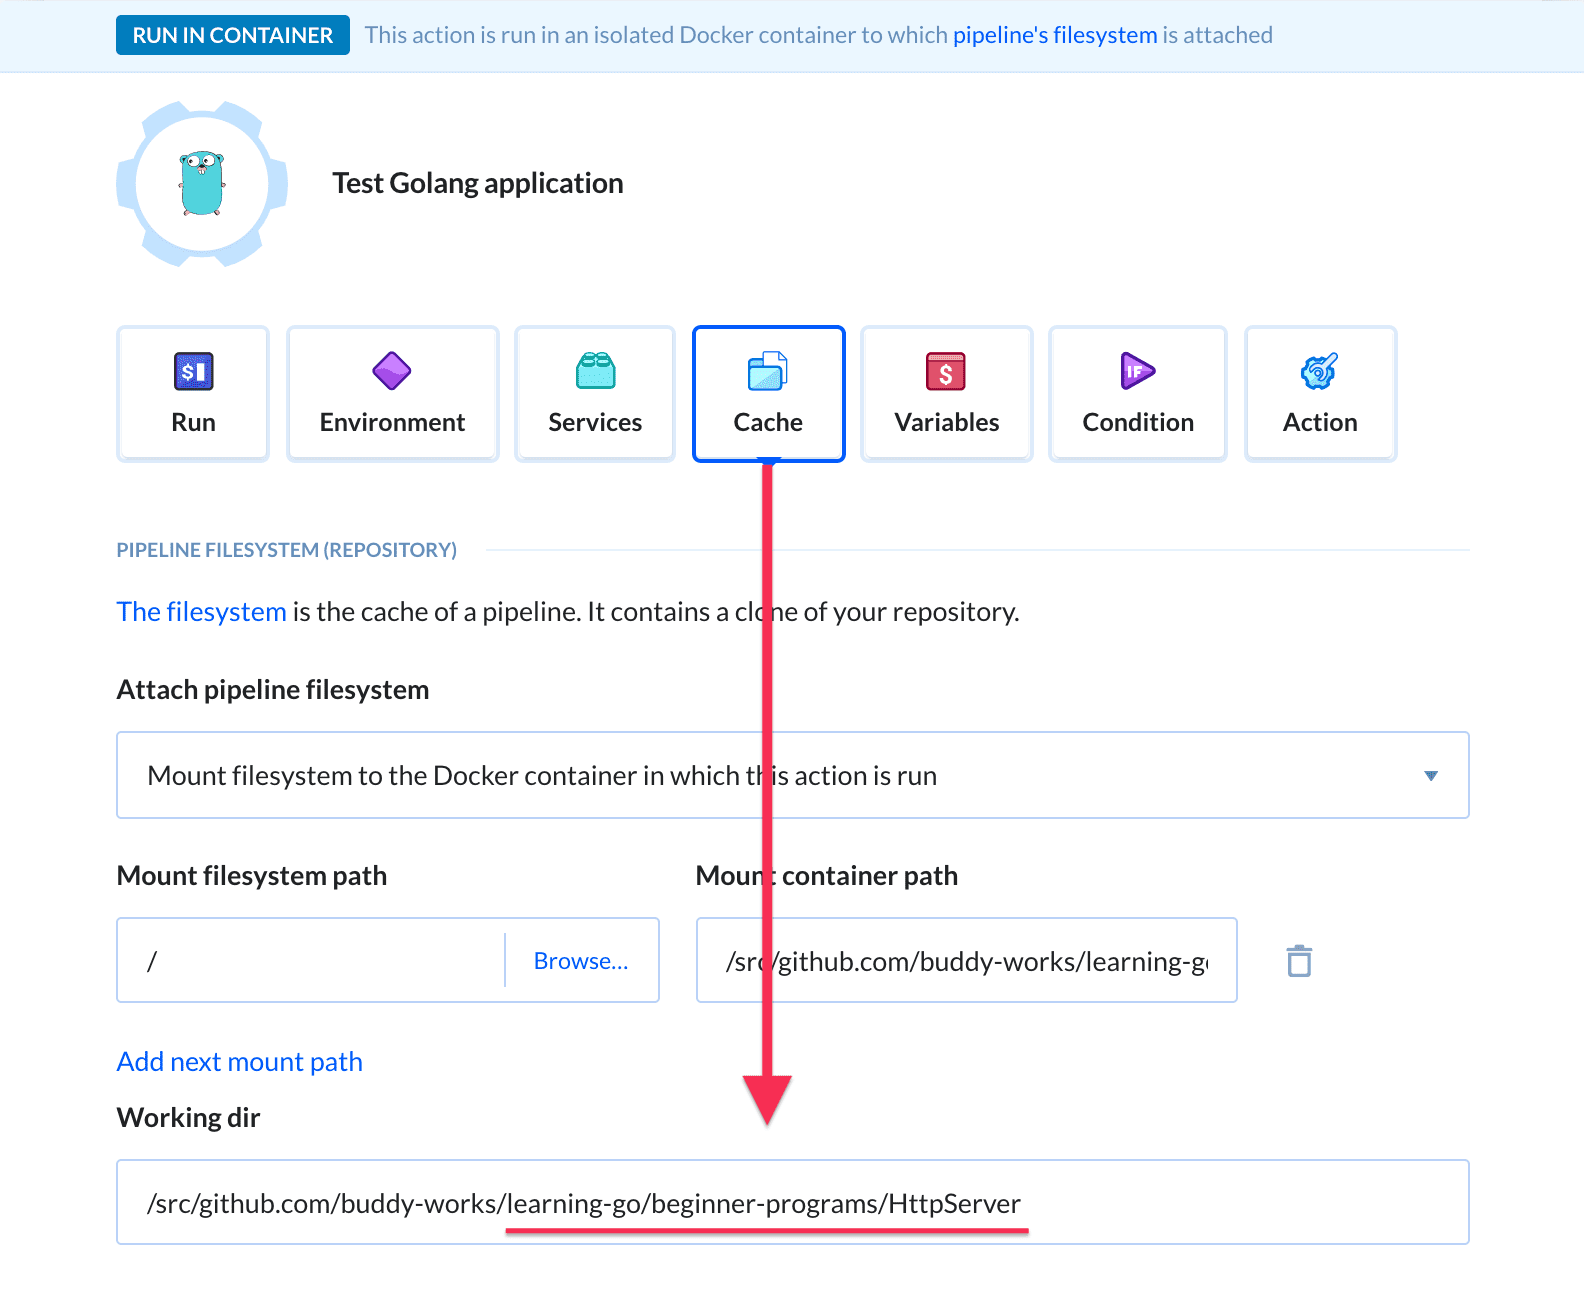
最后,我们需要将操作使用的Golang版本从当前的默认值更改为“1.15.0”:
![]
测试流水线
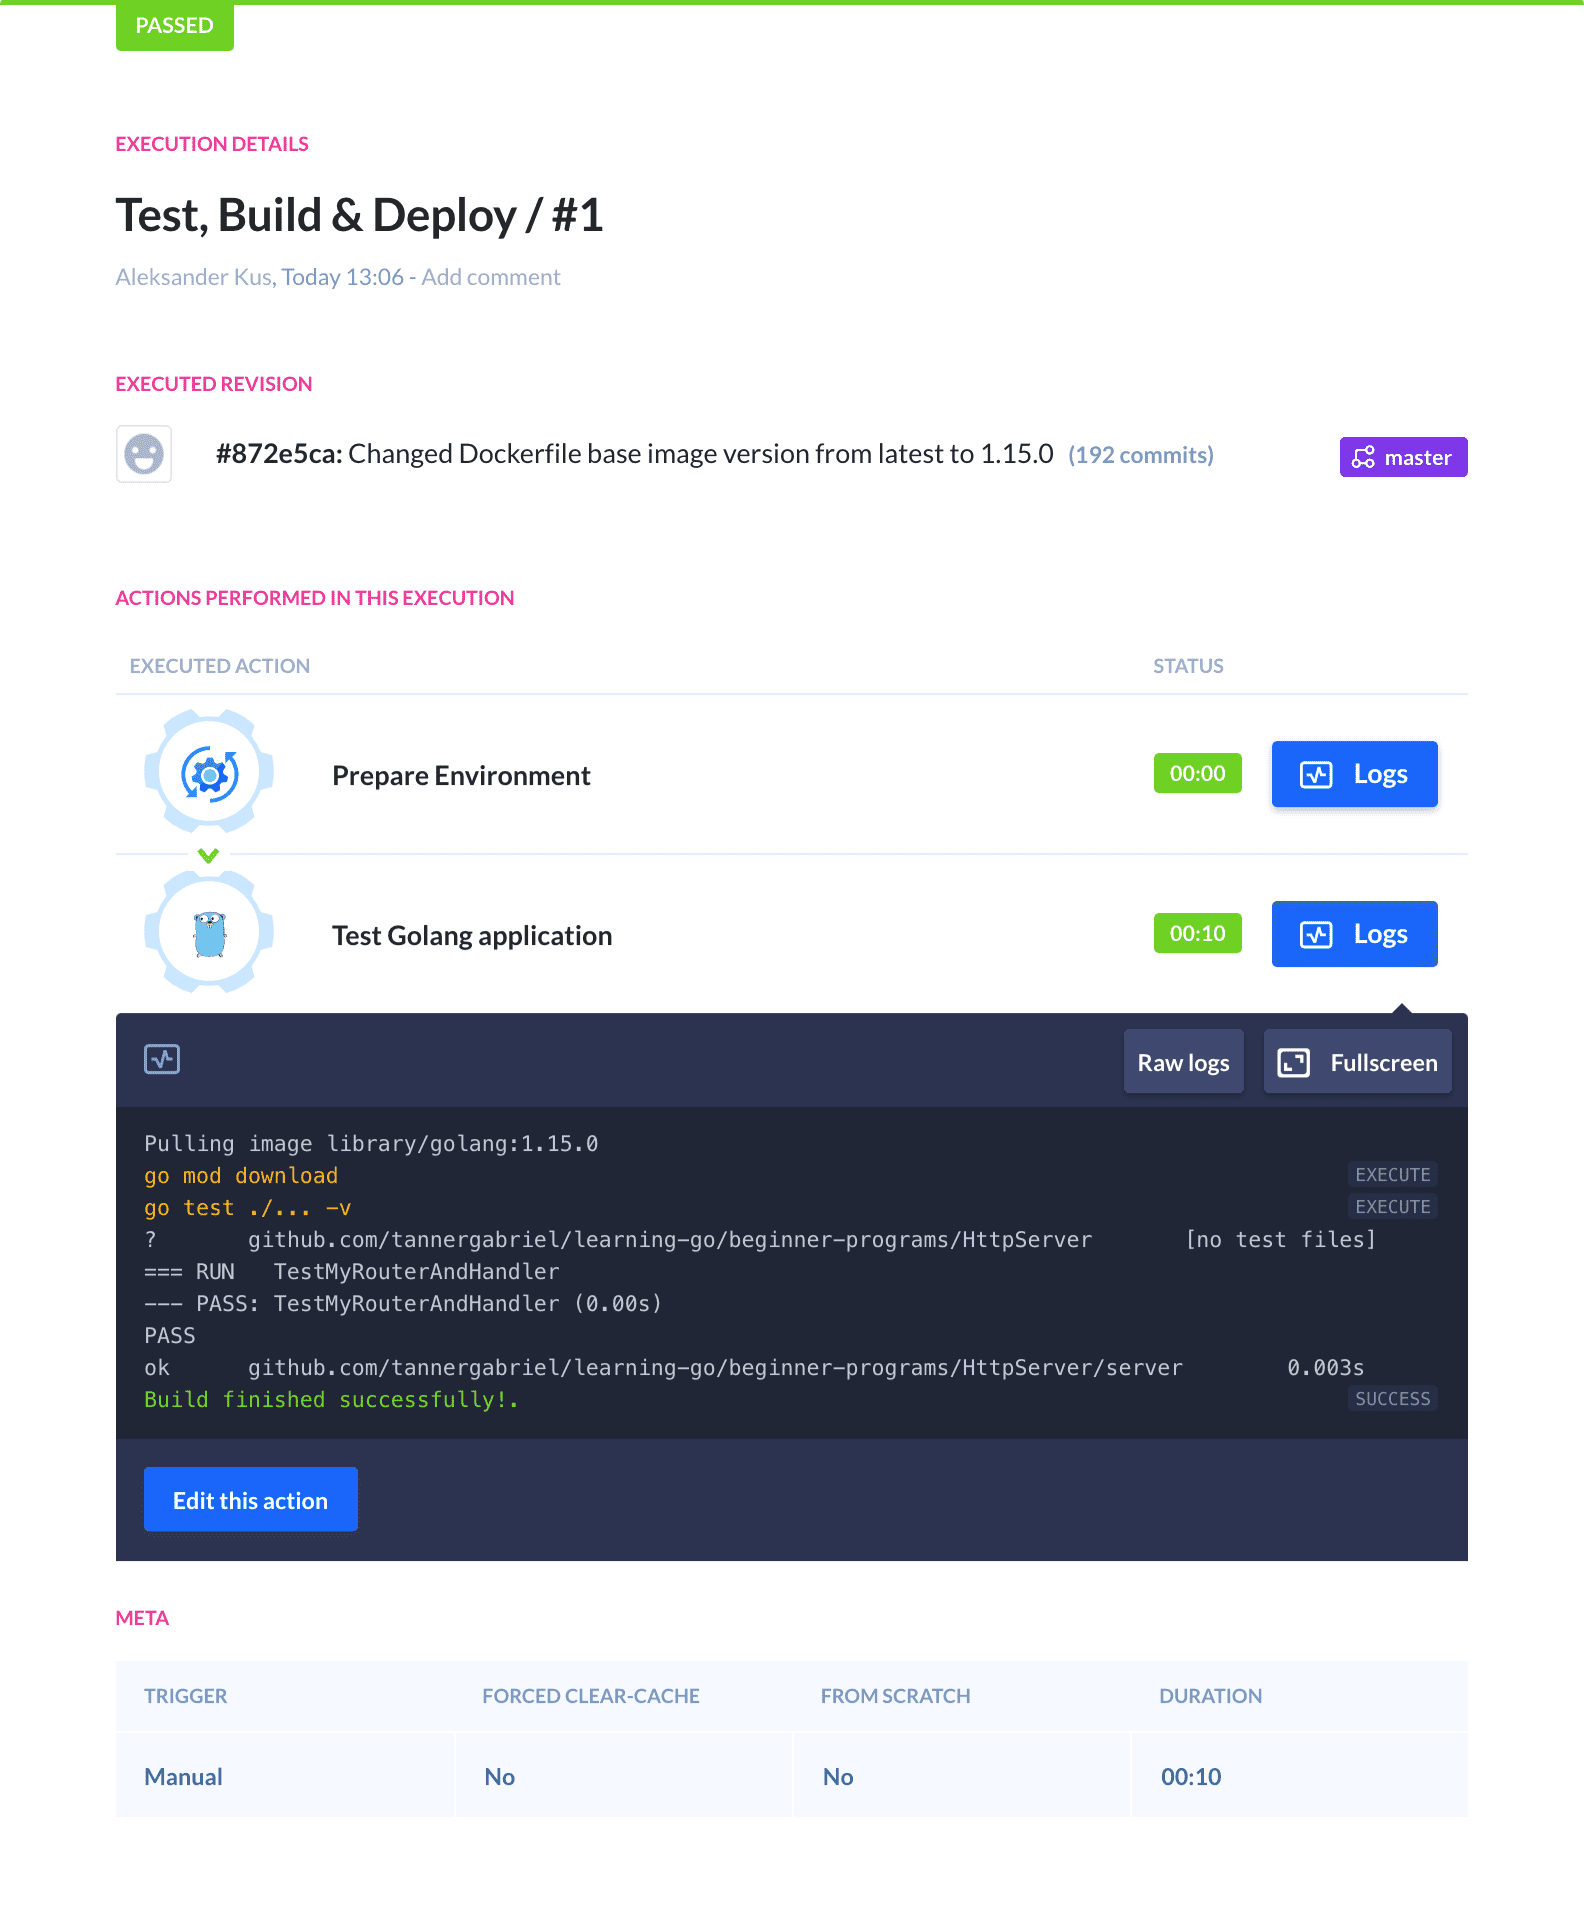
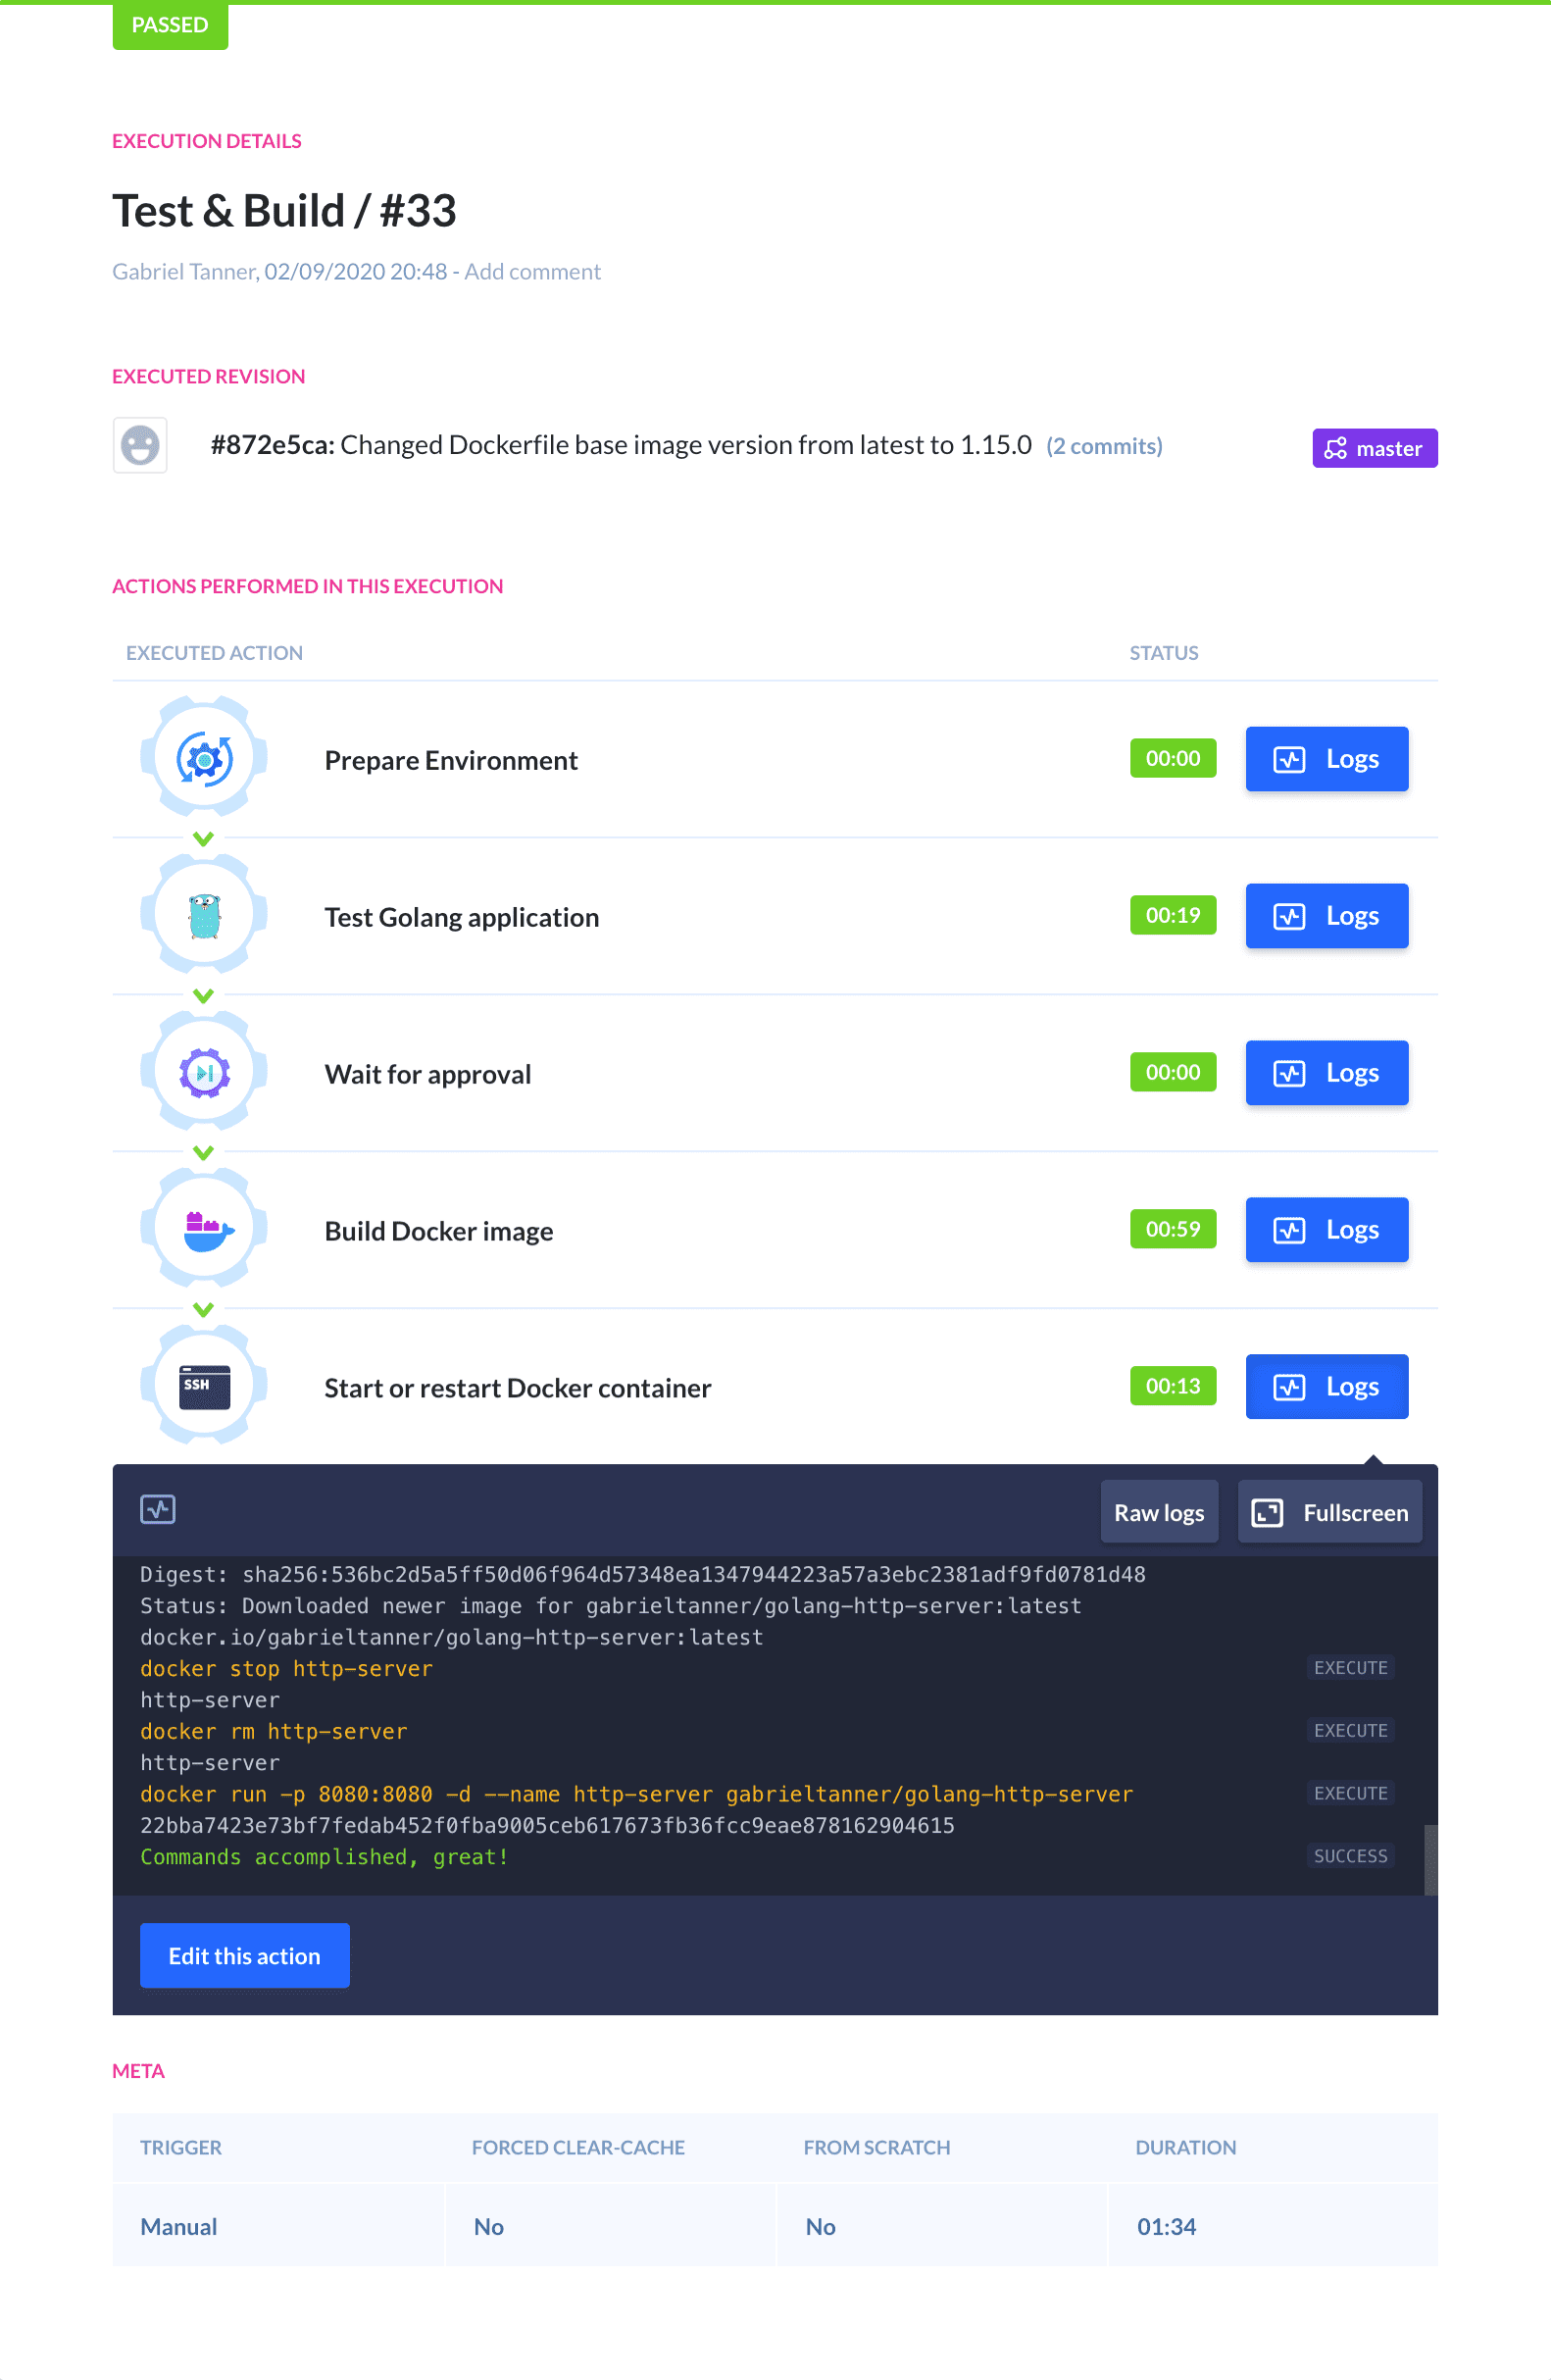
完成Golang操作的配置后,您可以通过手动单击屏幕右上角的运行按钮来测试流水线。然后,您可以单击流水线以获取执行详细信息:
第四步: 持续交付流水线
Now that the tests are successfully running, it is time to build and deploy the application on our DigitalOcean droplet. Since we want our application to be deployed using Docker, we first need to build the image and push it to some kind of a container registry before using it on our droplet.
构建应用
In this step we'll build a Docker image of our application and push it to a container registry. We'll use Docker Hub as the registry, as it's the most popular and free to use for public images (plus one private image is free).
Note: Feel free to use another public registry or your own private one. If you want to know how to create your own private registry from scratch you can follow this guide.
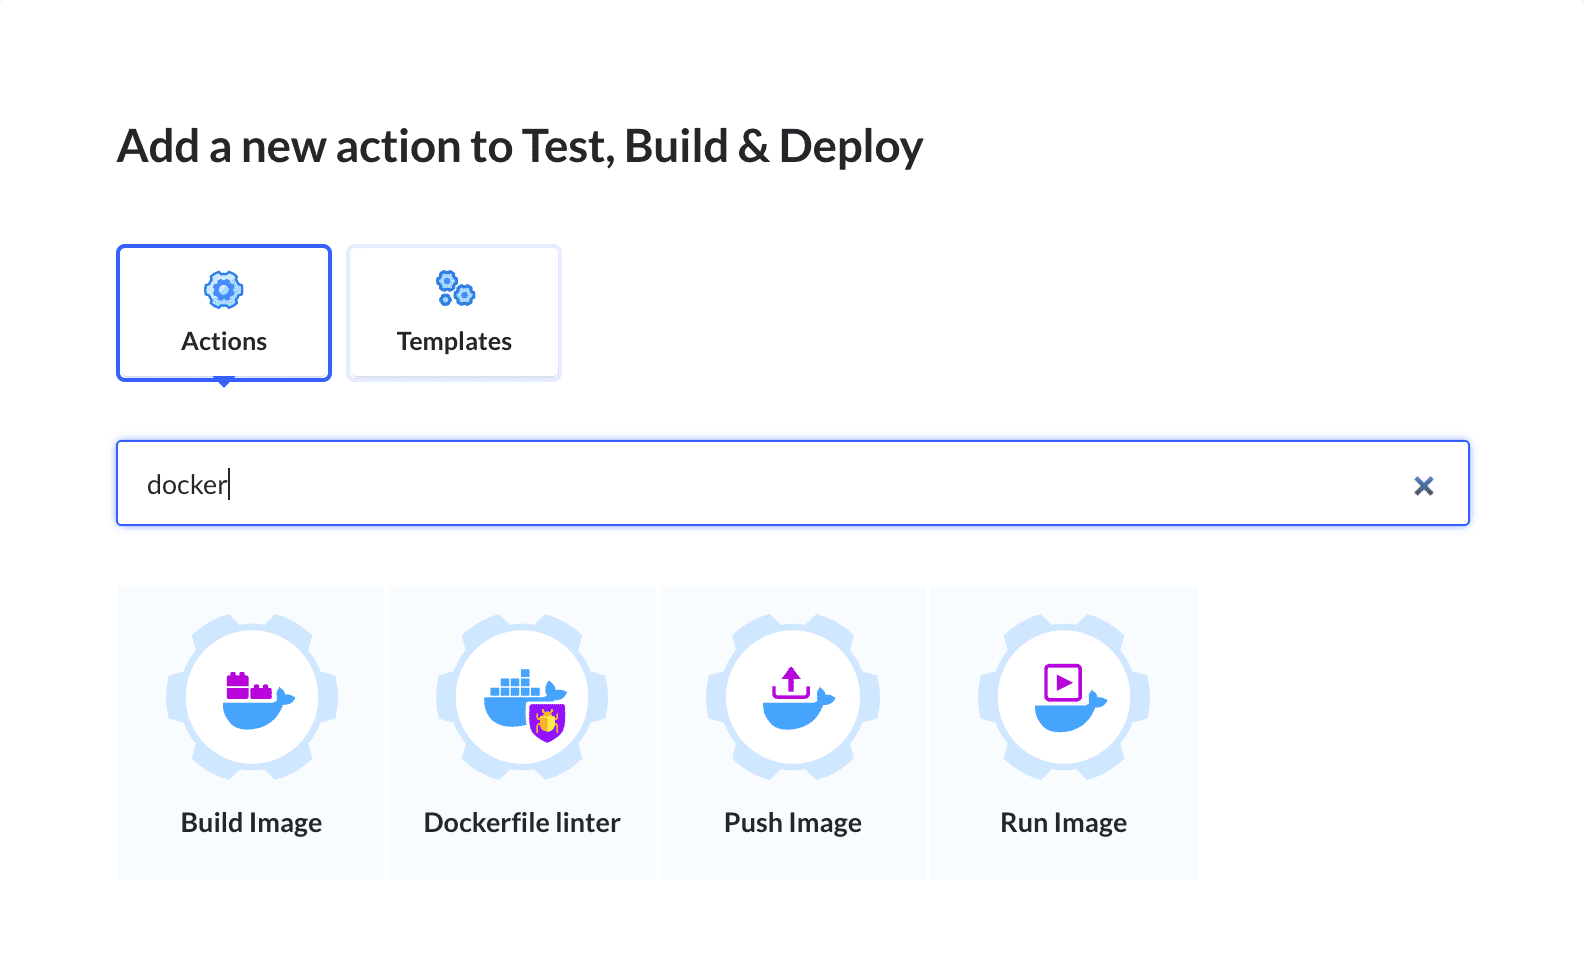
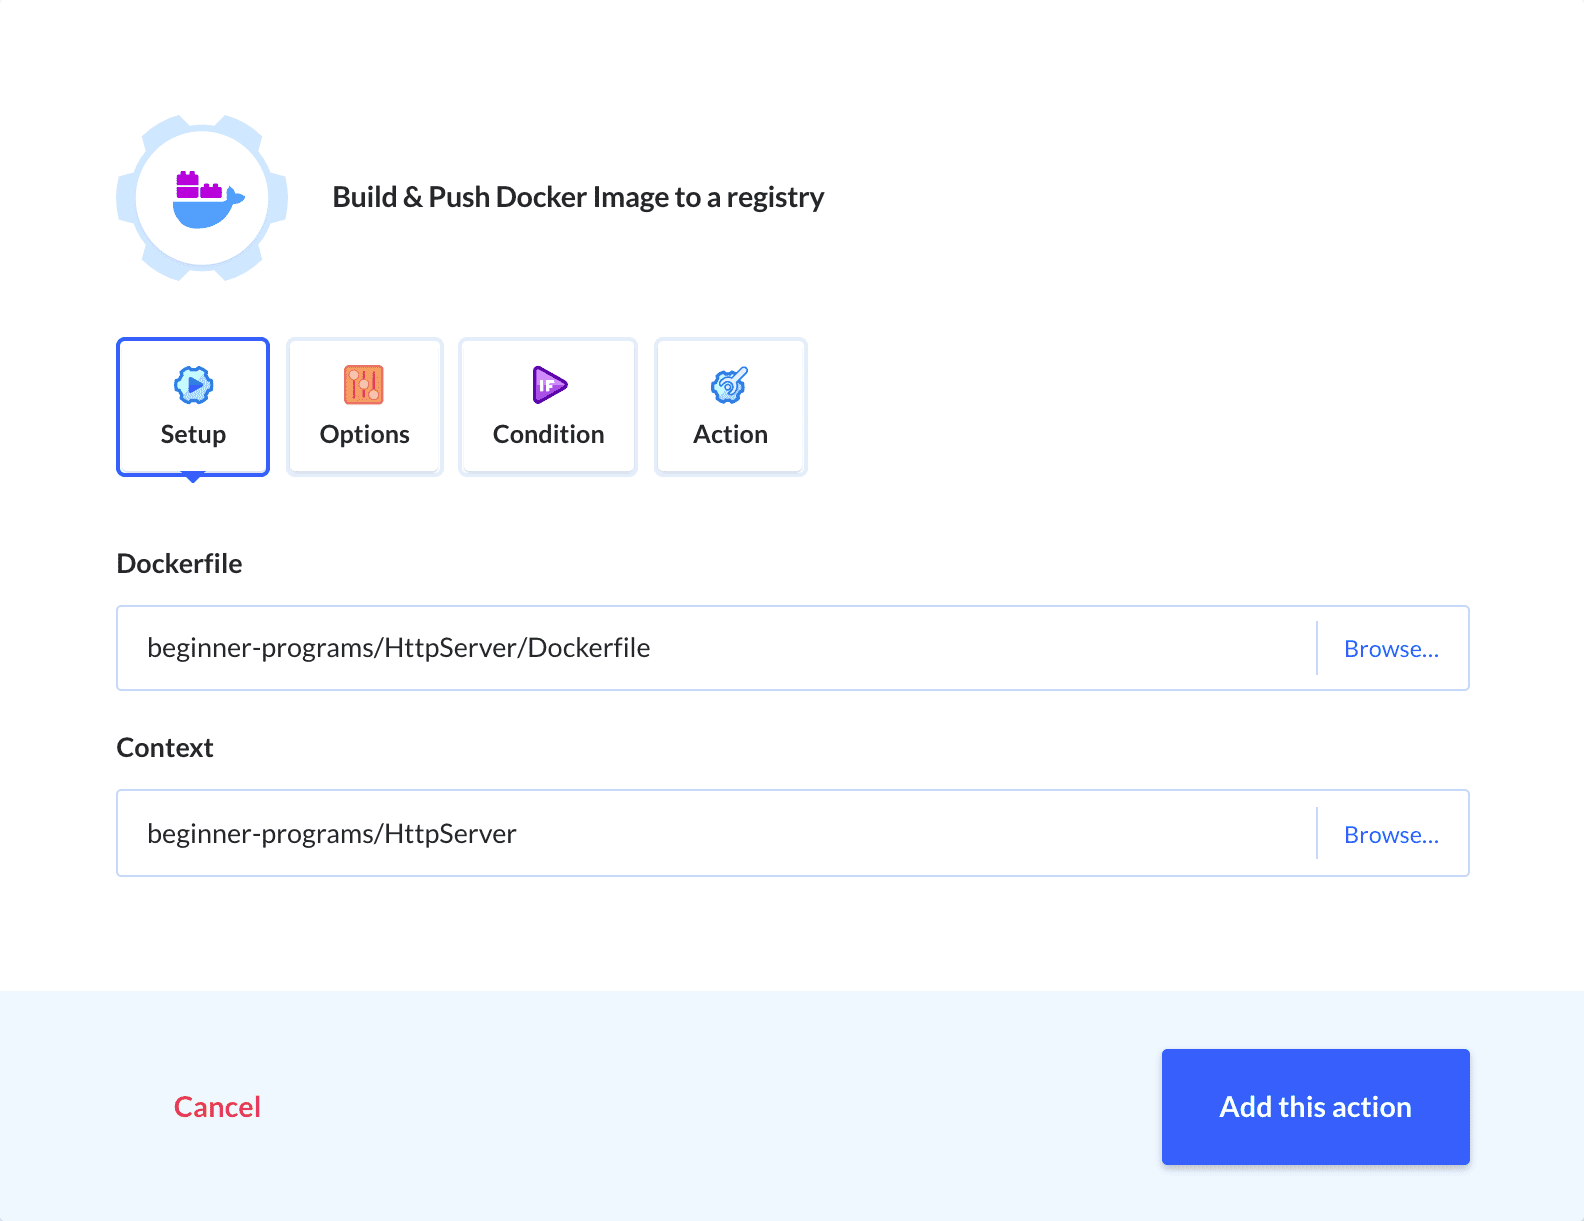
Start by adding the Build image action from the Docker section of the action roster:
Next, we need to select the Dockerfile that will serve as the basis of our image, alongside the context in which the build command will be executed. Here we choose the directory to the project:
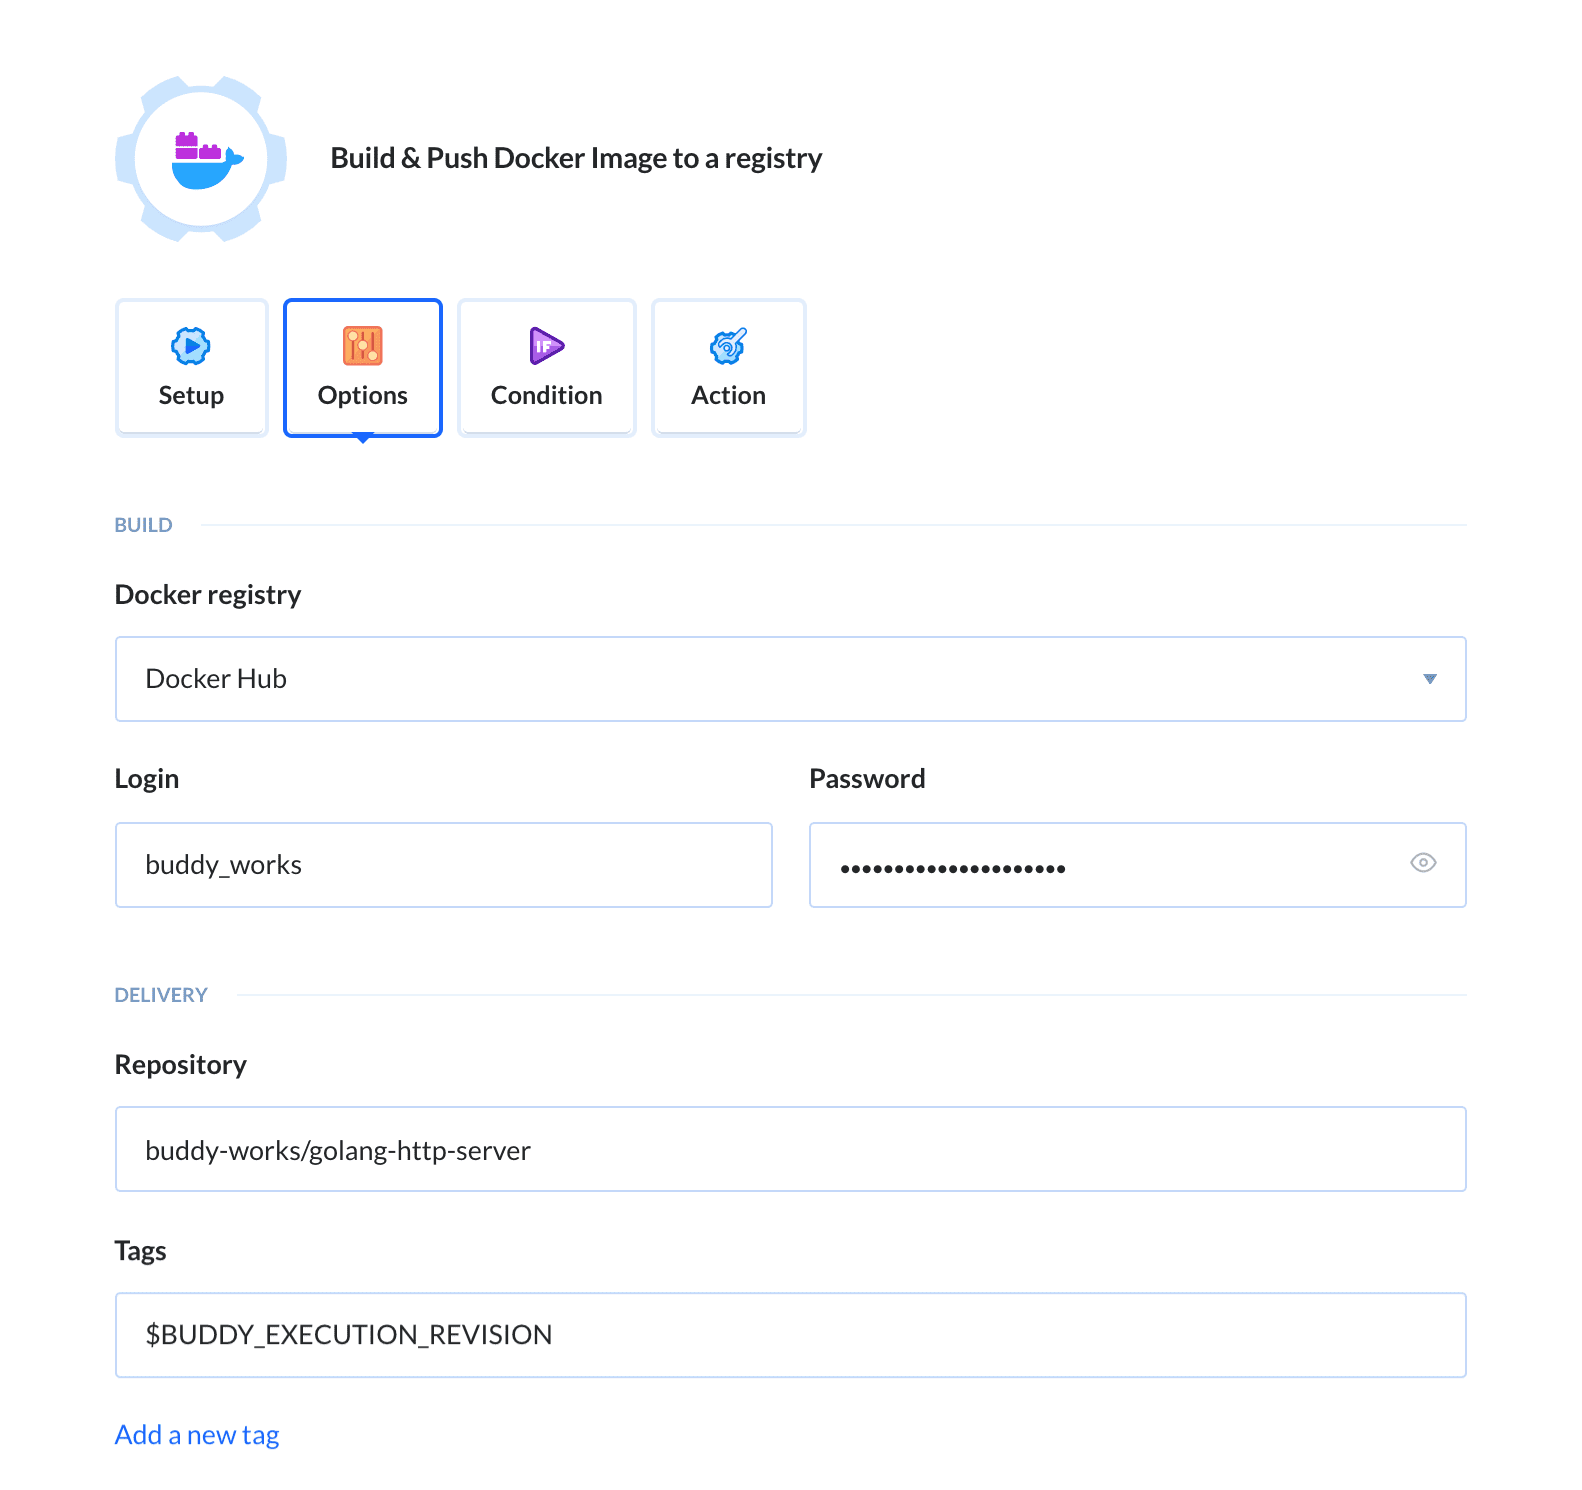
Now you only need to select a registry and provide the necessary credentials for pushing the image to your account in the Options window. You can also set the repository and tag of the image:
运行Docker镜像
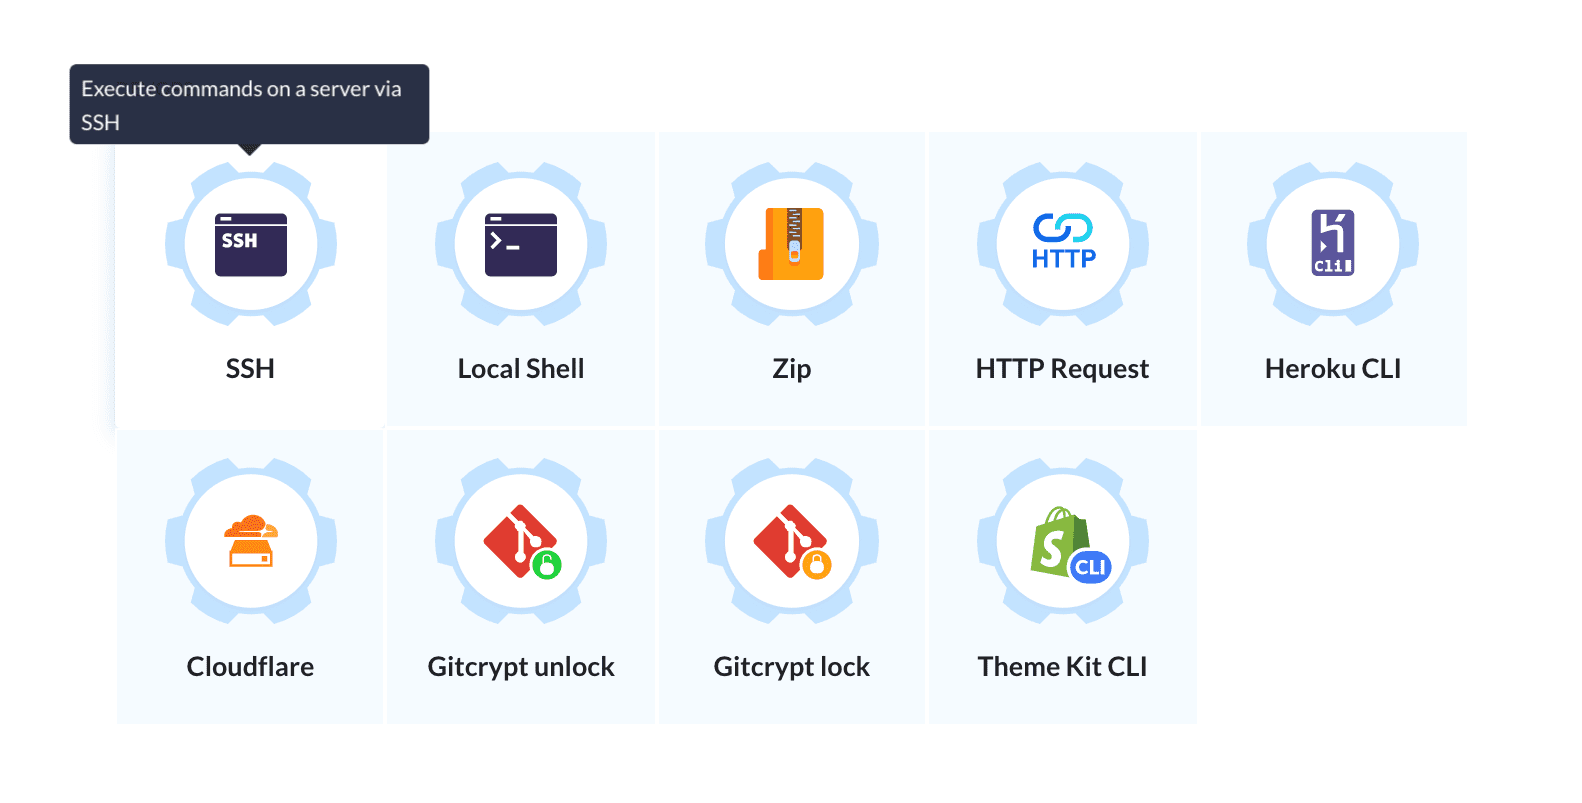
The next step is deploying and running the image on our DigitalOcean droplet. There is currently no official Buddy action for this (yet), so we're going to use the SSH action instead:
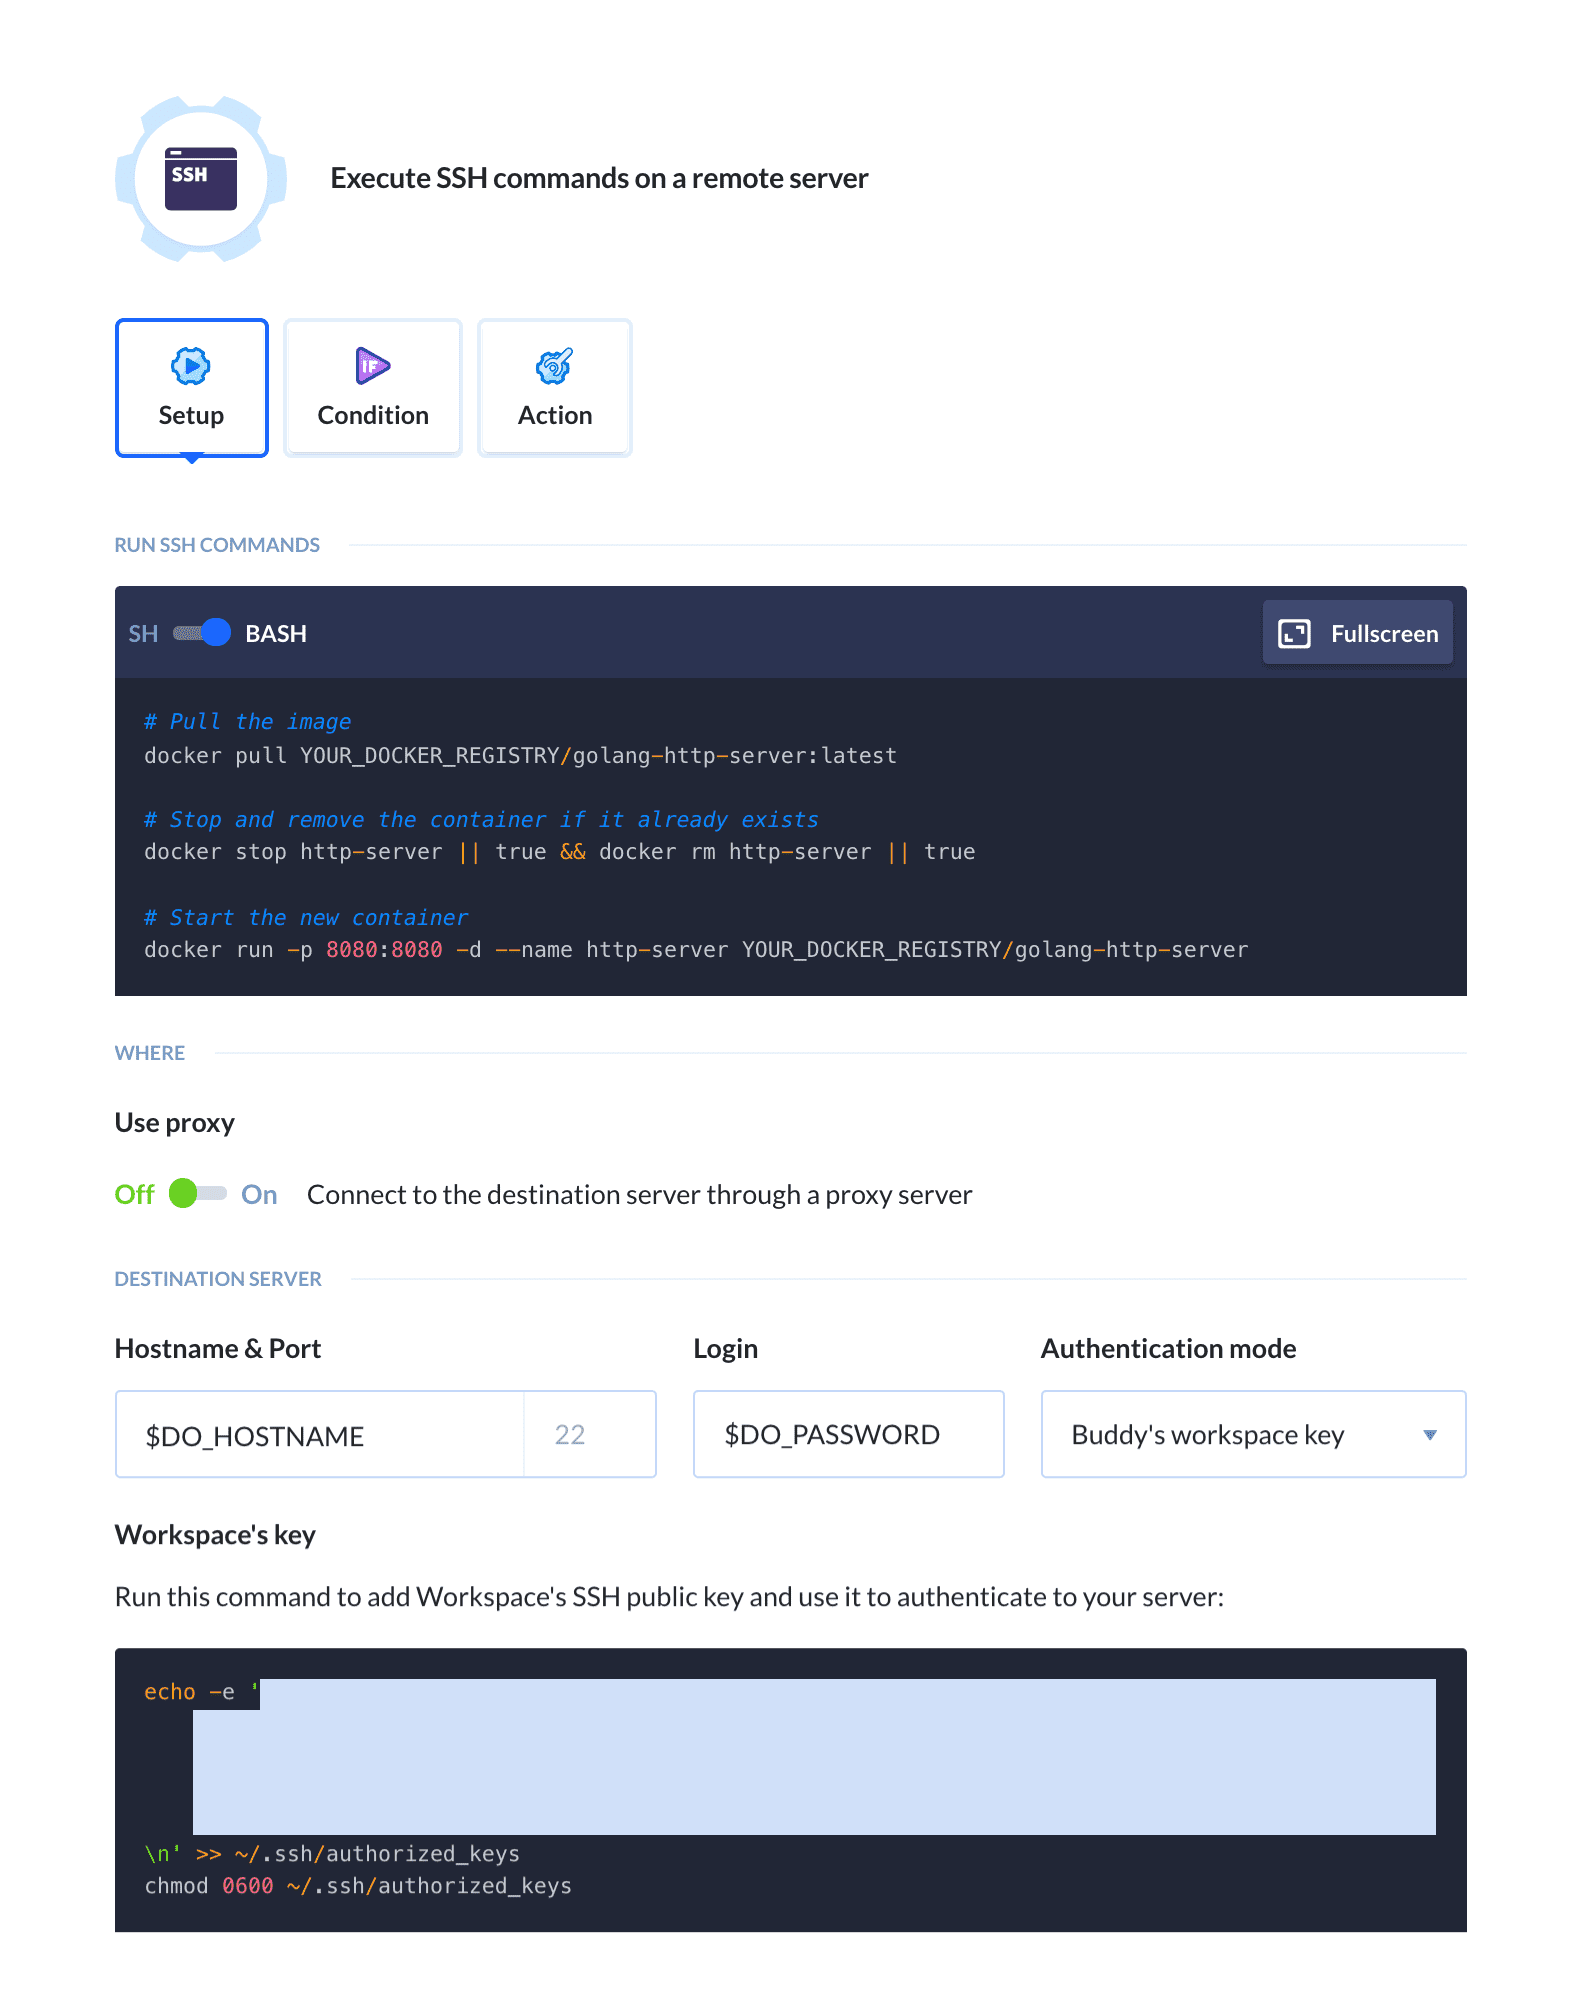
After adding the action to the pipeline, we need to configure it to match our droplet settings:
- Set the authentification mode to
Password(if you are using an SSH key then selectPrivate SSH keyorBuddy workspace keyinstead) - Fill in the IP Address, username and password used to sign in to your server
Next add the following commands to the action details:
# Pull Docker image
docker pull gabrieltanner/golang-http-server:latest

# Stop and remove the container if it already exists
docker stop http-server || true && docker rm http-server || true

# Start the new container
docker run -p 8080:8080 -d --name http-server gabrieltanner/golang-http-server
Let's walk through these commands:
- The
docker pullcommand is used to pull our image from the container registry on the selected server - The second command is used to stop and remove the existing container. This needs to be done to update the container to the newly built image version. The commands will return an error if the container is not running. This is expected behavior, so we need to ignore it using
... || true. - The
docker runcommand starts the container and publishes port8080to the host system using the-pflag.
A properly configured SSH action will look like this:
You can use environment variables to store sensitive data like login and password.
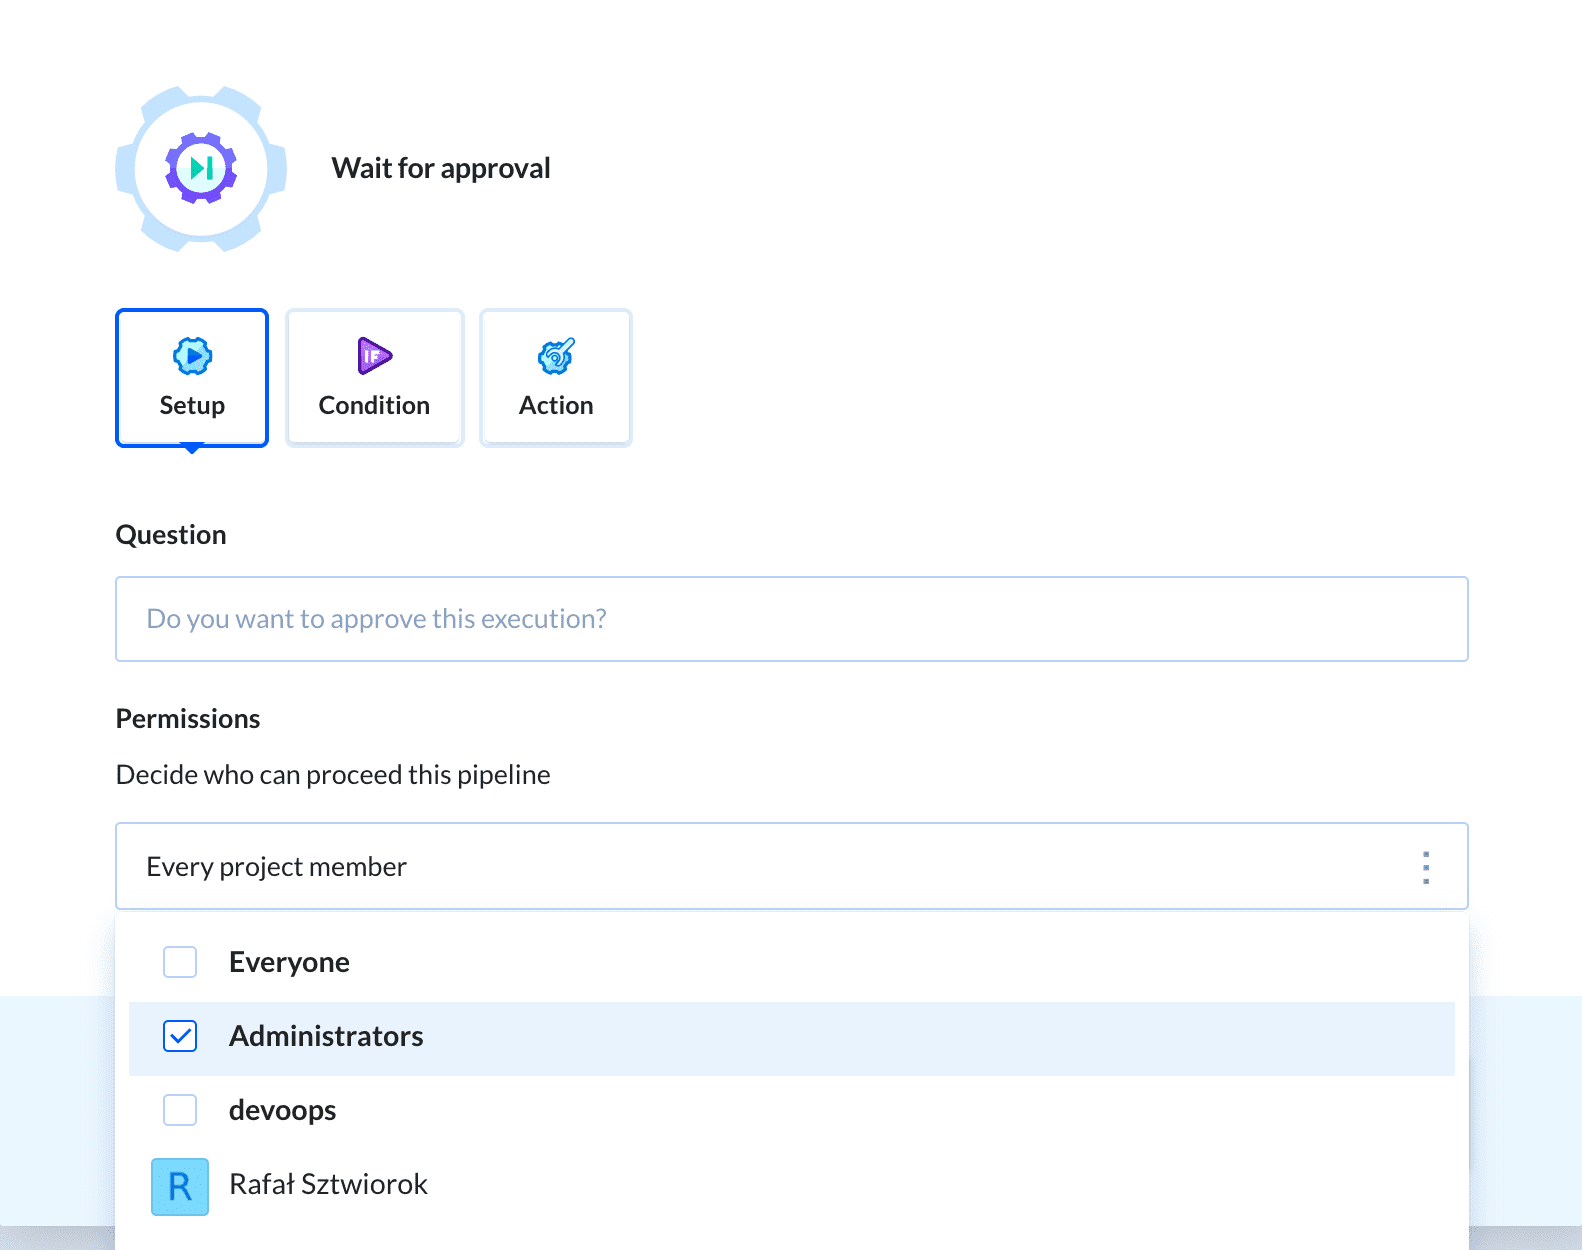
可选项: 人工审核
You can add some kind of manual confirmation to the process before deploying the new version to your production server. This can be done by adding the Wait for approval action to your pipeline:
测试流水线
Once you've finished configuring the newly added actions, it's time to rerun the pipeline to test the functionality. For that, you can either push some changes to the Git repository or click on the Run pipeline button to trigger the run manually:
You now have a fully functional Continuous Integration/Deployment pipeline for your Golang application. On every push to the selected branch, However, you can still add some useful actions that keep you up to date with your applications' current build status.
第五步: (可选) 发送成功或失败通知
In this section, we will look at how we can send a notification to keep yourself and your team updated on the newest build status.
Here is a list of all available notification actions at the time of publishing this article:
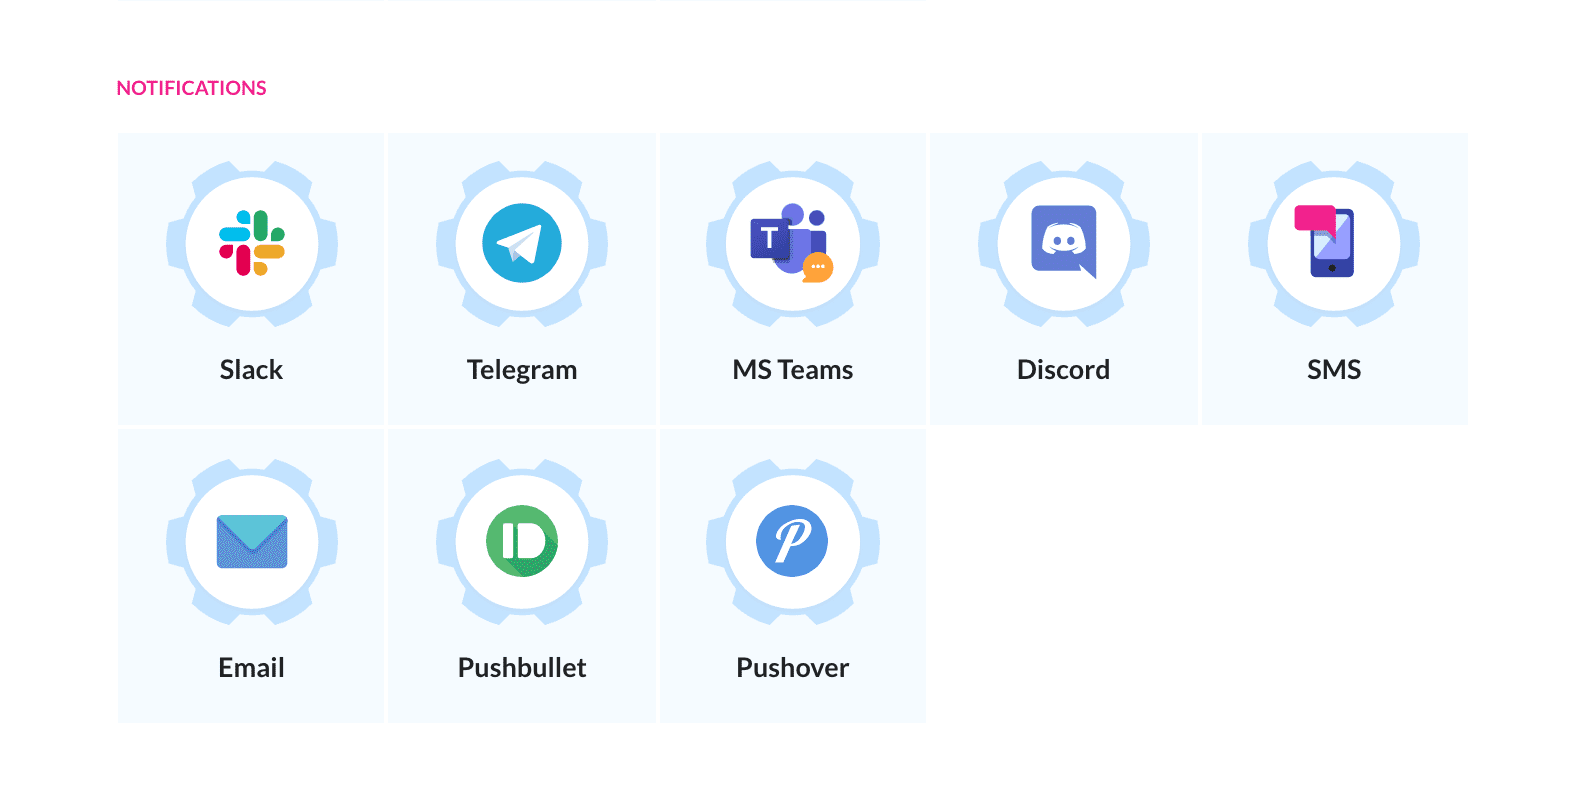
For that, we will utilize the Email action for failing builds and the Slack action for succeeding builds, but you can also use different ones if you, for example don't use Slack.
The notifications for successful builds can be sent by adding another action on the bottom of your pipeline, which will only be executed when all other actions succeed. The failure notification action needs to be added to the ACTIONS RUN ON FAILURE section of the pipeline.
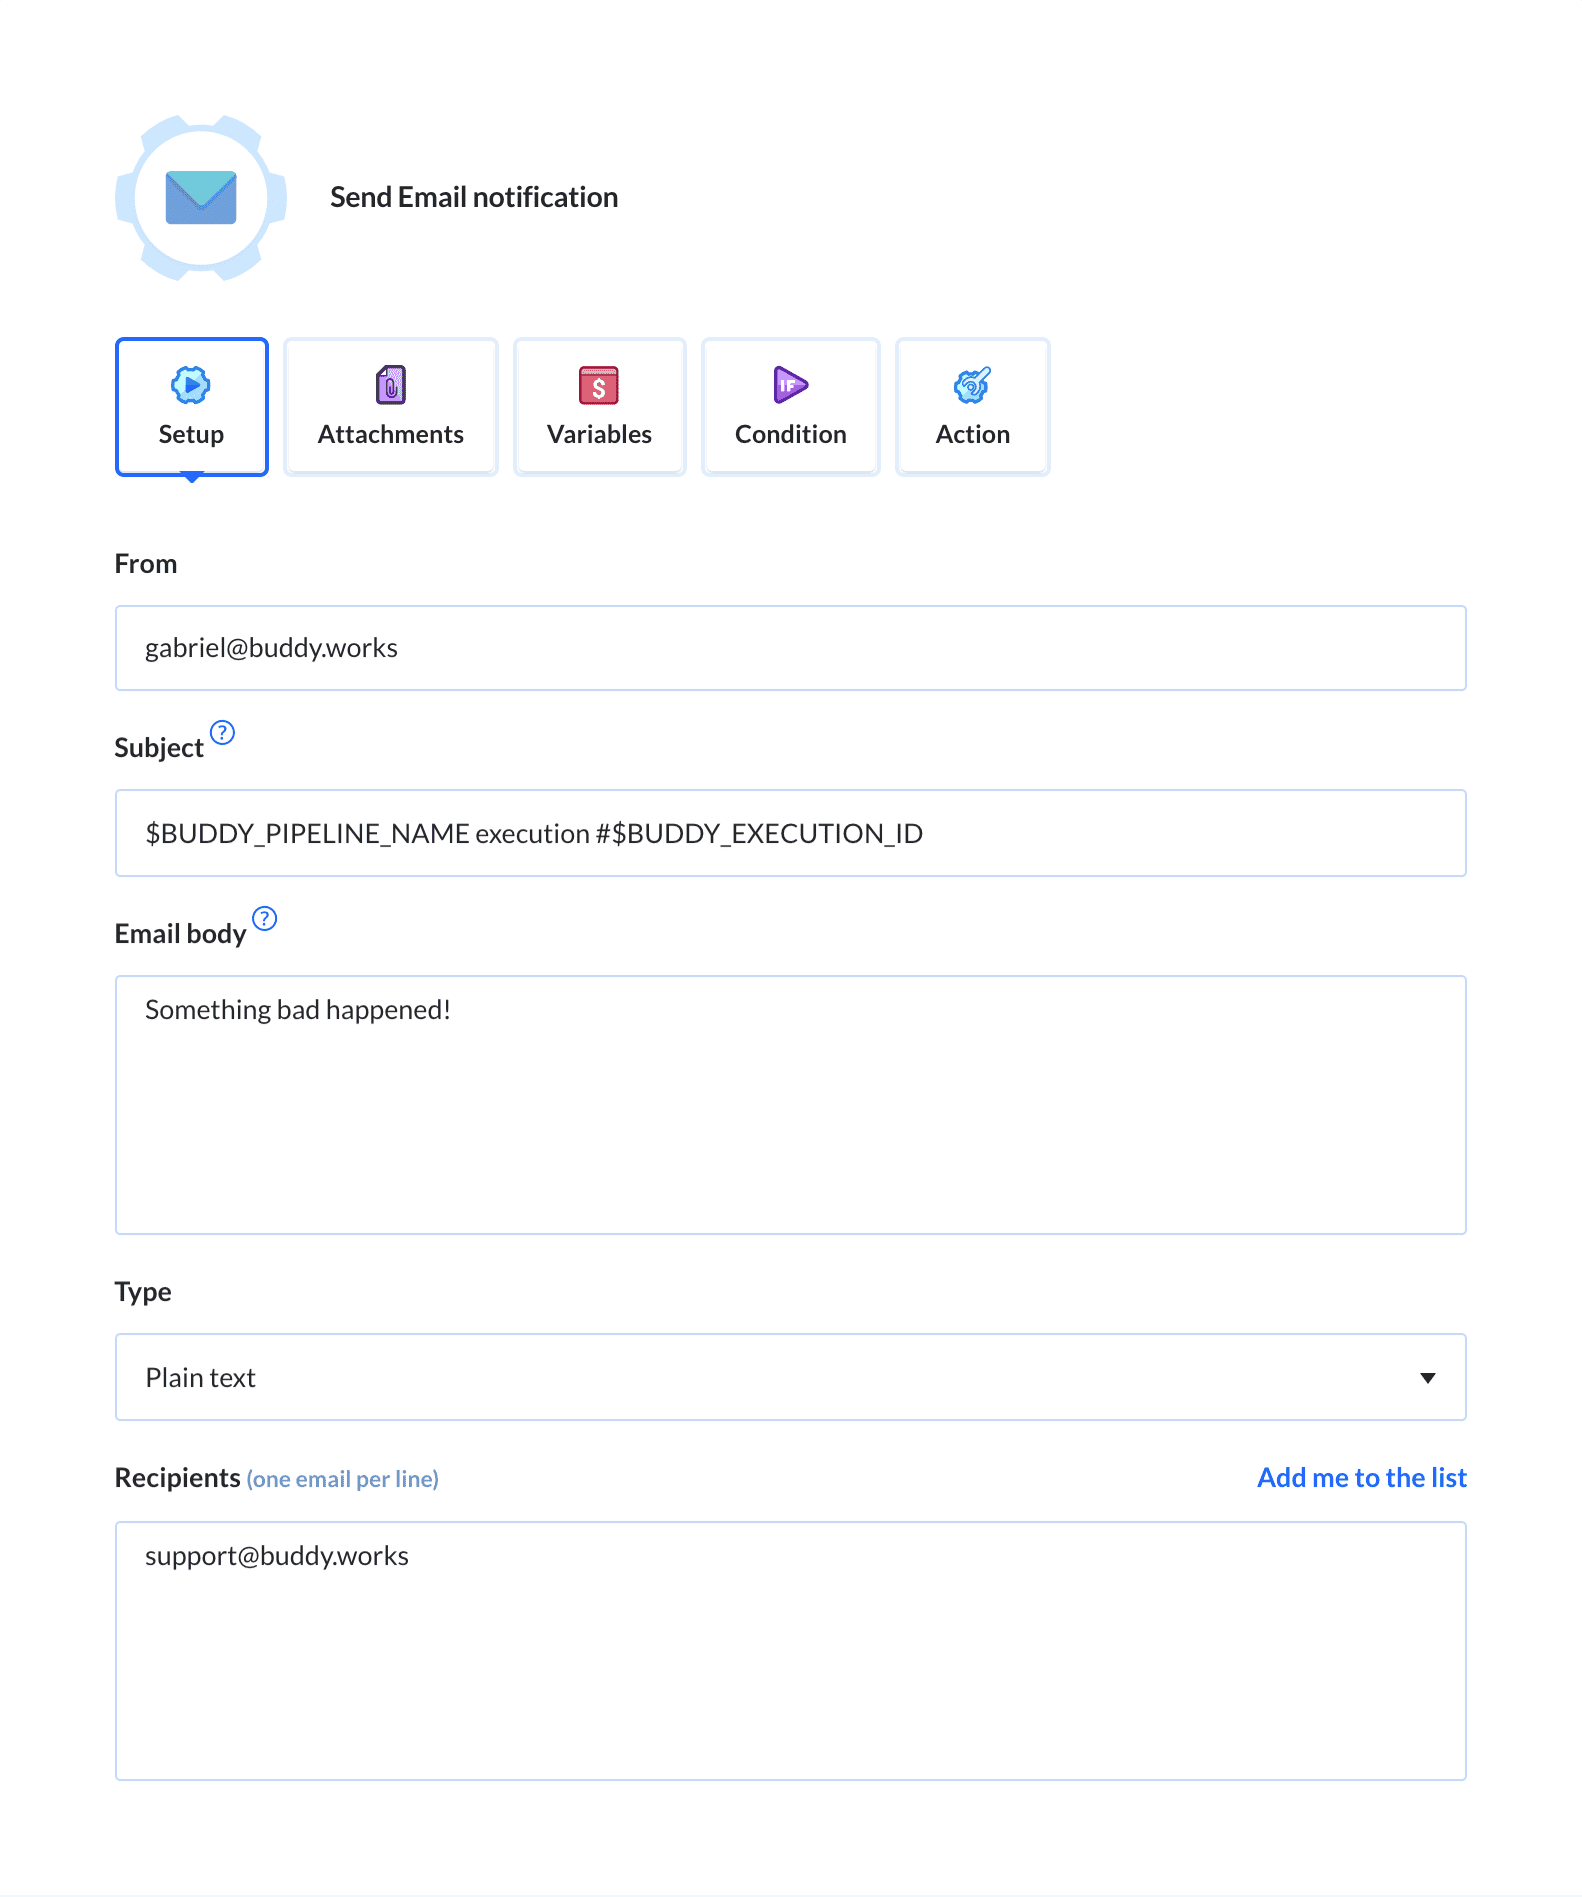
After adding the action to your pipeline, customize it using the environment variables in the action setup page. A sample email configuration could look similar to this:
总结
There you have it! You have successfully set up your own CI/CD pipeline for your Golang application that automatically tests and deploys your application whenever you push a change to your Git repository and even sends notifications with the current build status out to you and your colleagues. I suggest that you play around with the different Buddy actions shown in the article and further customize the settings for your purposes. Enjoy!