Buddy合并请求
This guide will explain you how to use branches, branch permissions and merge requests to improve source code quality with Buddy.
Objectives of this guide
With this guide you’ll be able to:
- Get familiar with Git workflow and understand the link between this approach and quality assurance processes.
- Understand the concept of a branch, branch permission and merge request and their role in Git workflow.
- Find out how to employ the above tools in your project to improve the quality of your code.
- Learn how to easily set up branches and run requests to follow the industry standards and improve your development process.
Code review—cool tool to improve quality
Code reviews allow you to:
- Detect errors faster, at an early stage of the development process.
- Improve code transparency and consistency.
- Follow industry standards and best practices concerning the code.
- Educate the development team and spark the collaboration.
When should you schedule your code review? Before you introduce any major change into the application. And this is where branches come in handy.
Branches and merge requests in Buddy
Every new feature or smaller change, every bug fix you’re working on, should form a separate branch, ready to access and review by someone responsible for marking your code as “checked and approved” and integrating it with the application. With Buddy you can work with any number of branches, at different development stages and with different access rights (permissions) and coordinate the merging process using merge requests.
Bringing the requests to your project
Create a new project and select Buddy as your Git provider. If you are already storing the code under version control, just push it to the repository in Buddy.
If you are not using version control yet, simply zip the code and import it to your Buddy project.
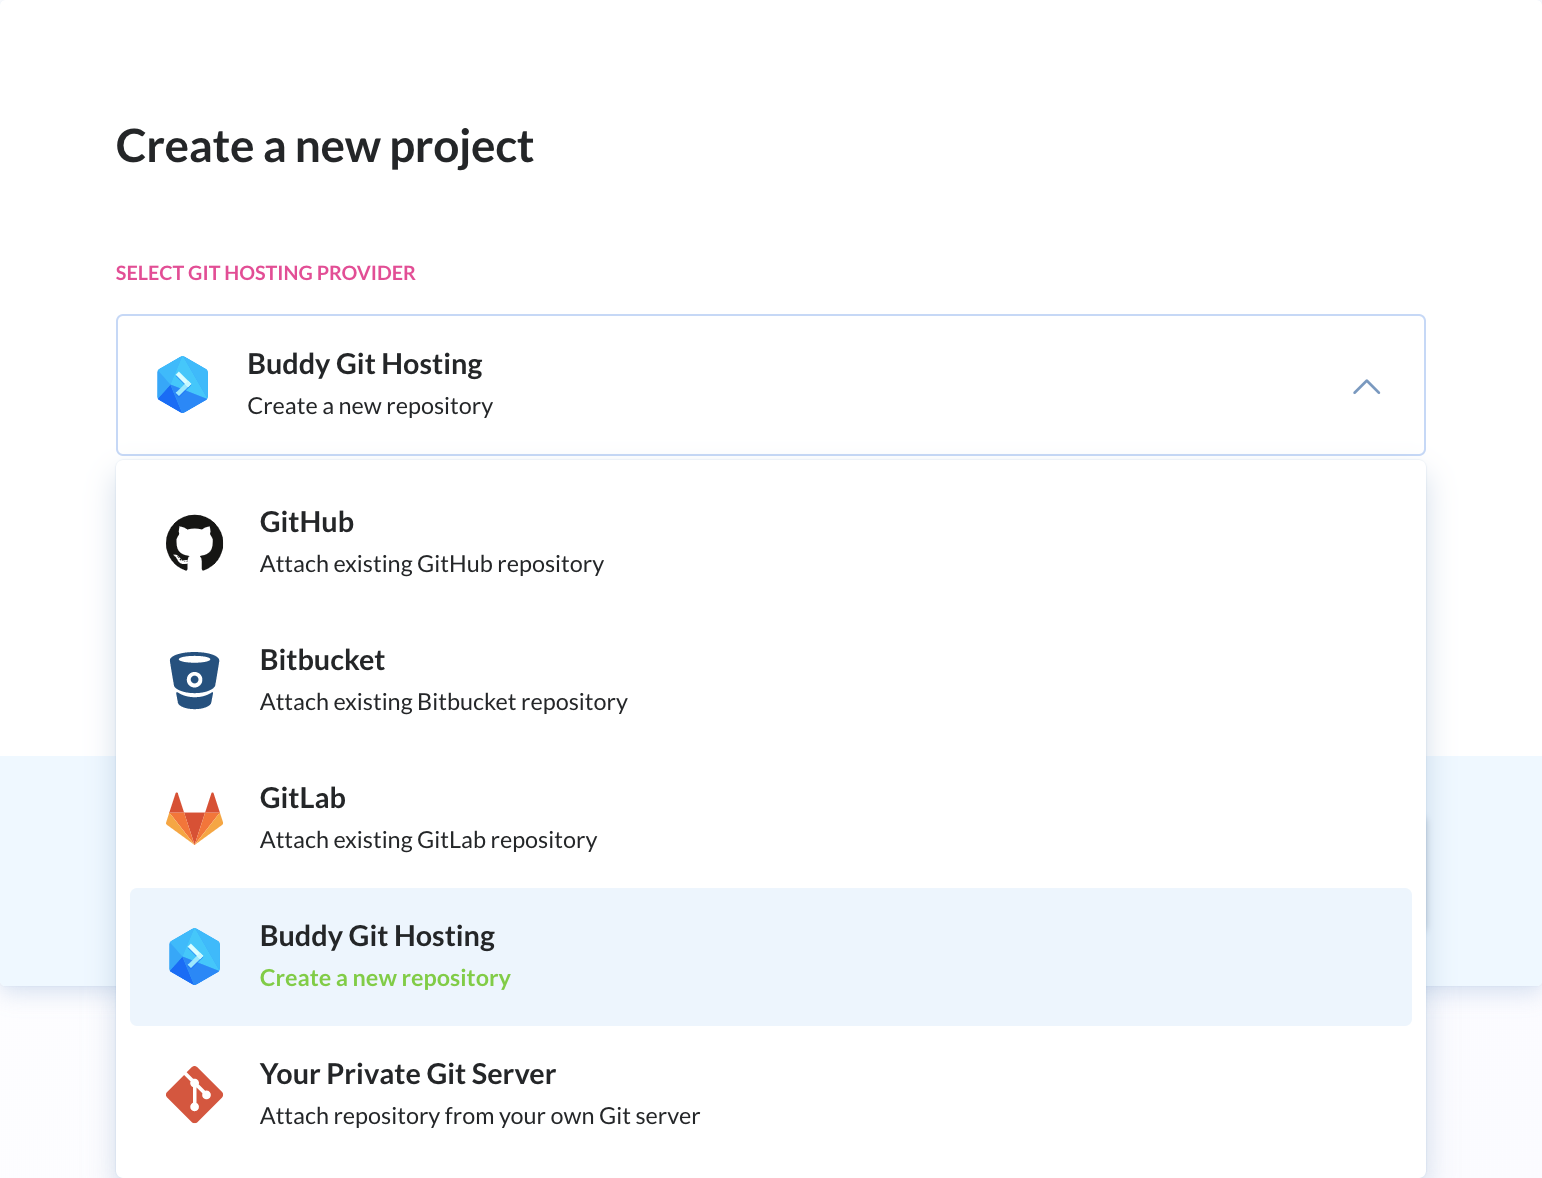
To find out how to work with Git and repositories, please refer to our beginner's guide to Git.
No version control ⟶ no branches ⟶ no code review.
Working with branches
Master branch
Upon initializing the repository, Git automatically sets up the main branch called master.
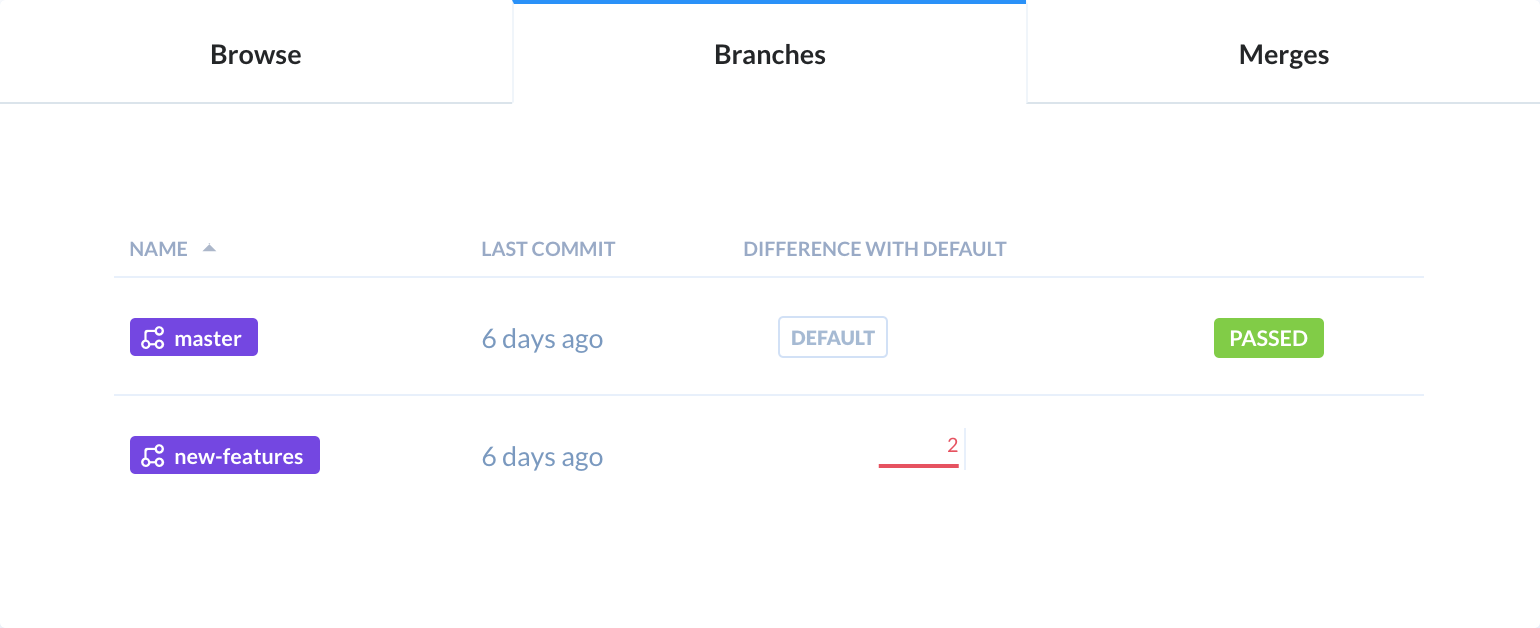
Master branch should store ready-to-release version, free from under-construction features or “on the fly” bug fixes. You’ll set up a separate branch for every single change.
Set up a branch for a new feature
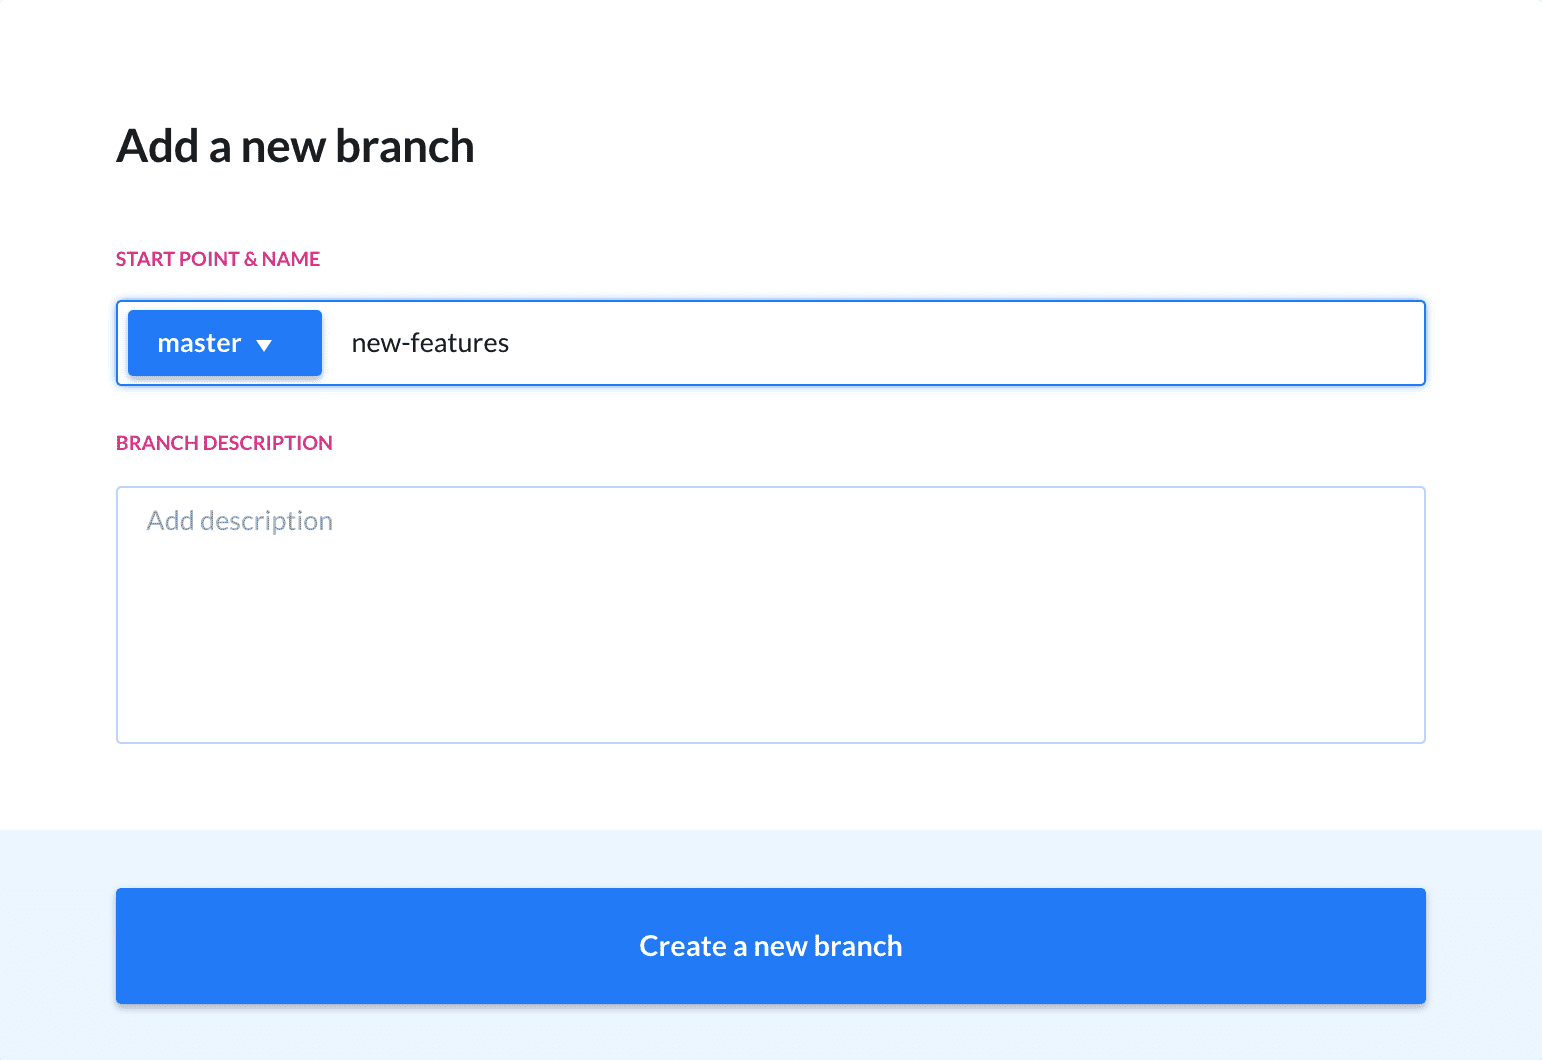
To set up a new branch in Buddy you have to complete six easy steps:
- Click Code, switch the tab into Branches and select Add a new branch.
- Pick branch starting point (this will be the head of the newly created branch).
- Enter the name of your branch— new-features (description is optional) .
- Click Create a new branch.
Develop the feature under a separate branch
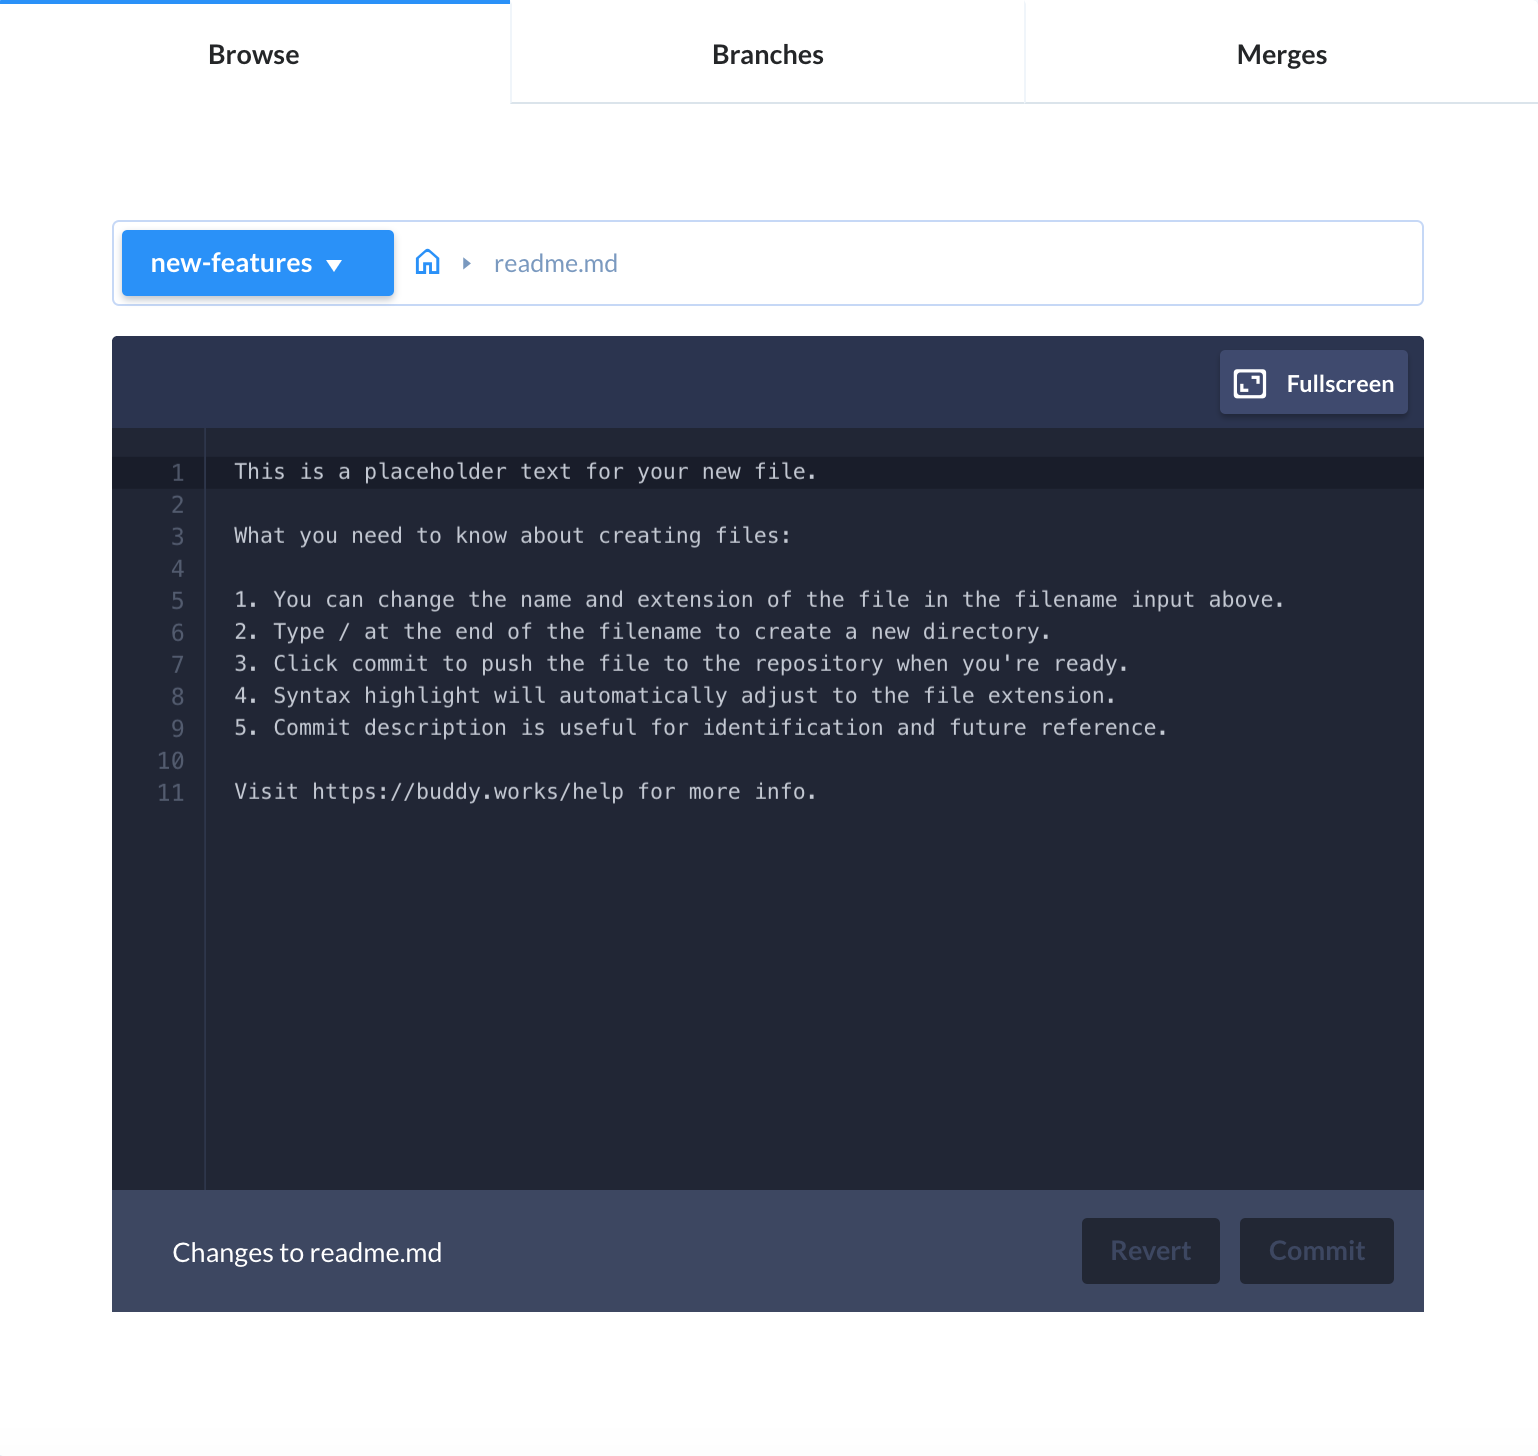
Now you can work on your new feature as long as you want and don’t worry that your changes may cause trouble in the main branch—they are not visible there until the merge, but check it if you like. We know you probably prefer you IDE (like Eclipse for example), but we’ll use Buddy online editor:
- Go to Code.
- Switch the tab Browse.
- From the branches dropdown list, pick new-features —we don’t want to change master branch.
- Pick the file, change it and commit changes.
How to merge the changes now?
The changes you’ve just introduced affect only the separate new-features branch. Before we merge them with the master branch, it’s necessary to review the code using a merge request.
Working with merge requests in Buddy
What is a merge request? Generally speaking it’s a code review tool. When you’re done with you work and think it won’t do any harm to include your code into the live application, you need to ask someone to review your work and approve it. You do it in a form of a merge request.
Buddy allows merging branches from the application level. Its handy features ensure the seamless workflow and support repository maintenance.
Issue a merge request
When the feature developed under the separate branch (new-features) is ready and you want to merge it with the master branch:
- Go to the Merges tab.
- Click Merge on the right.
- Pick branches to be merged.
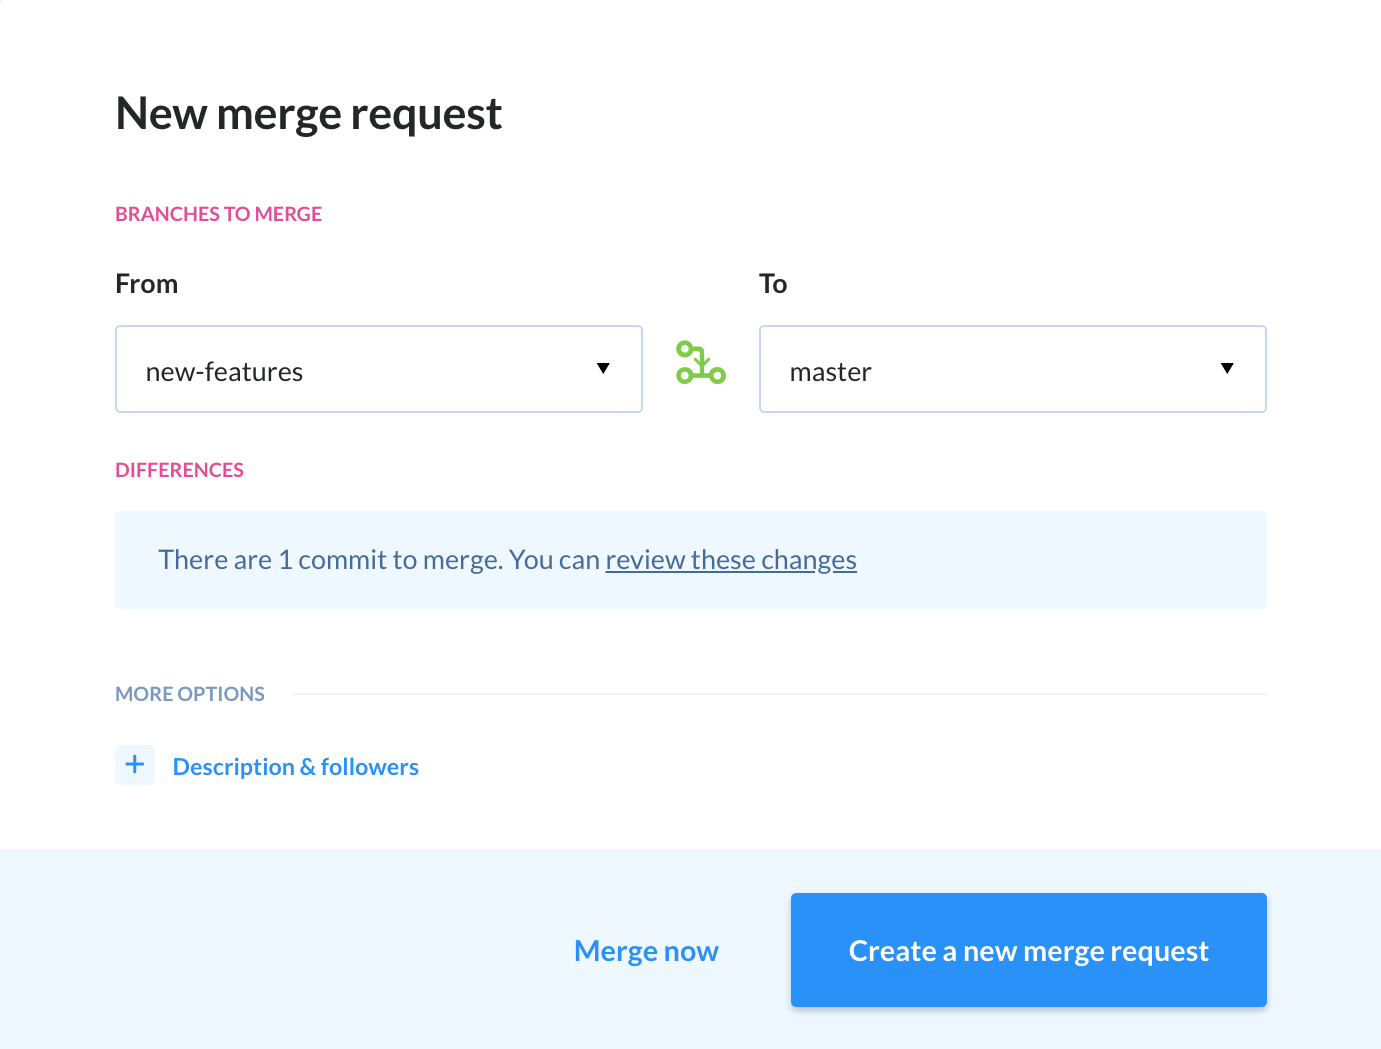
While selecting the branches for a merge you have an option to:
- Merge now
- Create a new merge request. The request is sent to the person who reviews your code and accepts the request.
Check what’s on your to-merge list
All the merges awaiting approval are displayed on the Merges tab.
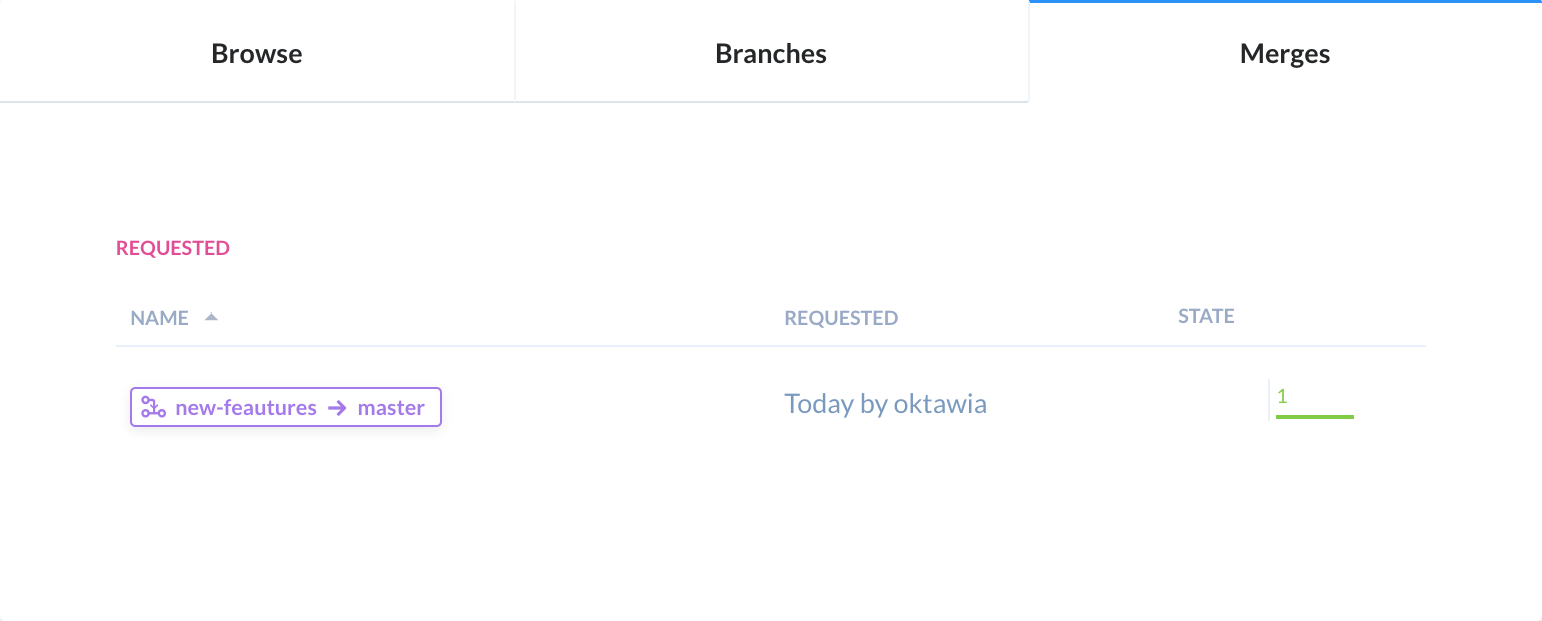
Here you can check who issued a merge request and how many commits are awaiting a merge. Additionally Buddy, on the basis of the merge history and branch names, suggests which ones might be merged now. This is really helpful as you can analyze when the last merge for a given pair of branches was performed.
Merging branches—keeping order
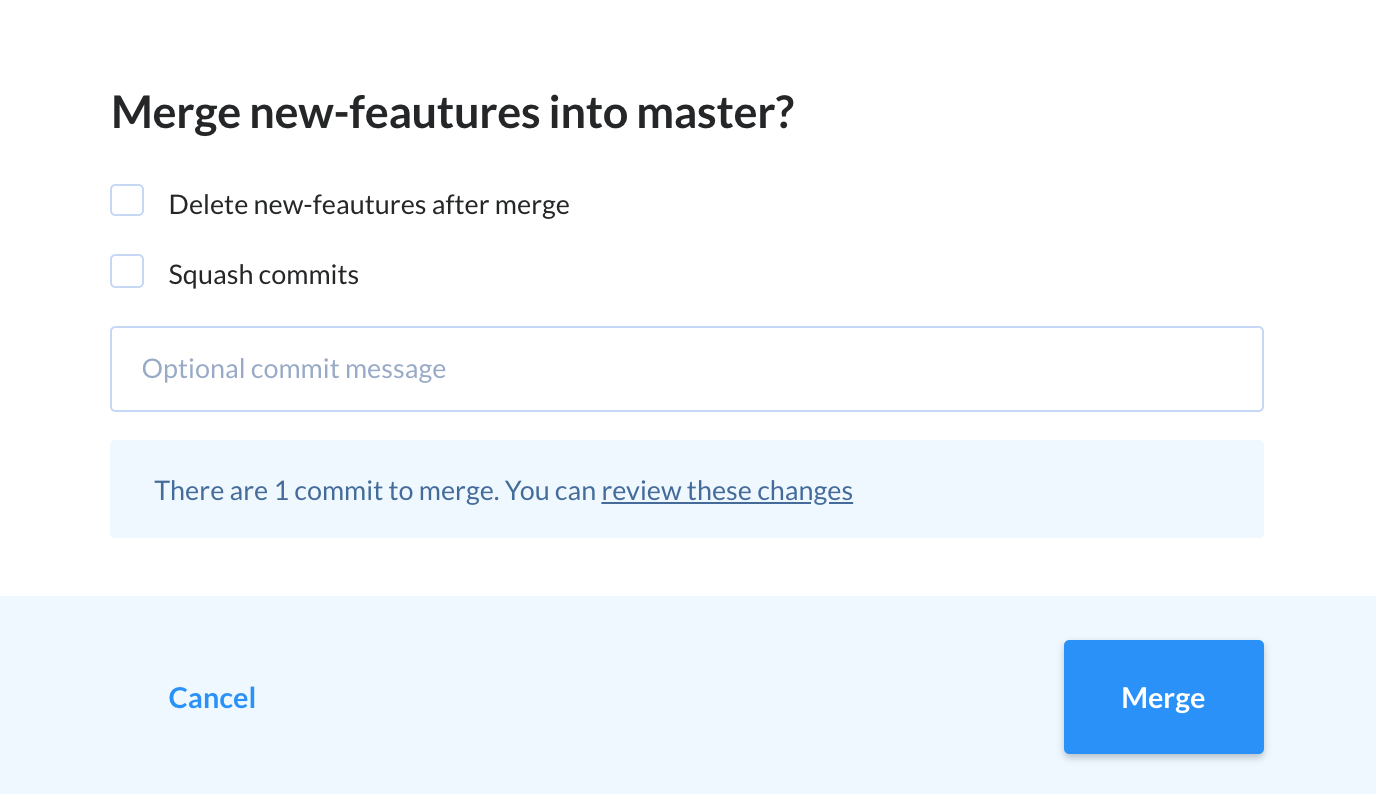
The moment you decide to accept a merge request, Buddy allows you to pick one of the following options:
- Delete the merged branch to keep branches list short.
- Squash commits, which means combining all the commits for the merged branch into a larger one. This is useful if you want to keep your commit history short.
Click-click and we’re done
Do you want to accept a merge request? If yes:
- Pick the merge request.
- Select Approve & Merge.
- Click Merge now.
Branch permissions
Till now we were explaining branches and merge requests assuming two-level responsibility workflow. However, the default setting in Buddy states that everyone is allowed to push changes for any branch and accept merge requests. If you want to change this (which we recommend), you have to set up permissions that will ensure only the senior developers will be allowed to work with master branch (or any other branch that requires limited access rights). Setting these options in Buddy is just as easy as other branch-related tasks:
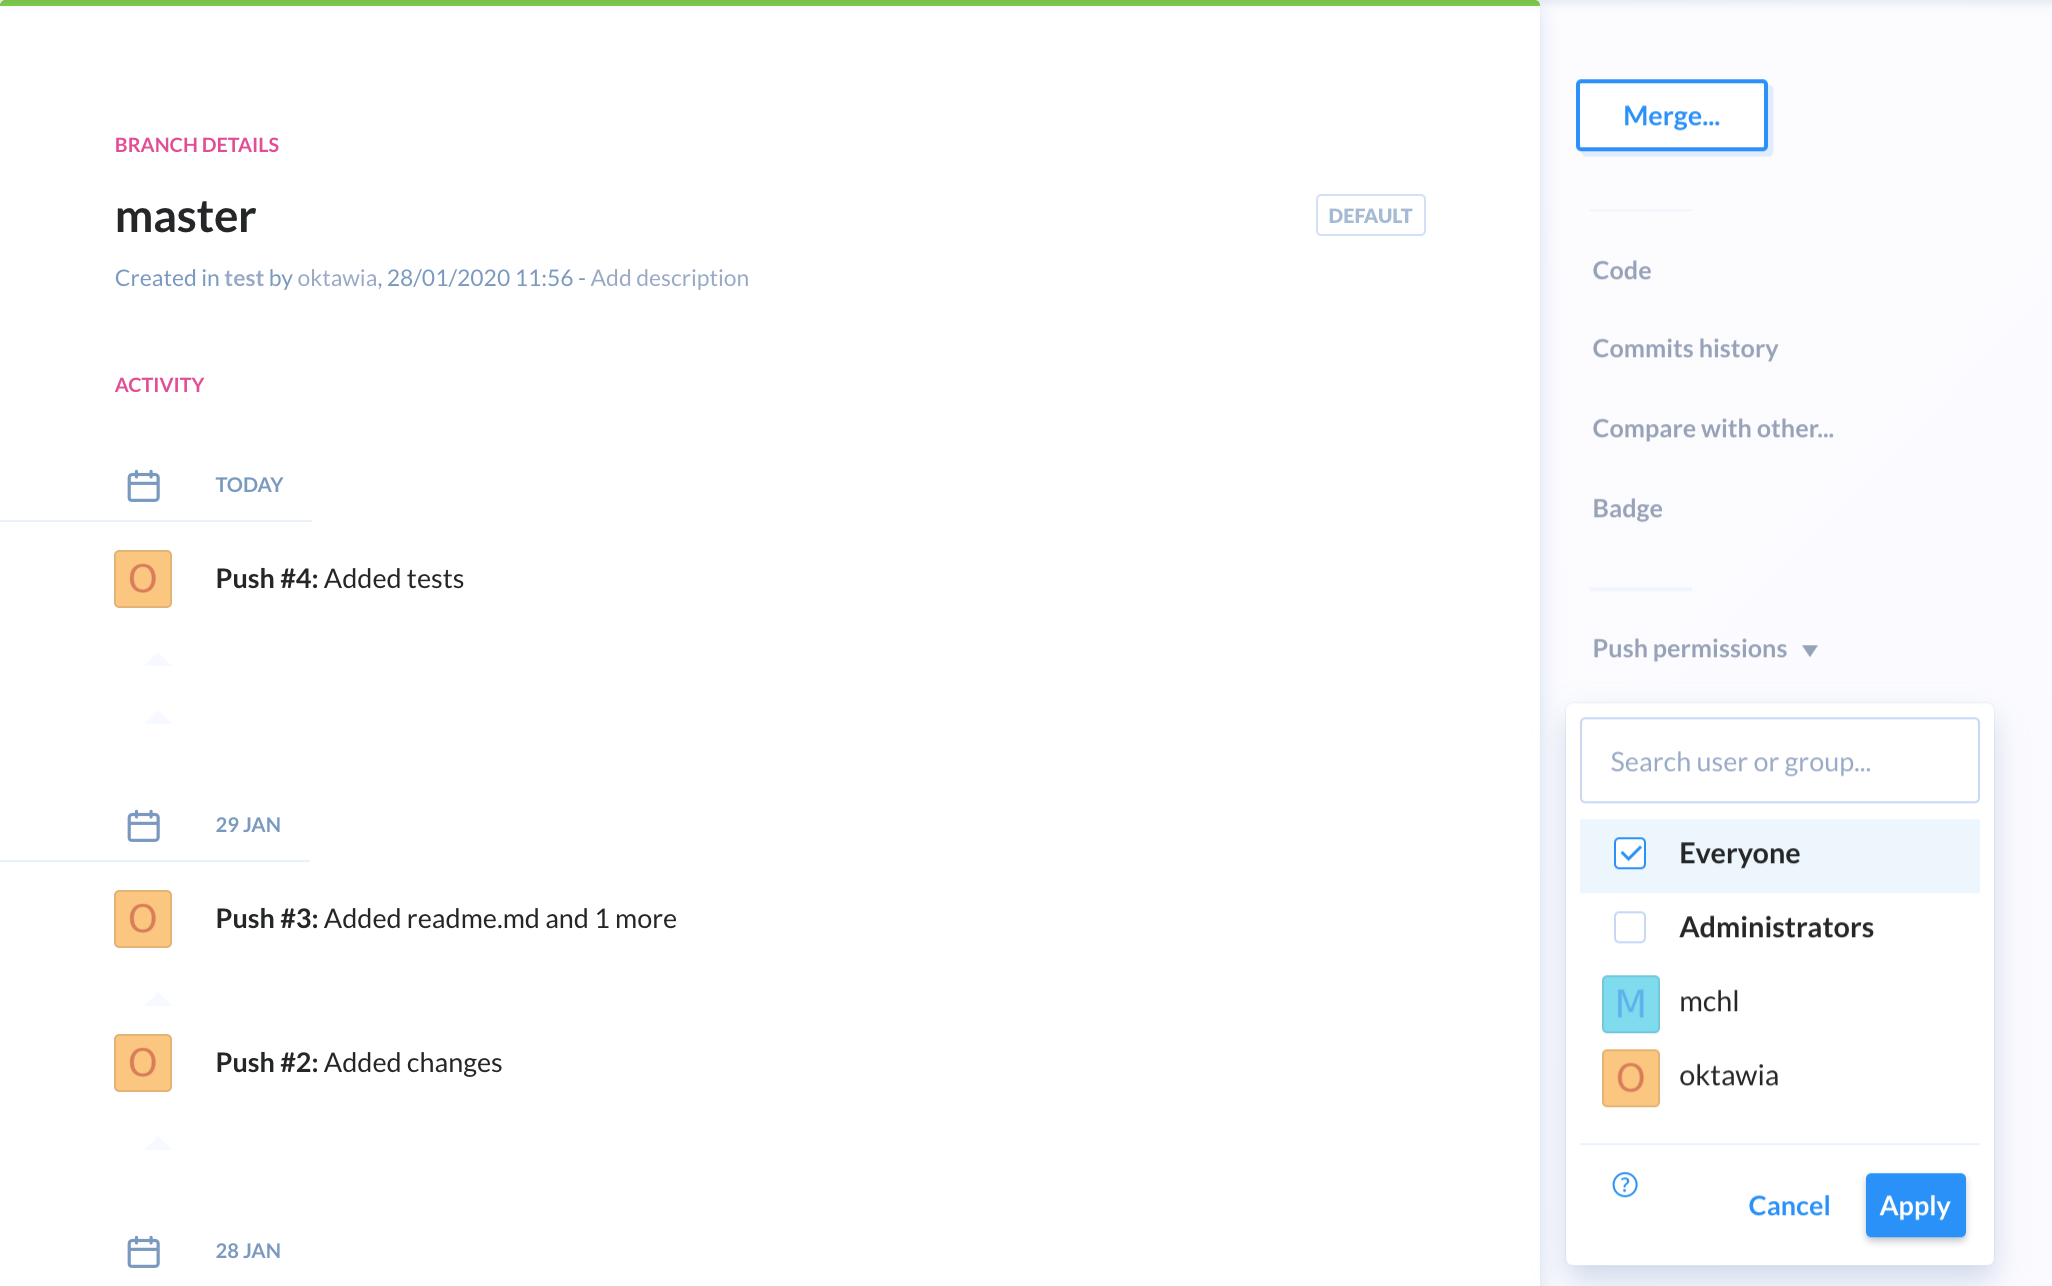
- Open the branch you want to work with (let’s say master) by clicking Code ⟶ Branches and selecting the branch.
- On the right side panel click Push permissions.
- Pick the persons (or groups of persons) who’re allowed to push changes to this branch.
Nobody will mess up with your Branch without you knowing
What happens when the setting is in force? The developers with no branch permissions:
- Will not be able to push changes to the repository for that branch.
- Will not be able to accept merge requests concerning that branch.
- You’ll have a chance to review changes before they hit the live application and make sure the quality of the code meets corporate standards and best practices.
Go one step further
Branching and merging features help you develop better applications, and you probably want to deliver them (as soon as possible) to your customers. If you’re thinking of continuous development, Buddy can help you set up a continuous delivery pipeline.
With Buddy—among others—you can:
Set up a pipeline that will trigger application tests on every push to the repository. It will provide the information on which branch passed (didn’t pass) the tests. As a result it’s clear which merge requests from the list can or can’t be accepted.
Set up a Continuous Delivery pipeline that will deploy the application to a given server on every accepted merge request.
Pipelines are the core functionality of our application. Flexible and easy to configure, they can for example run the integration tests upon accepting a merge request and if the results are fine, deploy the application to the server.
If you have any further questions, don’t hesitate to contact us at support@buddy.works or simply register for the trial version and have a look at Buddy.
We are done—now you know how Buddy can help you develop high-quality code using branches, merge requests and push permissions—the typical Git workflow tools that streamline the review process and organize the work by dividing the code into smaller pieces, with different access rights.