如何使用WebdriverIO在Node.js中写一个Selenium tests测试
Objectives of this guide
Selenium is an open-source suite of tools used for testing web applications across different browsers and platforms. Selenium WebDriver, which is the focus of this guide, is used to create automated tests that open a page in a web browser and check its contents for errors, and/or induce interaction with the page, checking the contents later.
Action used in this guide:
Upon completing this guide you'll be able to:
- Write Selenium Node.js tests
- Run test locally on a Selenium Server
- Automate your testing process using Buddy CI/CD
Node.js Selenium configuration
Let's create a task that opens the Buddy website in the Chrome browser and captures a screenshot.
Make sure that you have Node.js installed before you start.
Installing Selenium WebDriver
Create a directory for the source files and initialize a Node project. The command will create a package.json file with the dependencies:
mkdir my-first-test
cd my-first-test
npm init -y
When the package is ready, install WebdriverIO and save it as a dependency in package.json:
npm install webdriverio --save
Creating selenium.js file
Now it's time to create a file that defines the actual test: grabbing the screenshot of a website and saving it to a file. Create a selenium.js file and populate it with this code:
var webdriverio = require('webdriverio');

var options = {
    desiredCapabilities: {
        browserName: 'chrome'
    }
};

webdriverio
  .remote(options)
  .init()
  .url('http://buddy.works')
  .saveScreenshot('buddyworks.png')
  .end();
Running Selenium Node.js locally
To run the example Selenium Node.js test scripts locally, you first need to set up a standalone server:
- Download Selenium server
- Download and unpack ChromeDriver
- Launch the standalone Selenium server:
java -jar -Dwebdriver.chrome.driver=’/PATH/TO/CHROMEDRIVER’ selenium-server-standalone-3.141.59.jar
When the server is up and running, all that remains is to run the test:
node selenium.js
The test will save the screenshot to a local directory—a glimpse of what can be done with Selenium. Below we'll show you a more advanced example that utilizes Buddy as a CI server.
Test automation (Recurrent)
Buddy lets you automate the process of testing and delivering your application to the server. This part of the guide will show how to automate screenshot grabbing with our service.
Sign up to Buddy with your Git provider to get started:
Next, create a new project. For the purpose of this guide, we'll use Buddy as the provider, but you can select any existing repository with Node:
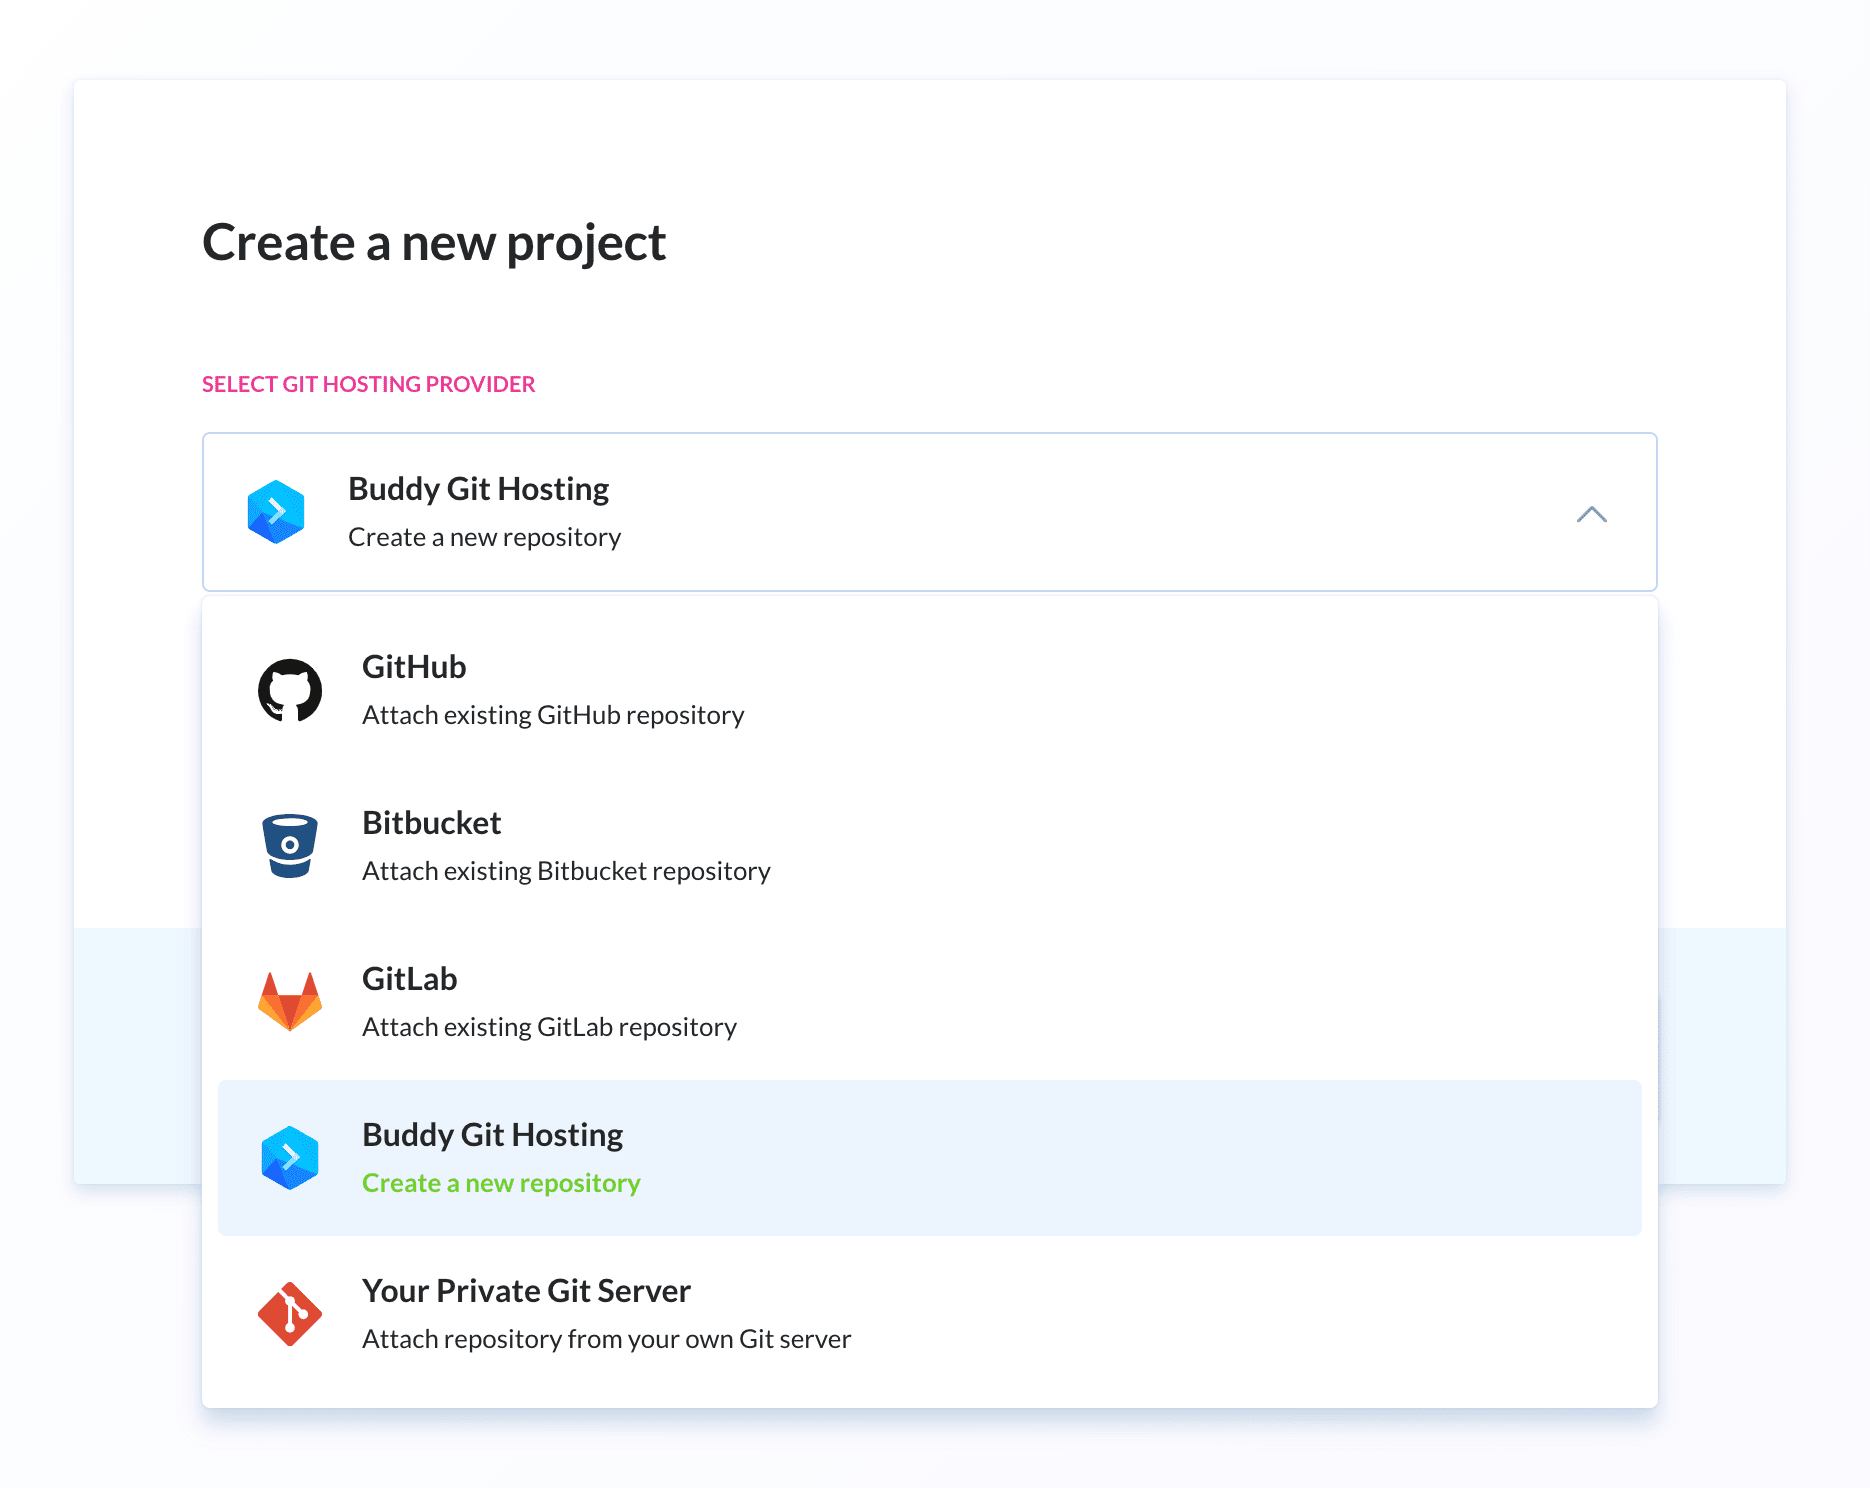
A project is a Git repository with pipelines that describe the way your code is processed and delivered.
With the repository in place, you can push
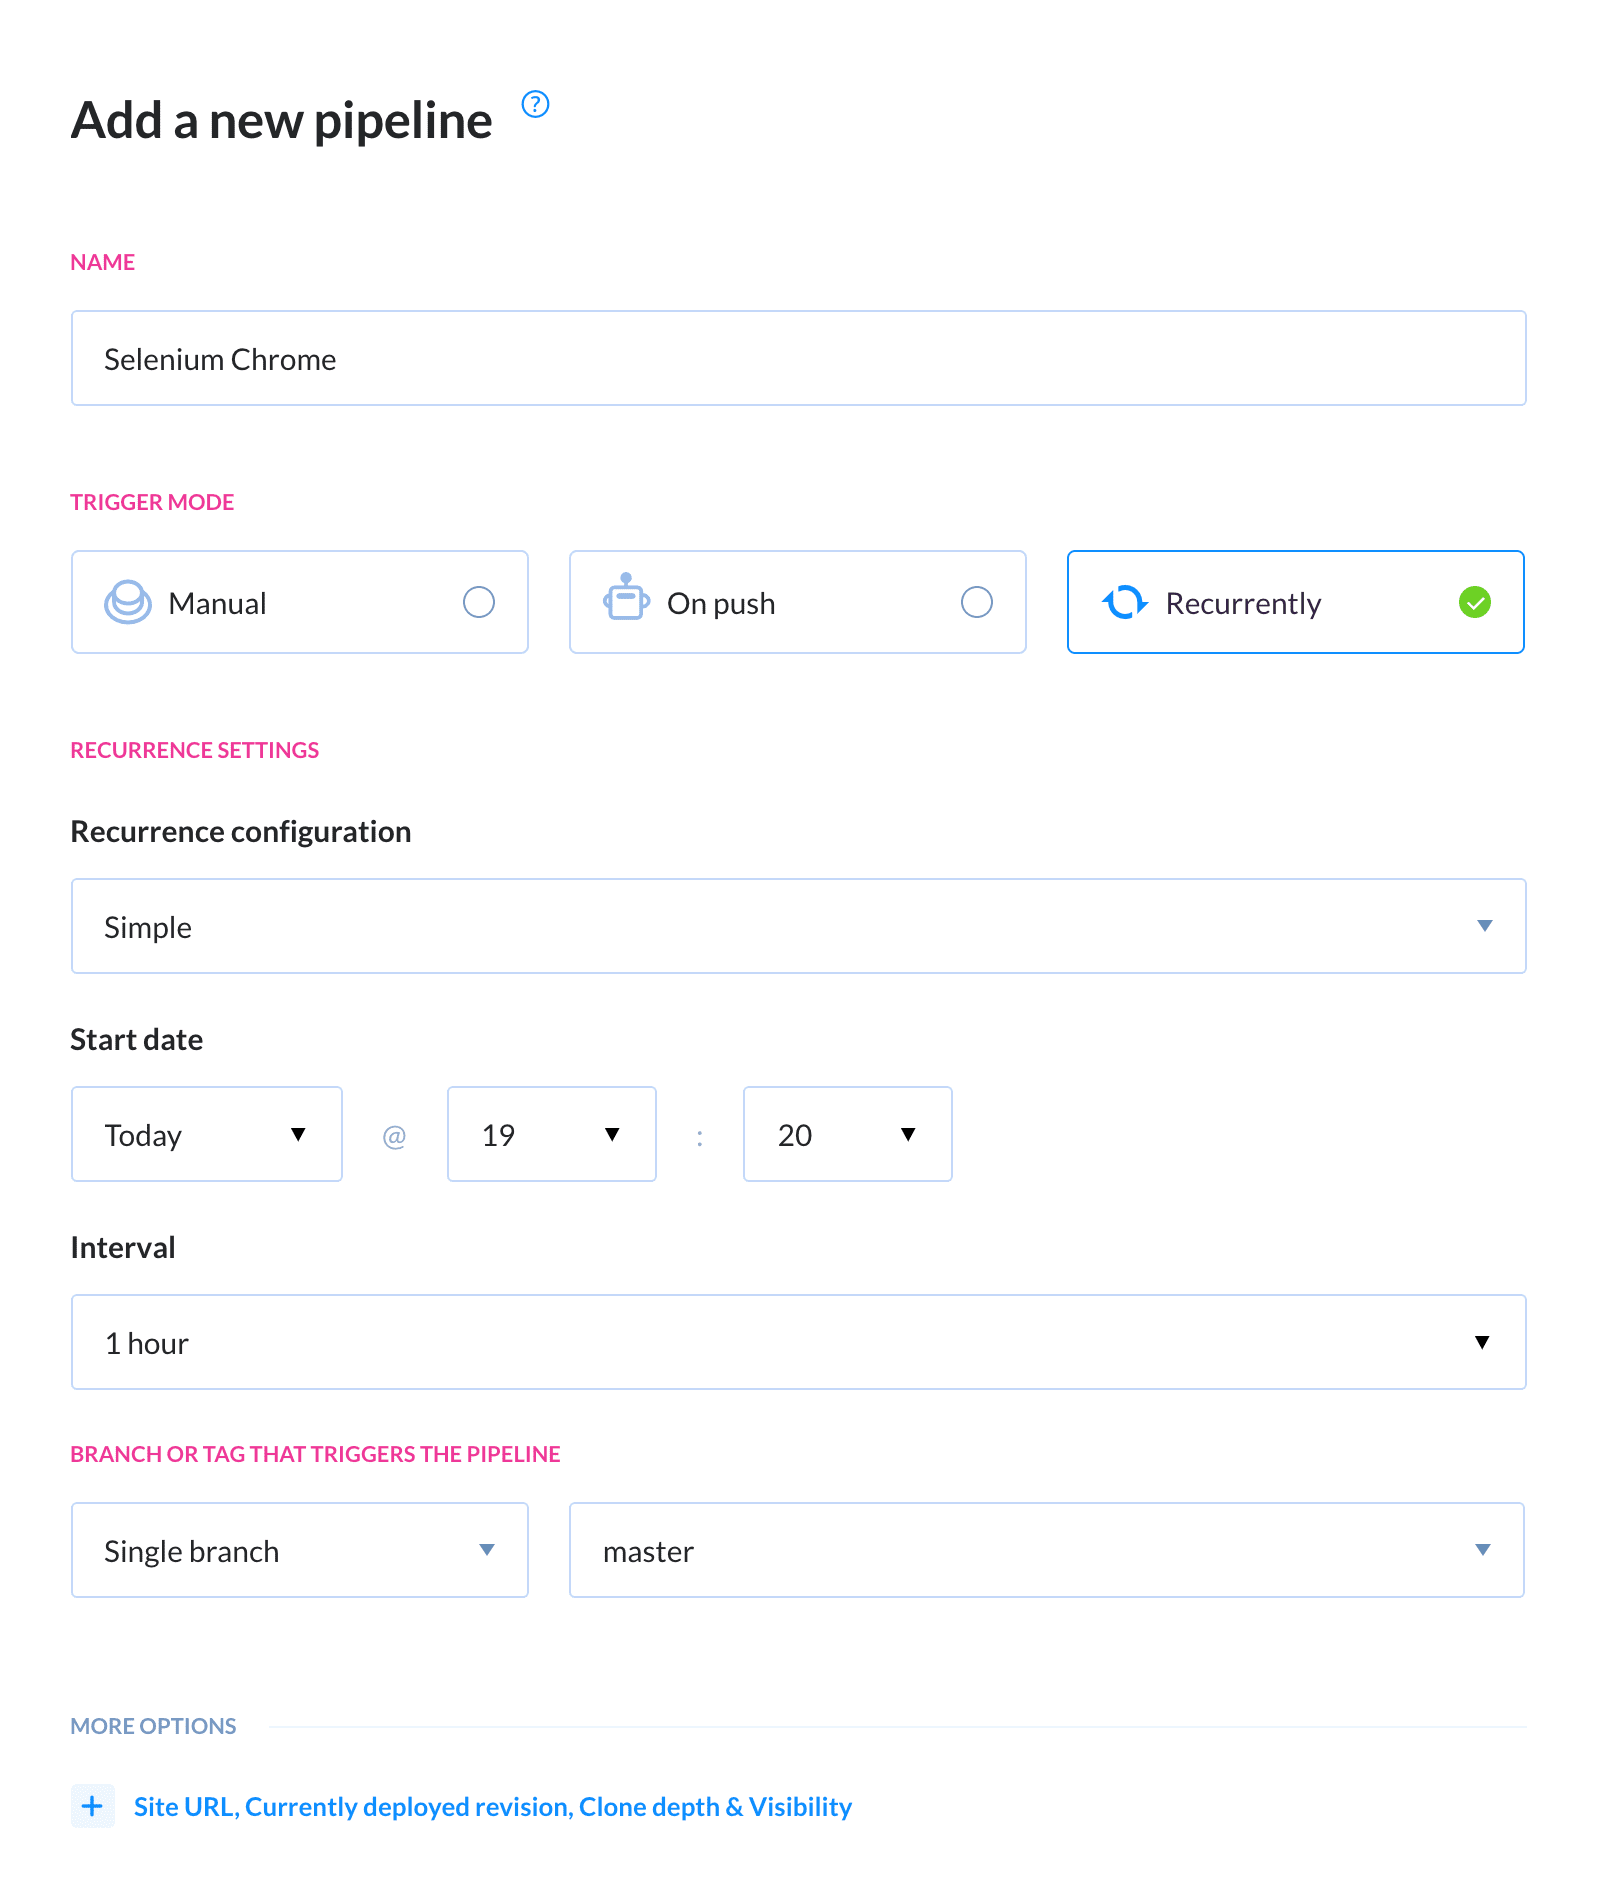
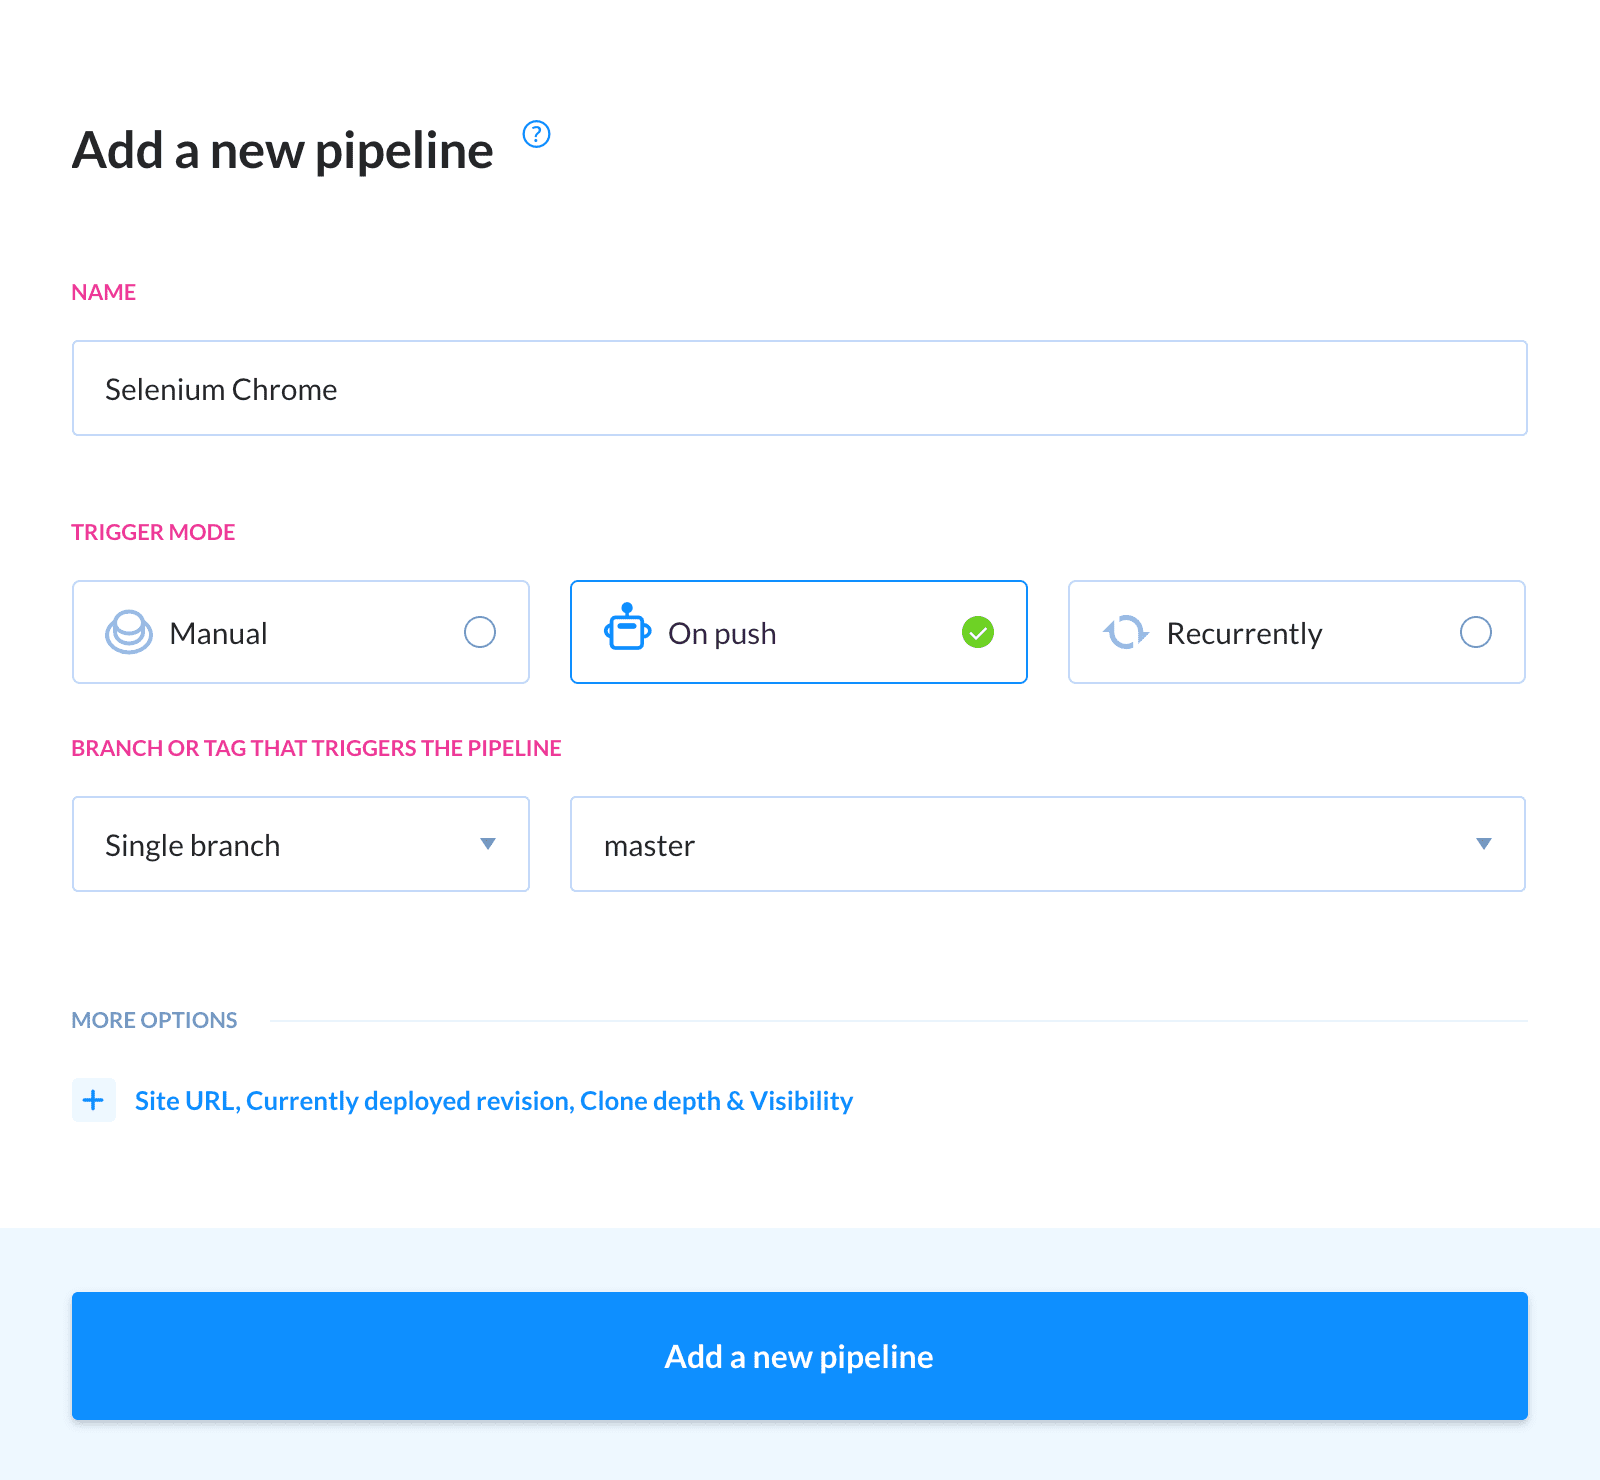
selenium.jsandpackage.jsonfiles to Buddy (you might want to initialize Git in the file directory):Now we can configure the execution. In this example, we'll run the tests periodically every hour. Add a new pipeline with the following settings:
- Trigger mode: Recurrently
- Interval: 1 hour
- Branch assignment: Master
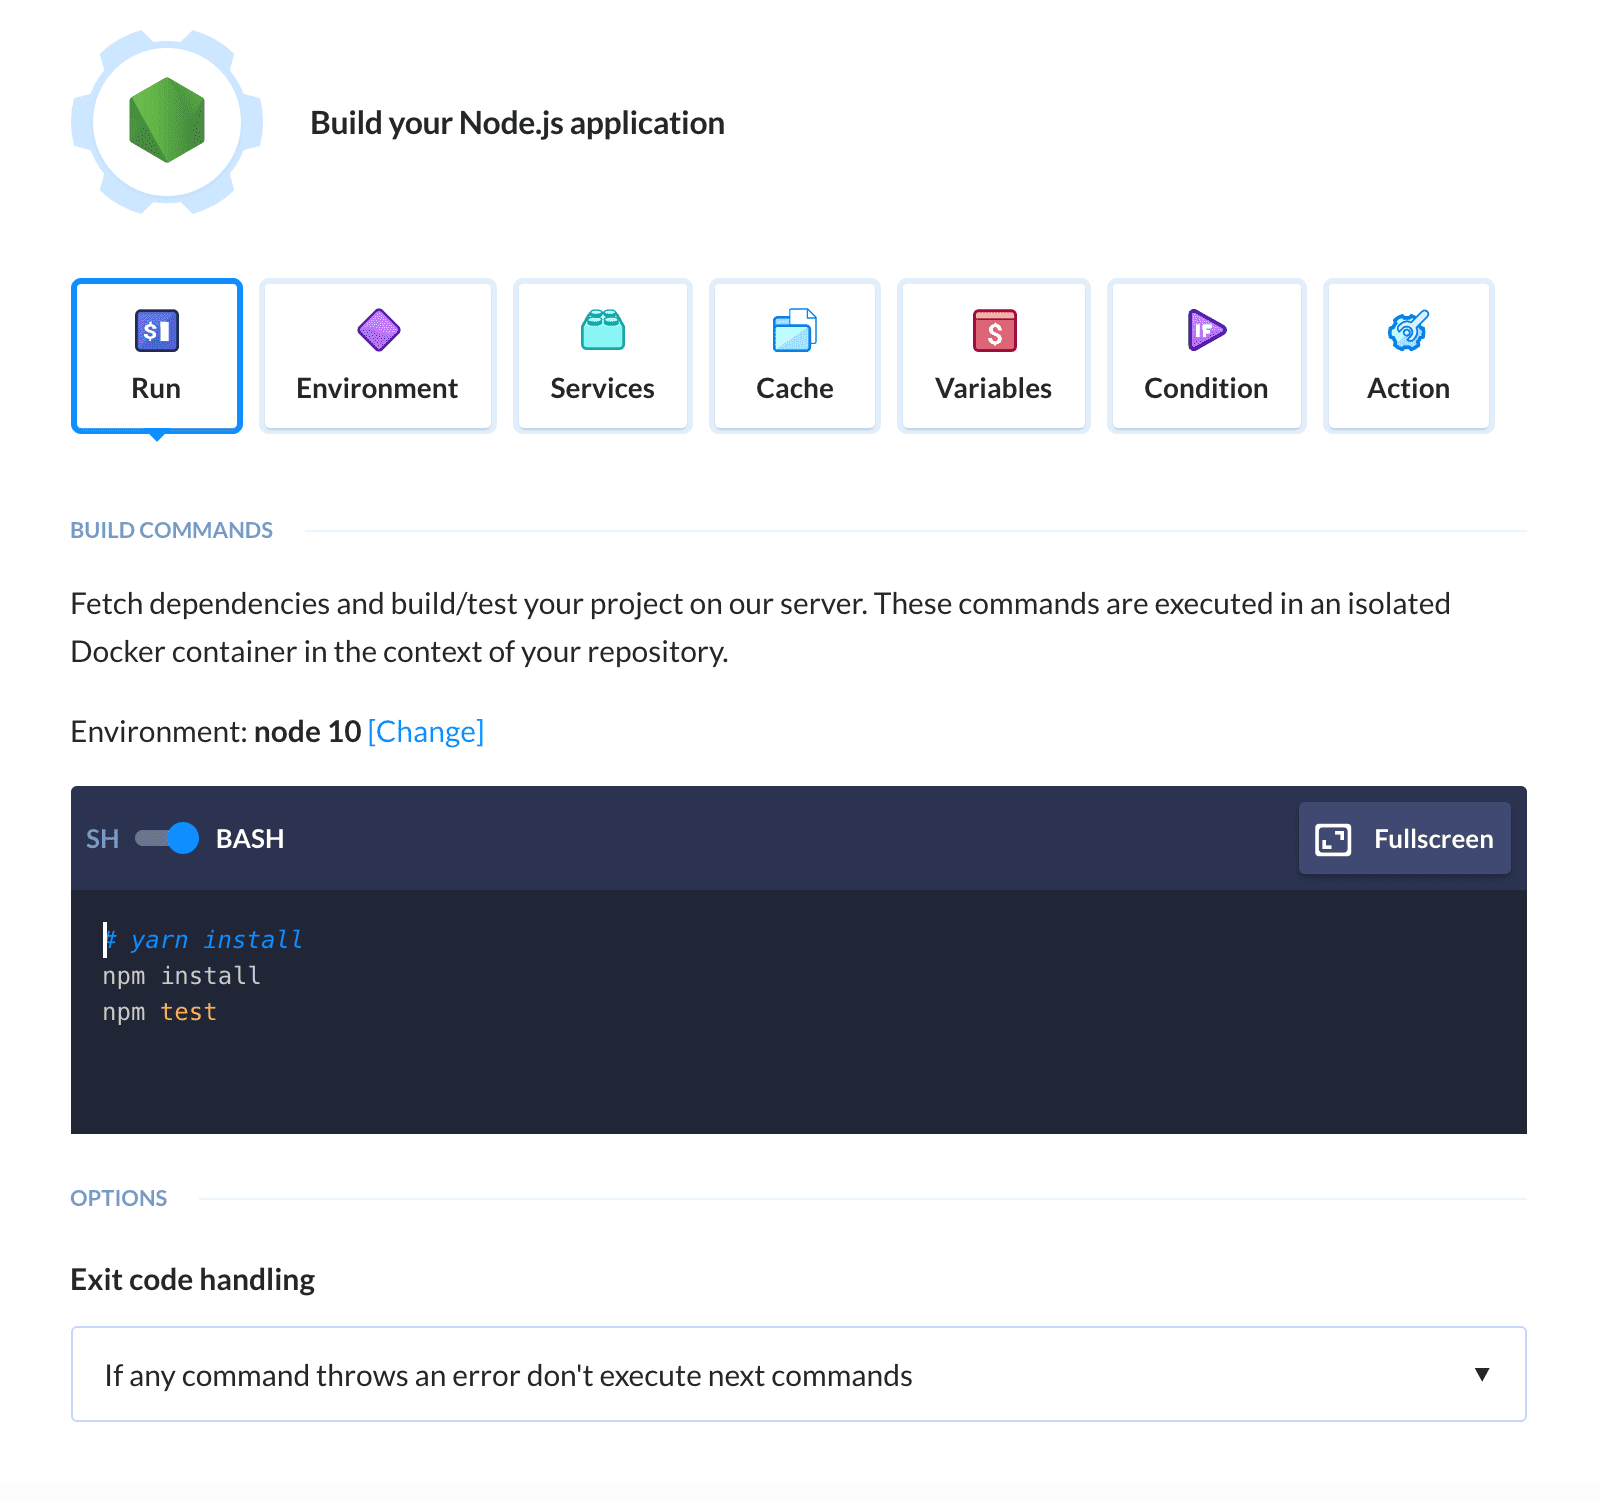
- Add the Node action to the pipeline and enter the commands that will run npm and your tests:
npm install
node selenium.js

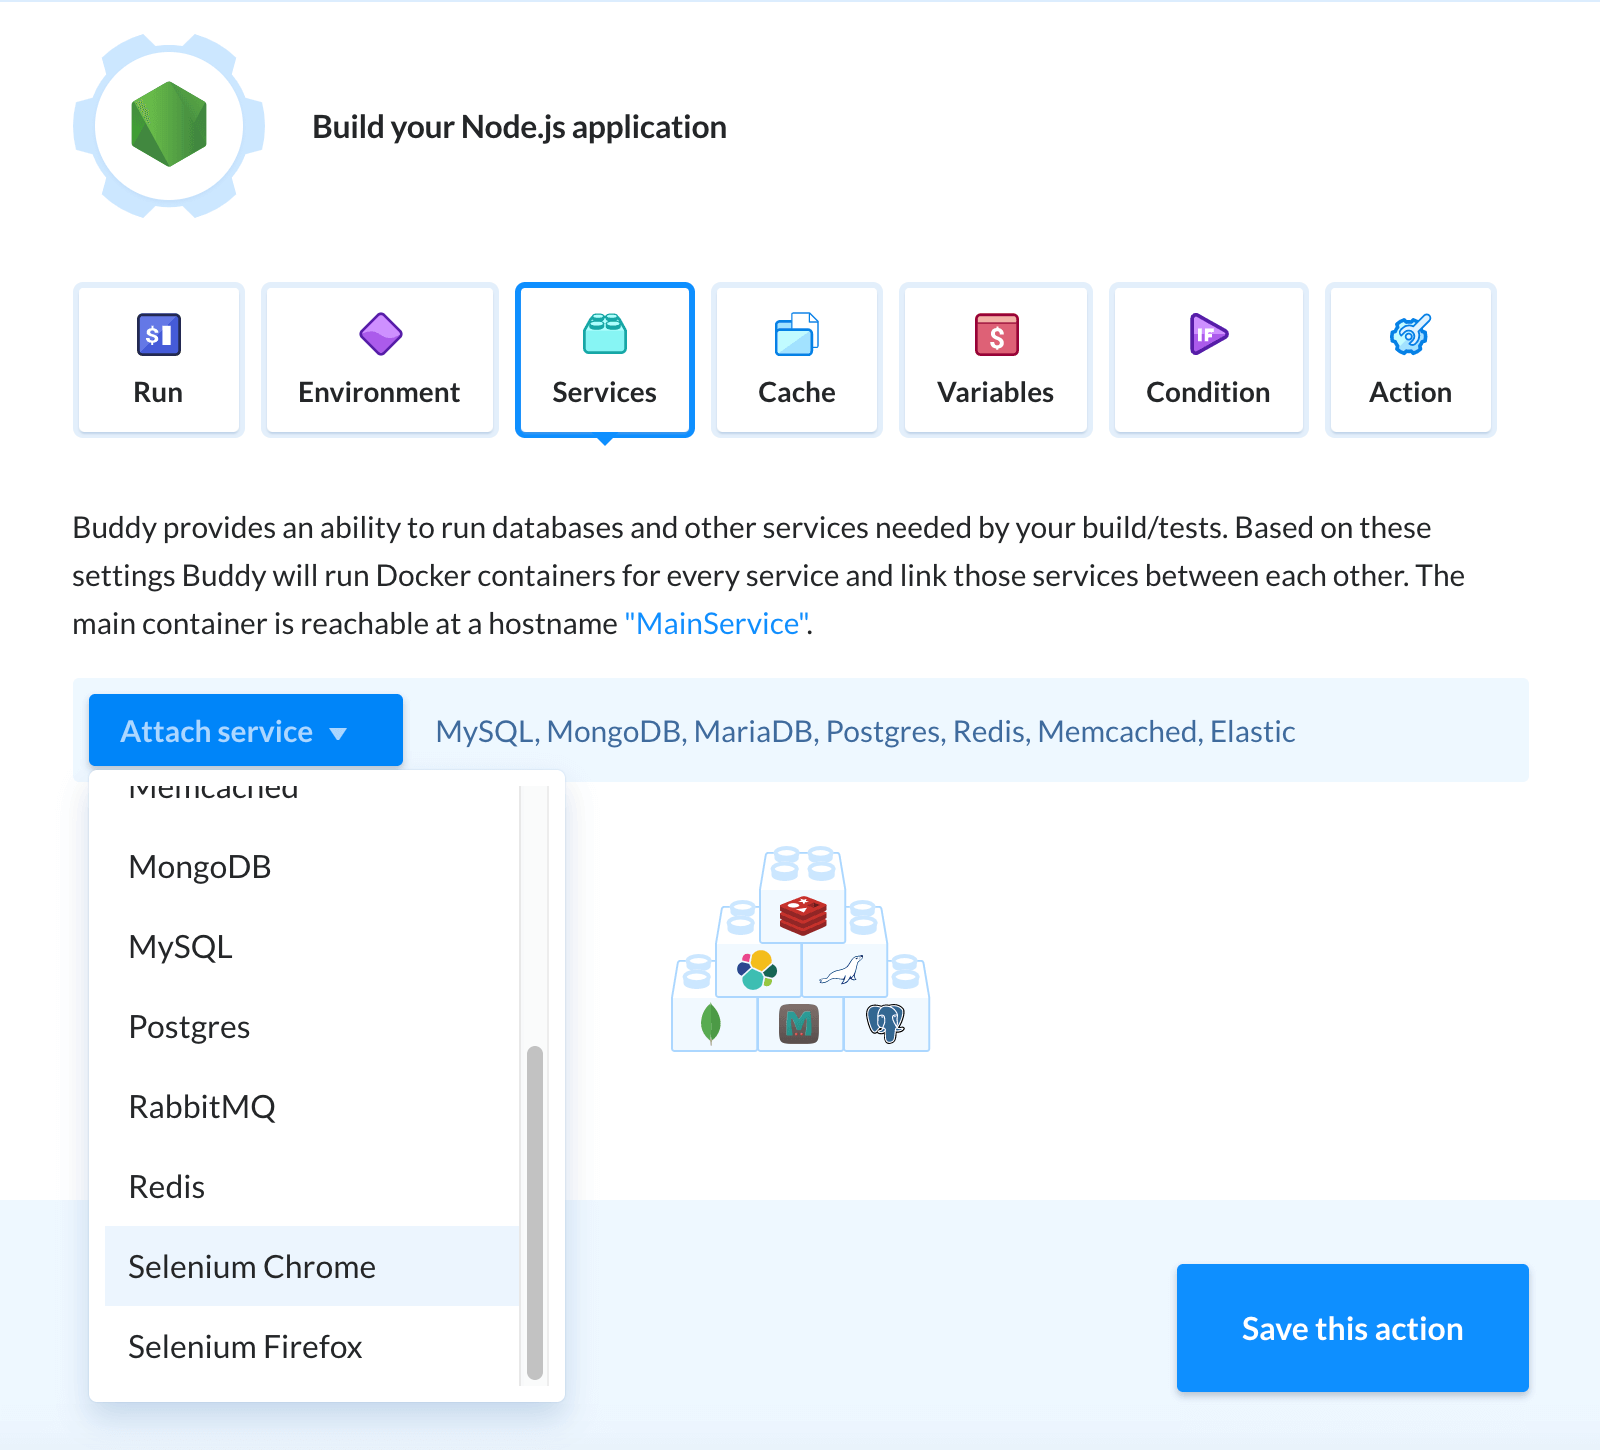
- Now we need to add Selenium. Switch to the Services tab and attach
Selenium Chrome:
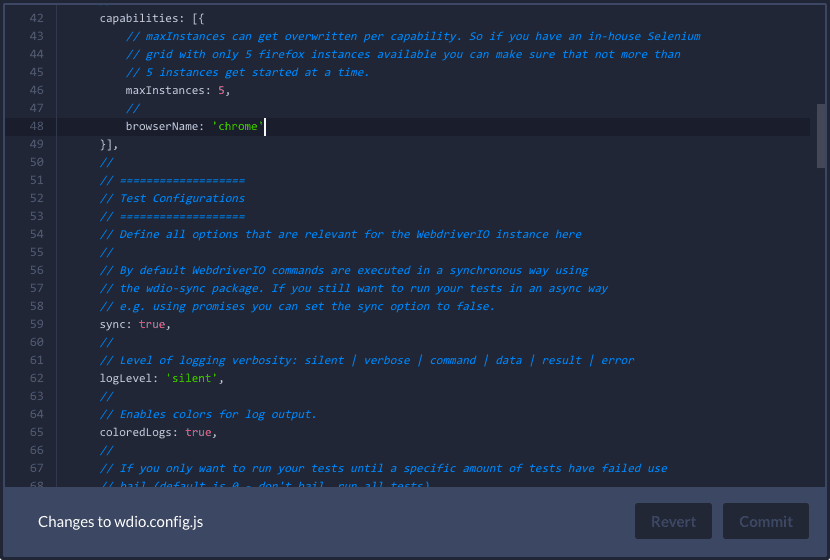
Make sure to update your config file with the details of the testing server:
host: 'selenium-ch',
port: 4444,
If you are hosting the project on Buddy, you can edit the config file directly in the Code tab.
- The pipeline is ready. Make a push to the assigned branch or click the run button to launch it manually. If everything was properly configured, the test will pass and a screenshot will appear in the pipeline's filesystem:
Please mind that the first execution will take a bit longer as Buddy needs to download and install the dependencies.
Applying unique name per execution
Buddy will execute the pipeline and grab a fresh screenshot every 1 hour. However, every subsequent execution will overwrite the original screenshot. You can change this behavior by appending the pipeline execution ID to the file name with an environment variable.
To do that, we shall use the $BUDDY_EXECUTION_ID parameter. Let's modify the script:
In
selenium.jschange the value to.saveScreenshot('buddyworks-' + process.env.EID + '.png')In the build action change the command to:
EID=${BUDDY_EXECUTION_ID} node selenium.js
This way every new screenshot will be generated with the ID of the execution in the name. The screenshots will have unique names which prevents overwriting.
Selenium and WebDriverIO with Mocha, Jasmine, Cucumber
Capturing screenshots is one of many tests that can be run with Selenium. Usually, the tests are run in sequence with a test runner. WebDriverIO has its own test runner, compatible with frameworks such as Mocha, Jasmine, or Cucumber. In this example, we'll show you how to use Mocha in WebDriverIO.
WebdriverIO configuration
Let's create a brand new project for this:
mkdir my-second-test && cd my-second-test
npm init
When asked about the test command, provide the following:
wdio wdio.conf.js
You can accept the default values for the rest of the questions with enter. Now we have to install WebDriverIO:
npm install webdriverio --save
The next step is defining the framework that we want to use. You can do it with the built-in config creator:
./node_modules/.bin/wdio config
Just like with npm install you can confirm most options with enter—just make sure to enter mocha when asked about the framework.
This operation will generate the WebdriverIO config file called wdio.conf.js. Edit the file and set the browser to Chrome:
When everything is ready, execute the tests by running
npm test
However, since we haven't defined any tests yet, the command will produce a message like this:
pattern ./test/specs/**/*.js did not match any file
Off we go to define some tests, then!
Testing configuration
The path with test files is described in the config. By default, the path is
./test/specs/*/.js
With that in mind, let's create a directory for the specs:
mkdir -p test/specs
Next, add the first test.js file in that directory:
var assert = require('assert');
describe('lorem imsum', function() {
   it('test page title', function () {
       browser.url('http://lipsum.com/');
       var title = browser.getTitle();
       assert.equal(title, 'Lorem Ipsum - All the facts - Lipsum generator');
   });
});
Launching the file locally
To execute the tests locally, install the Selenium Standalone Server. With the server in place, simply run the npm command:
npm test
You'll notice the first test has crashed because the title of the website was different than expected.
Test automation (On push)
Just like with single Selenium tasks, Buddy lets you automatically trigger test runners on specific conditions.
Sign up to Buddy with your Git provider to get started:
Create a new project and select Buddy as the provider (or select a repository with a Node project that you can test):
Push the newly created files
test/specs/test.js,package.json, andwdio.conf.jsto the repository.Add a new pipeline with the following settings. This time we'll run the tests on every push to Git:
- Trigger mode: On push
- Branch assignment: Master
- Select the Node.js action and add it to the pipeline. Leave the default npm commands as they are:
npm install
npm test
- Switch to the Services tab and attach
Selenium Chrome:
Make sure to update your config file with the details of the testing server:
host: 'selenium-ch',
port: 4444,
If you are hosting the project on Buddy, you can edit the config file directly in the Code tab.
- When you're ready, make some changes to the repository files and push them to the assigned branch. Buddy automatically pick up the changes and launch your tests:
Summary
Thorough test coverage on all levels ensures that your application is stable and well performing, with Selenium being just a part of the bigger suite.
Tools like Buddy can help you automate any type of tests, from unit testing to daily integration tests to Cypress.io testing.
What's more, a CI pipeline can be easily upgraded to a fully fledged Continuous Delivery pipeline by adding new actions, like builds, deployments and remote scripts.
Stay safe, test often & deliver awesome software!