Node.js服务器连接到AWS Aurora Serverless
Serverless technologies specialize in allocating dynamic resources on-the-fly, charging per use, and making scalability a worry of the past. AWS Aurora Serverless is Amazon’s serverless database solution and it’s been around since 2018, with a version 2 out available for preview now.
However, Aurora Serverless must be hidden away from the public eye in an Amazon Virtual Private Cloud (VPC), connecting to it locally is a challenge, and connecting to it in a CI build is even more of a challenge. Luckily, Buddy makes it easy to navigate the networking and get you connected in no time.
1. Prerequisites
- Git environment
- Node.js
- CMD / Terminal
- Code editor like Visual Studio Code, SublimeText or Notepad++
- A free AWS account (you may incur small costs though!)
2. What is serverless computing?
Serverless computing is the idea that a service is only running when it is being used, and – perhaps more importantly – you only pay for it while it's being used!
A traditional web server setup would look like a database that's up and running, and a backend up and running and waiting for HTTP requests. With serverless computing, upon a controller receiving a HTTP request, a server is spun up, and instance of a database is spun up, and, after responding, they all go back to sleep. There is usually built-in scalability as well—in the case of AWS Aurora, you don't have to worry about running out of connections as much as you would with a traditional setup.
It's not without its drawbacks though! While the promise of "pay only what you use" sounds great, sleeping services can take some time to wake up, and typically there are costs associated with startup. That being said, serverless computing looks promising, and even if it's not perfect now, its future is bright.
3. Config: Serverless database
If you already have an Aurora Serverless database cluster set up, you can skip the following AWS sections. However, it may be worth going through them to make sure your cluster is set up correctly for external access.
We'll start in Amazon Web Services (AWS) which require no introduction. If you don't have an AWS account, there is a free tier that includes some premium features for the first 12 months. It requires a credit card, and you may incur some small charges if you go over free limits (probably accidentally), but they will likely be under 7 USD.
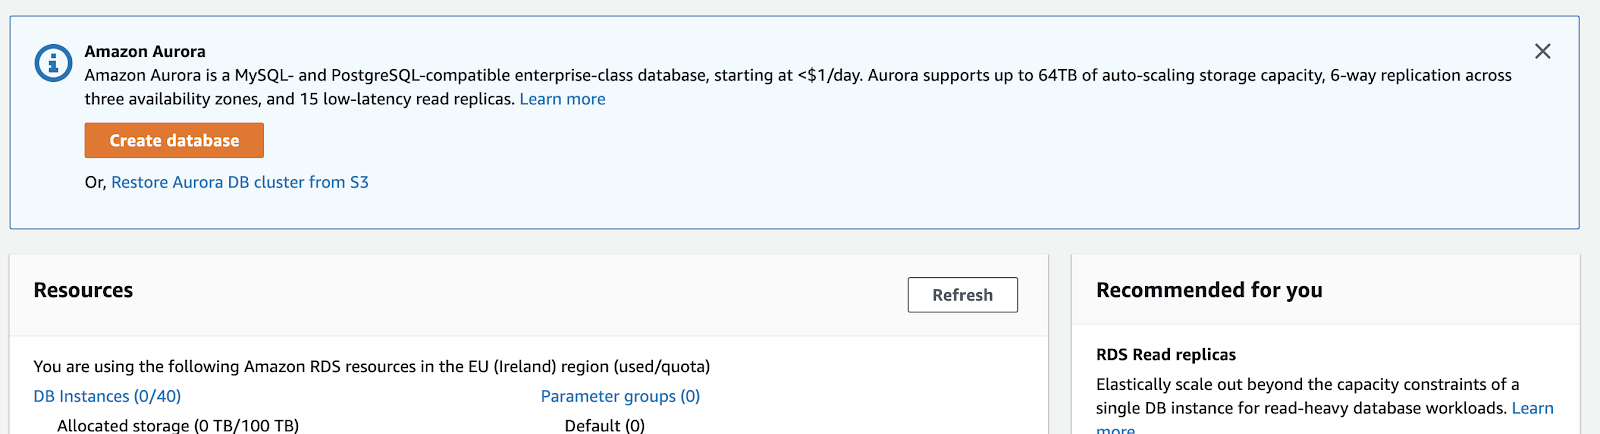
Jump into the AWS management console and open up RDS. Follow these steps to create your serverless database.
- Click Create database to begin configuration:
- For Engine type, choose
Amazon Aurora, and for Edition, chooseAmazon Aurora with MySQL compatibility:
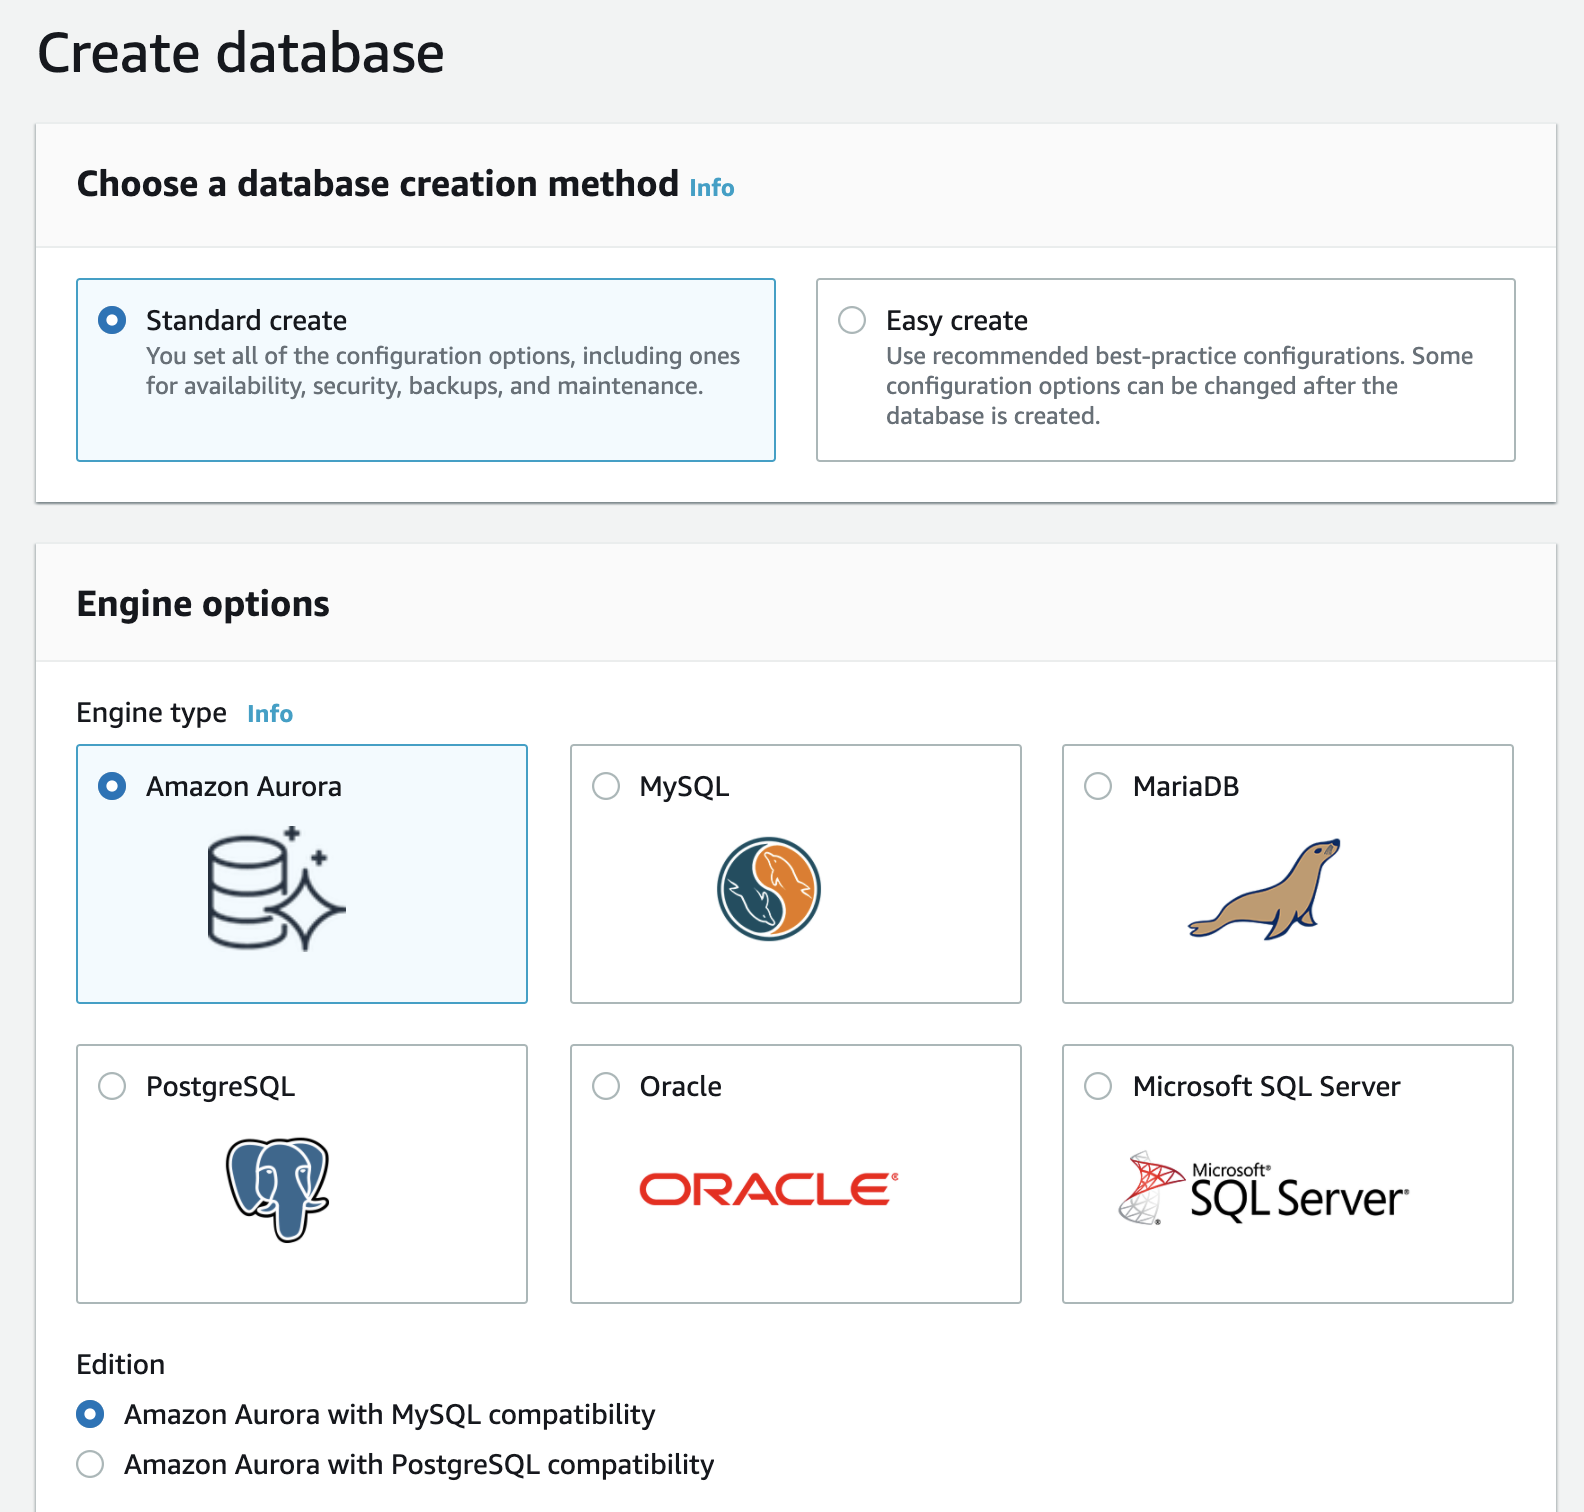
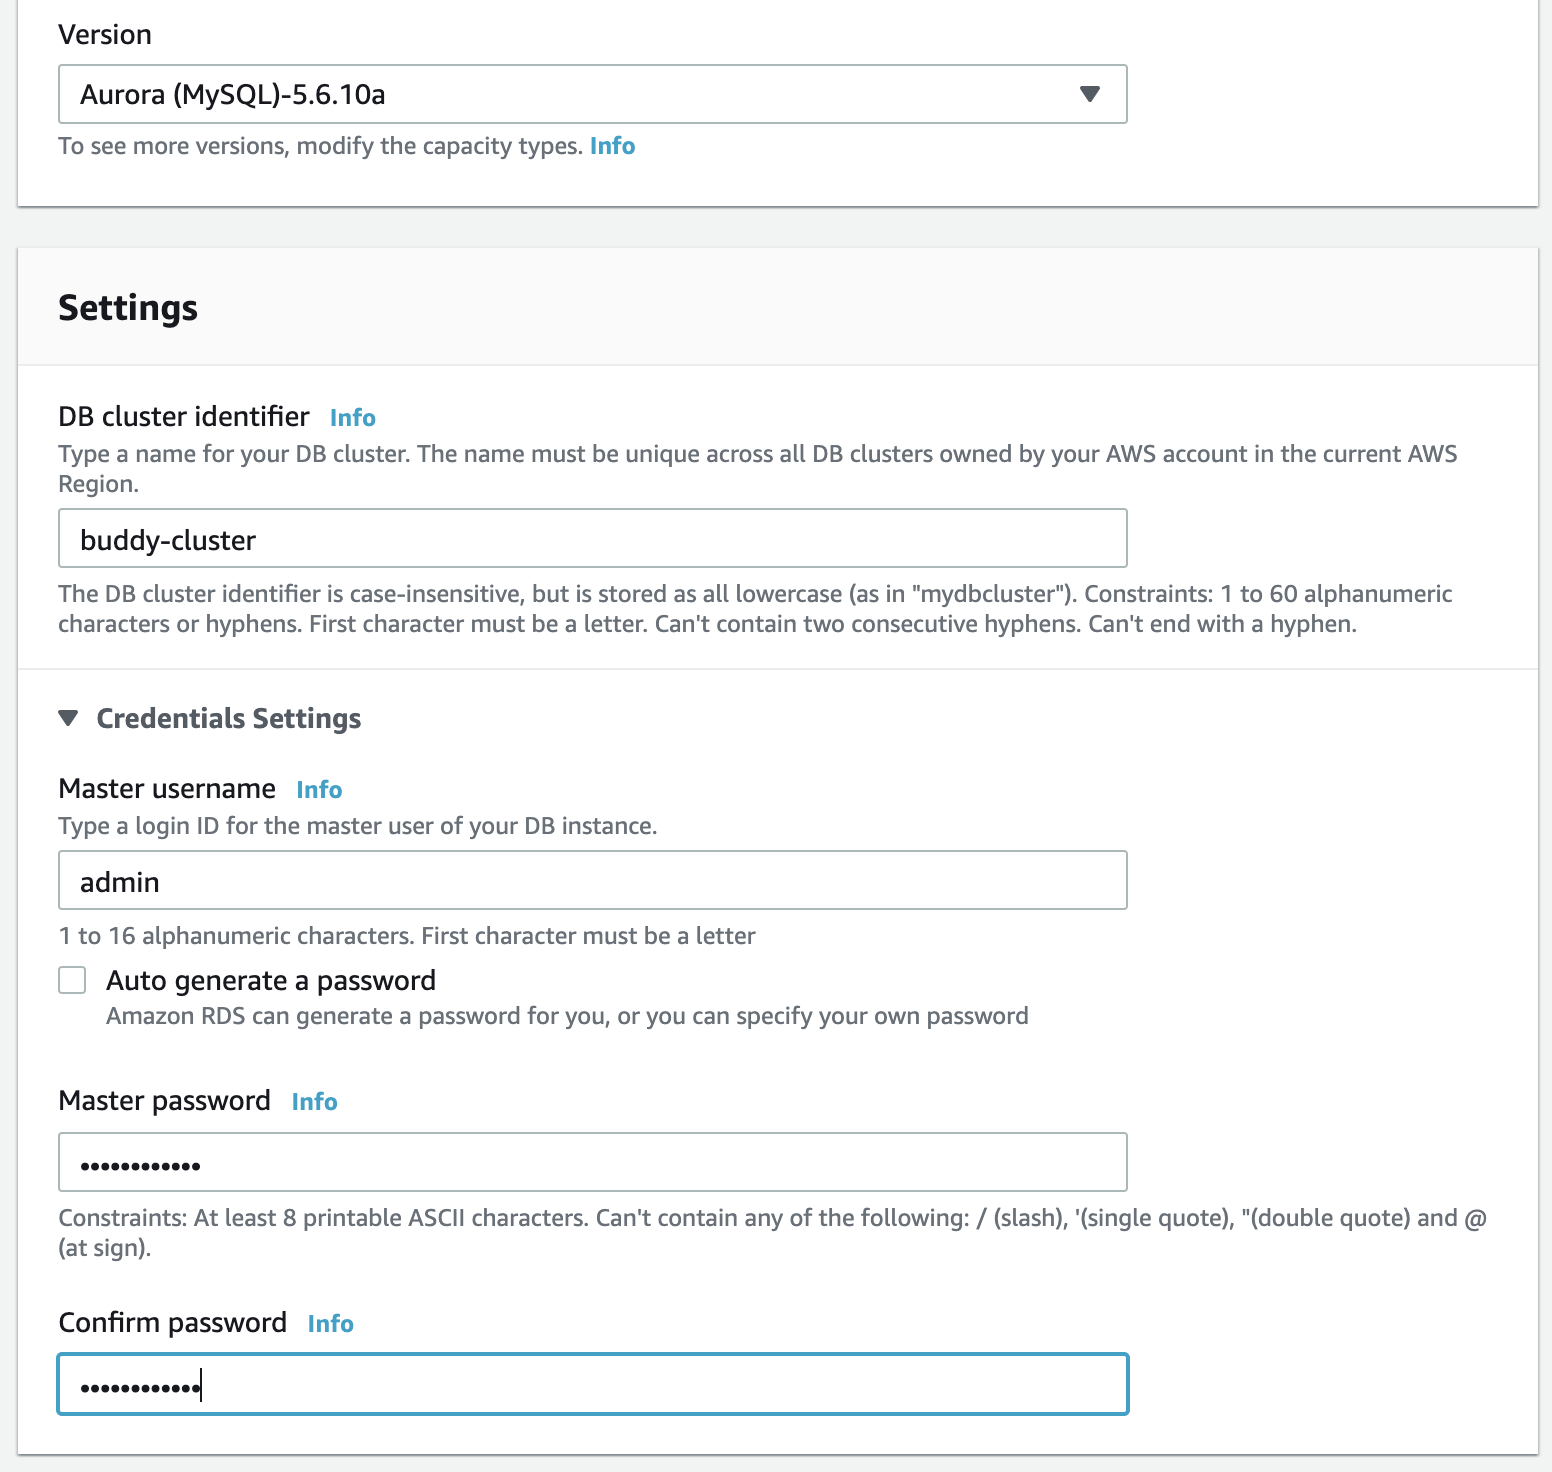
- For Capacity type, choose
Serverless. You can leave Version as default (in this case,Aurora (MySQL)-5.6.10a). - For DB cluster identifier, you can use any name. It is unrelated to the actual database name. Let's use
buddy-clusterhere. - Under Credentials Settings, set the username and password.
Make sure to keep track of the credentials, this user is the actual database admin user!
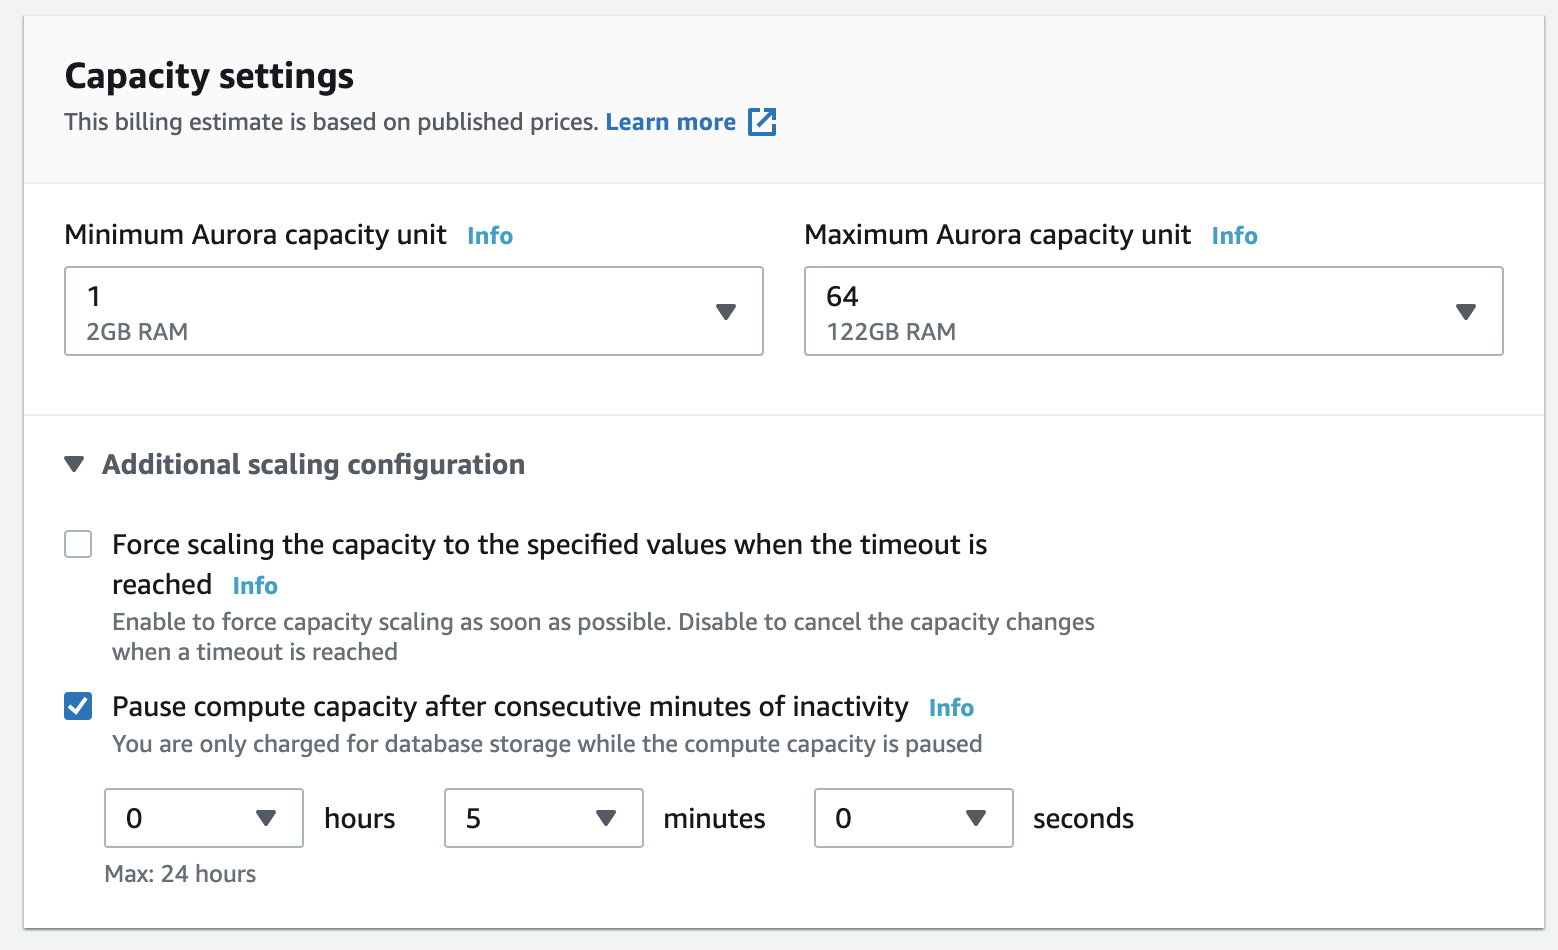
- Under Capacity settings, set the minimum capacity to
1. - Open the Additional scaling configuration toggle and check the option to pause compute capacity after a time of activity—this is so that when you're not using it, it'll go to sleep and you won't be charged for it!
- In the Connectivity section, leave everything as default.
You can note down the VPC's ID as you will need it later on.

- Scroll down to the Additional configuration section and set the initial database name to
dev:
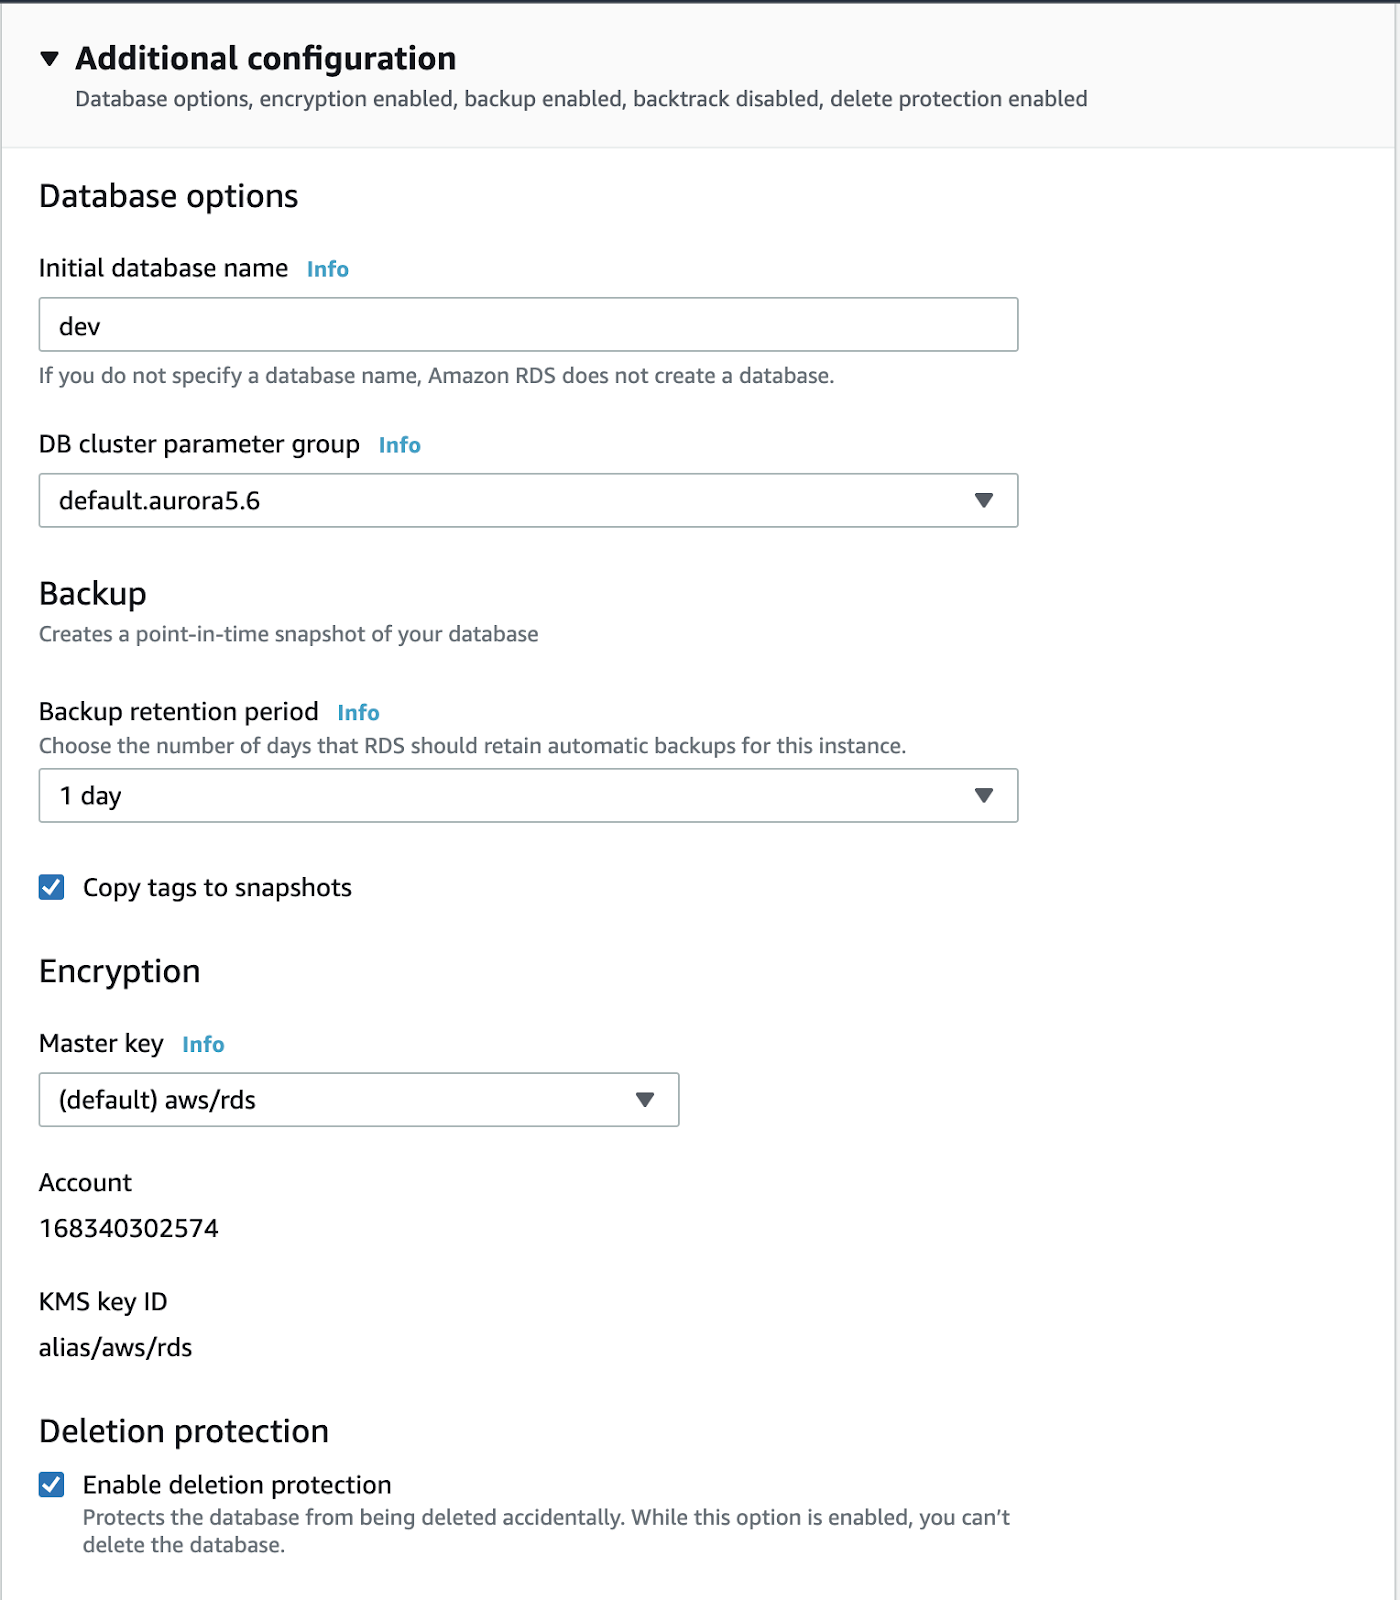
- When ready, scroll to the bottom and click Create database:

It will take a few minutes for the database to be available—watch the spinner at the top of the screen! When it's ready, the screen will go green:
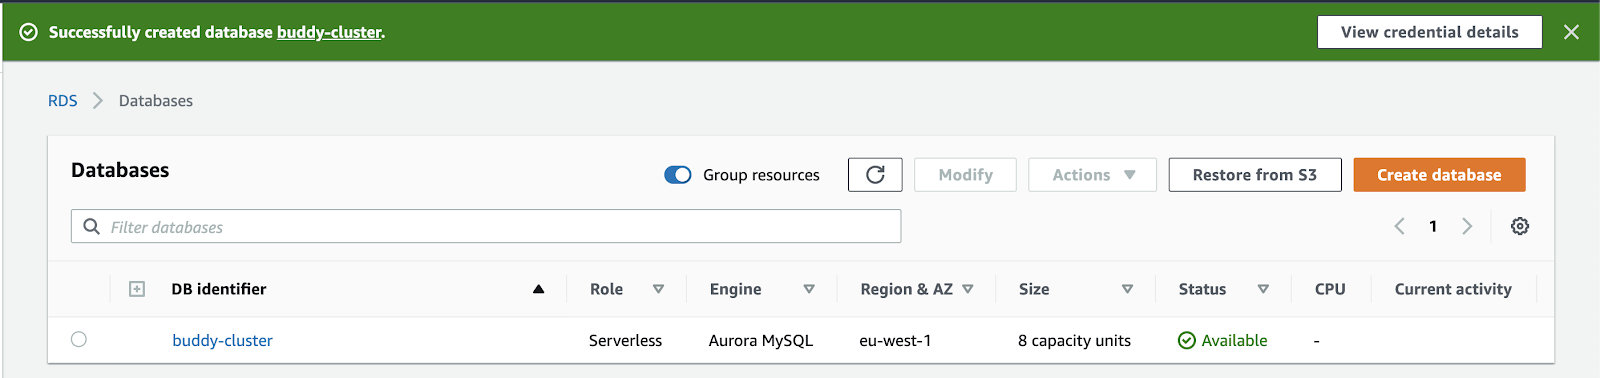
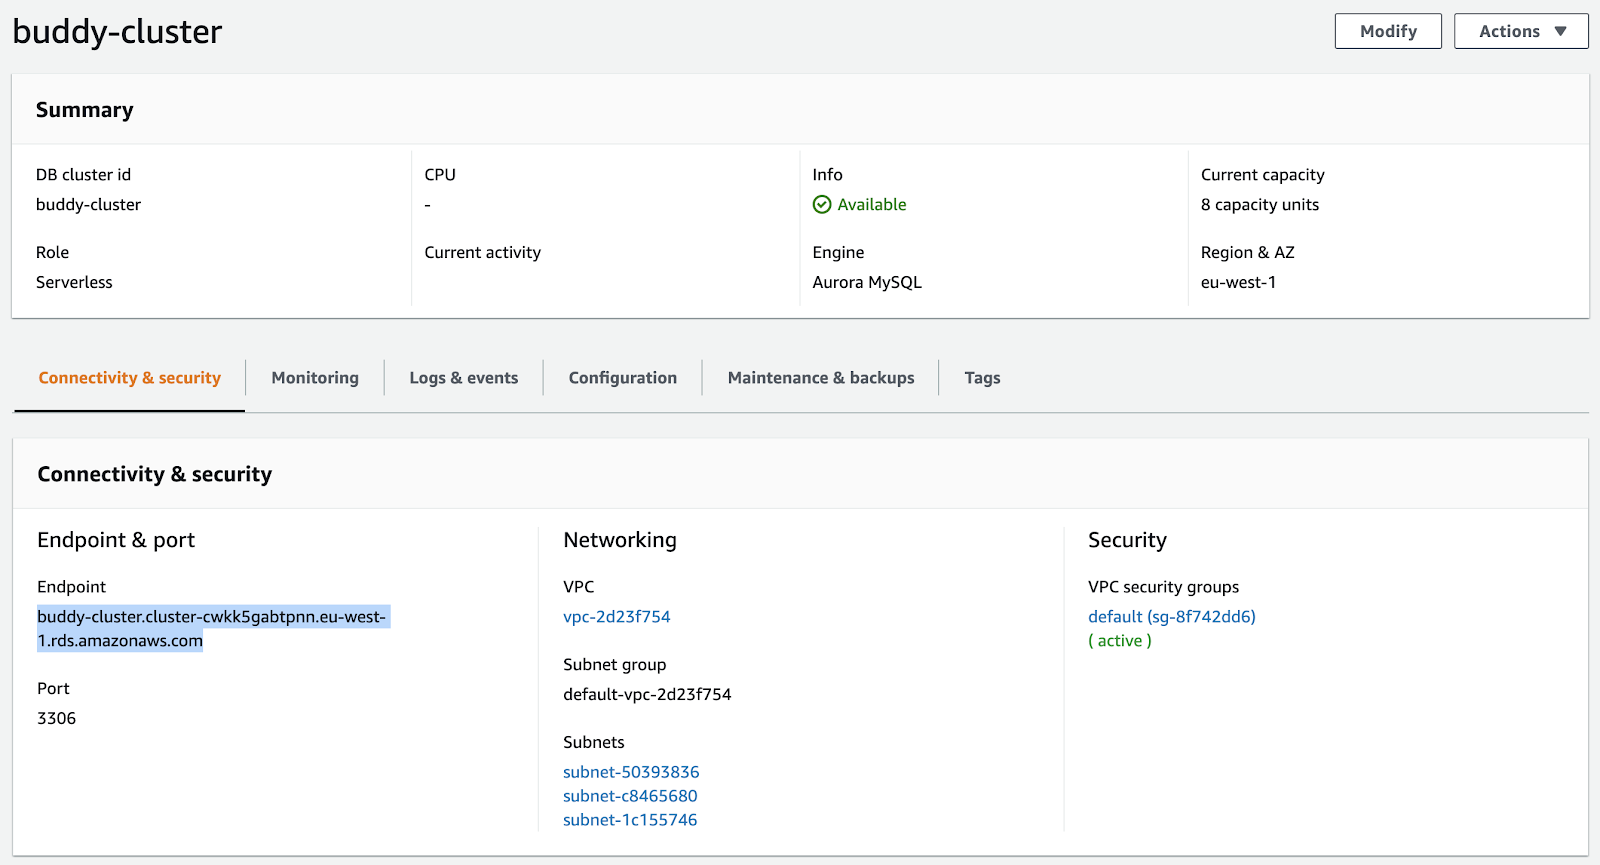
Click the name of the database to bring up its details. Take note of the Endpoint value in the Connectivity & security section at the bottom (it should start with buddy-cluster.cluster-):

Now that your database cluster and database is up and running, we're going to access it via the terminal.
4. Config: AWS Cloud9
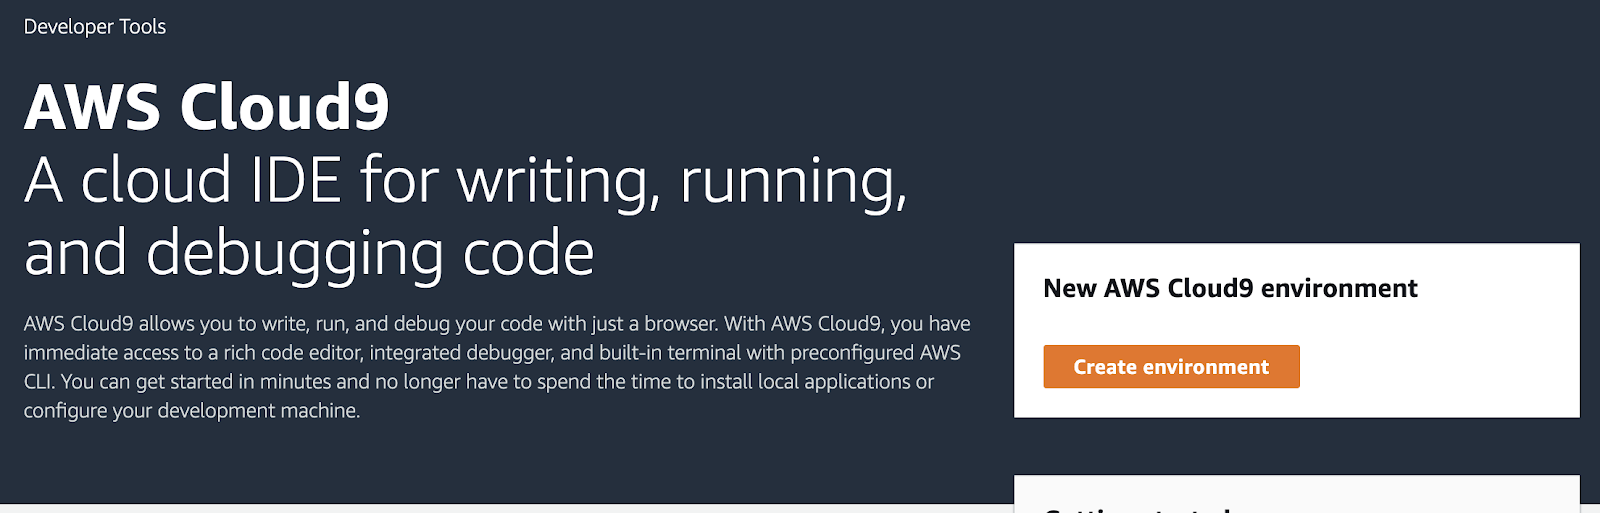
AWS has a product called Cloud9 that it uses to access AWS resources that are hidden inside of a VPC via a typical Unix terminal. It's a bit of a pain to get set up, but once it works, it works very well.
Go to your AWS management console and open up Cloud9. Follow these steps to set up your environment:
- Click Create environment:
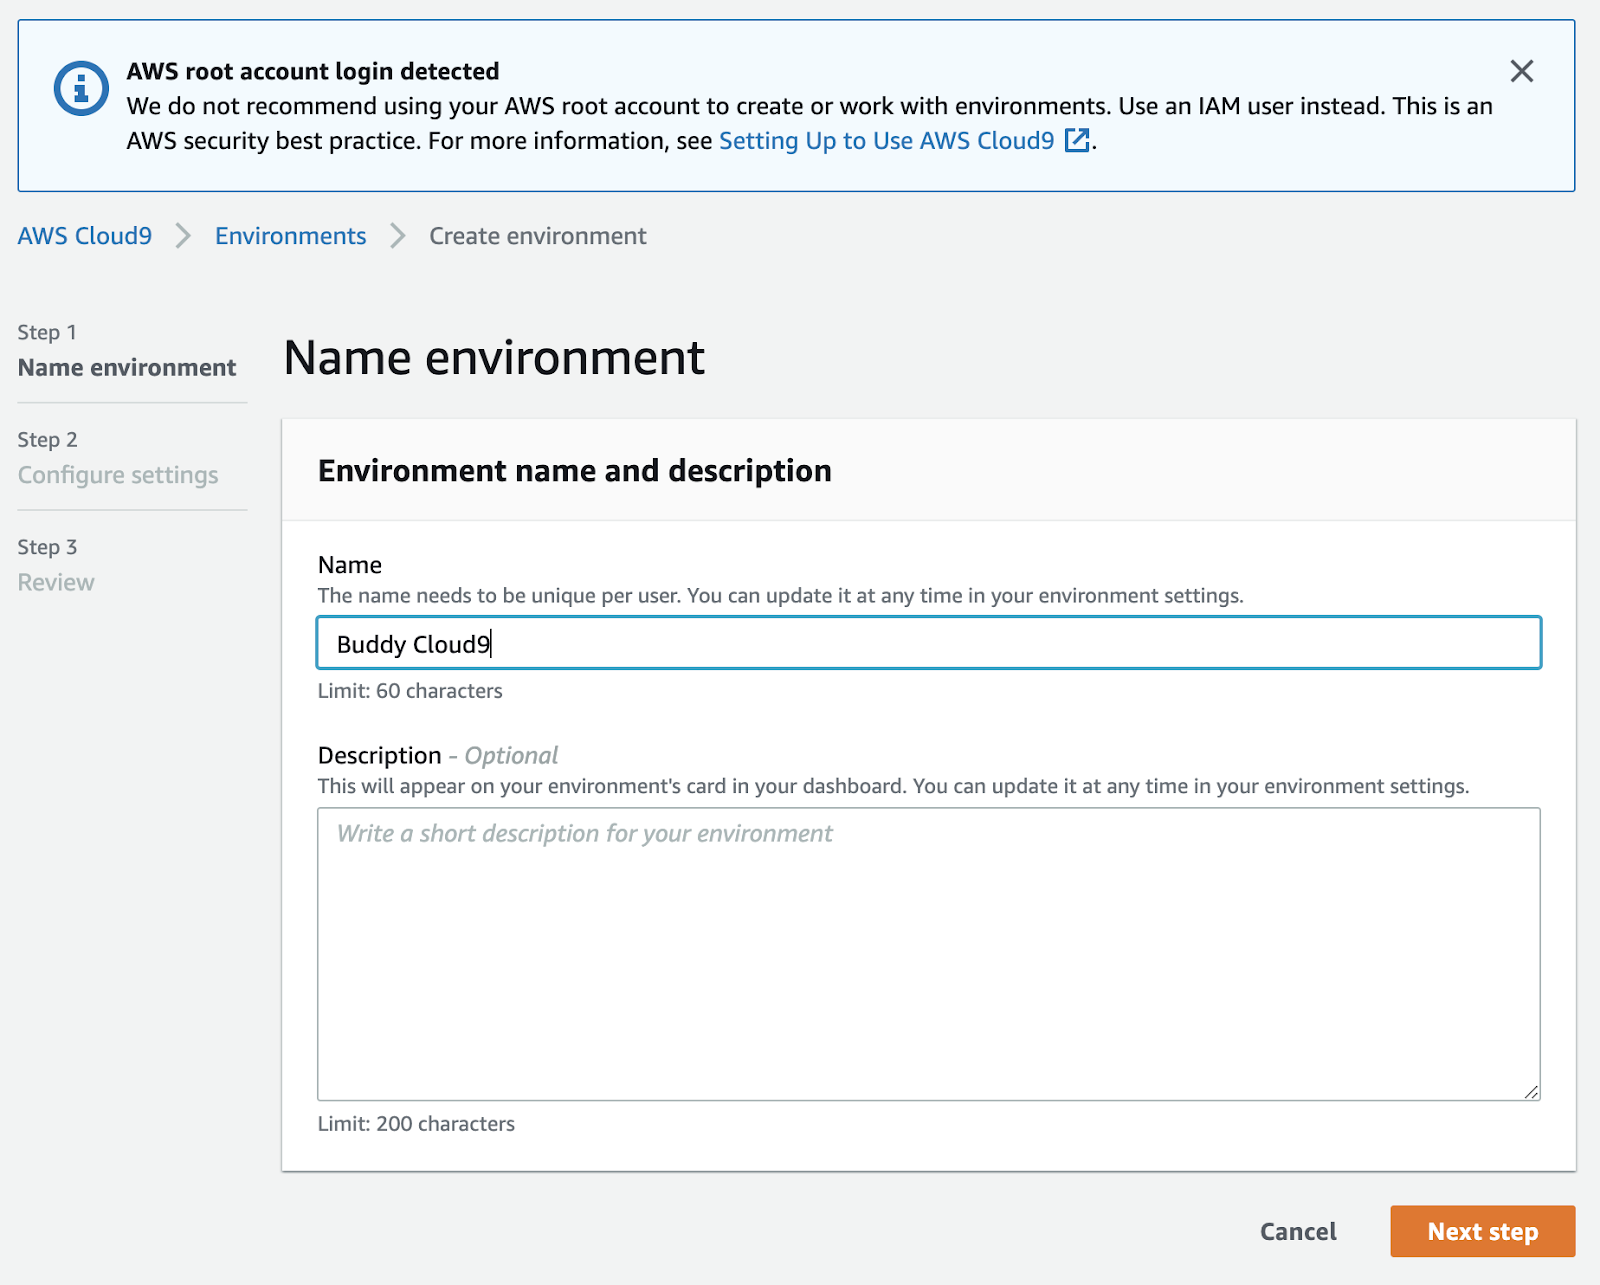
- Give your environment a telling name (e.g.
Buddy Cloud9) and click Next step to proceed:
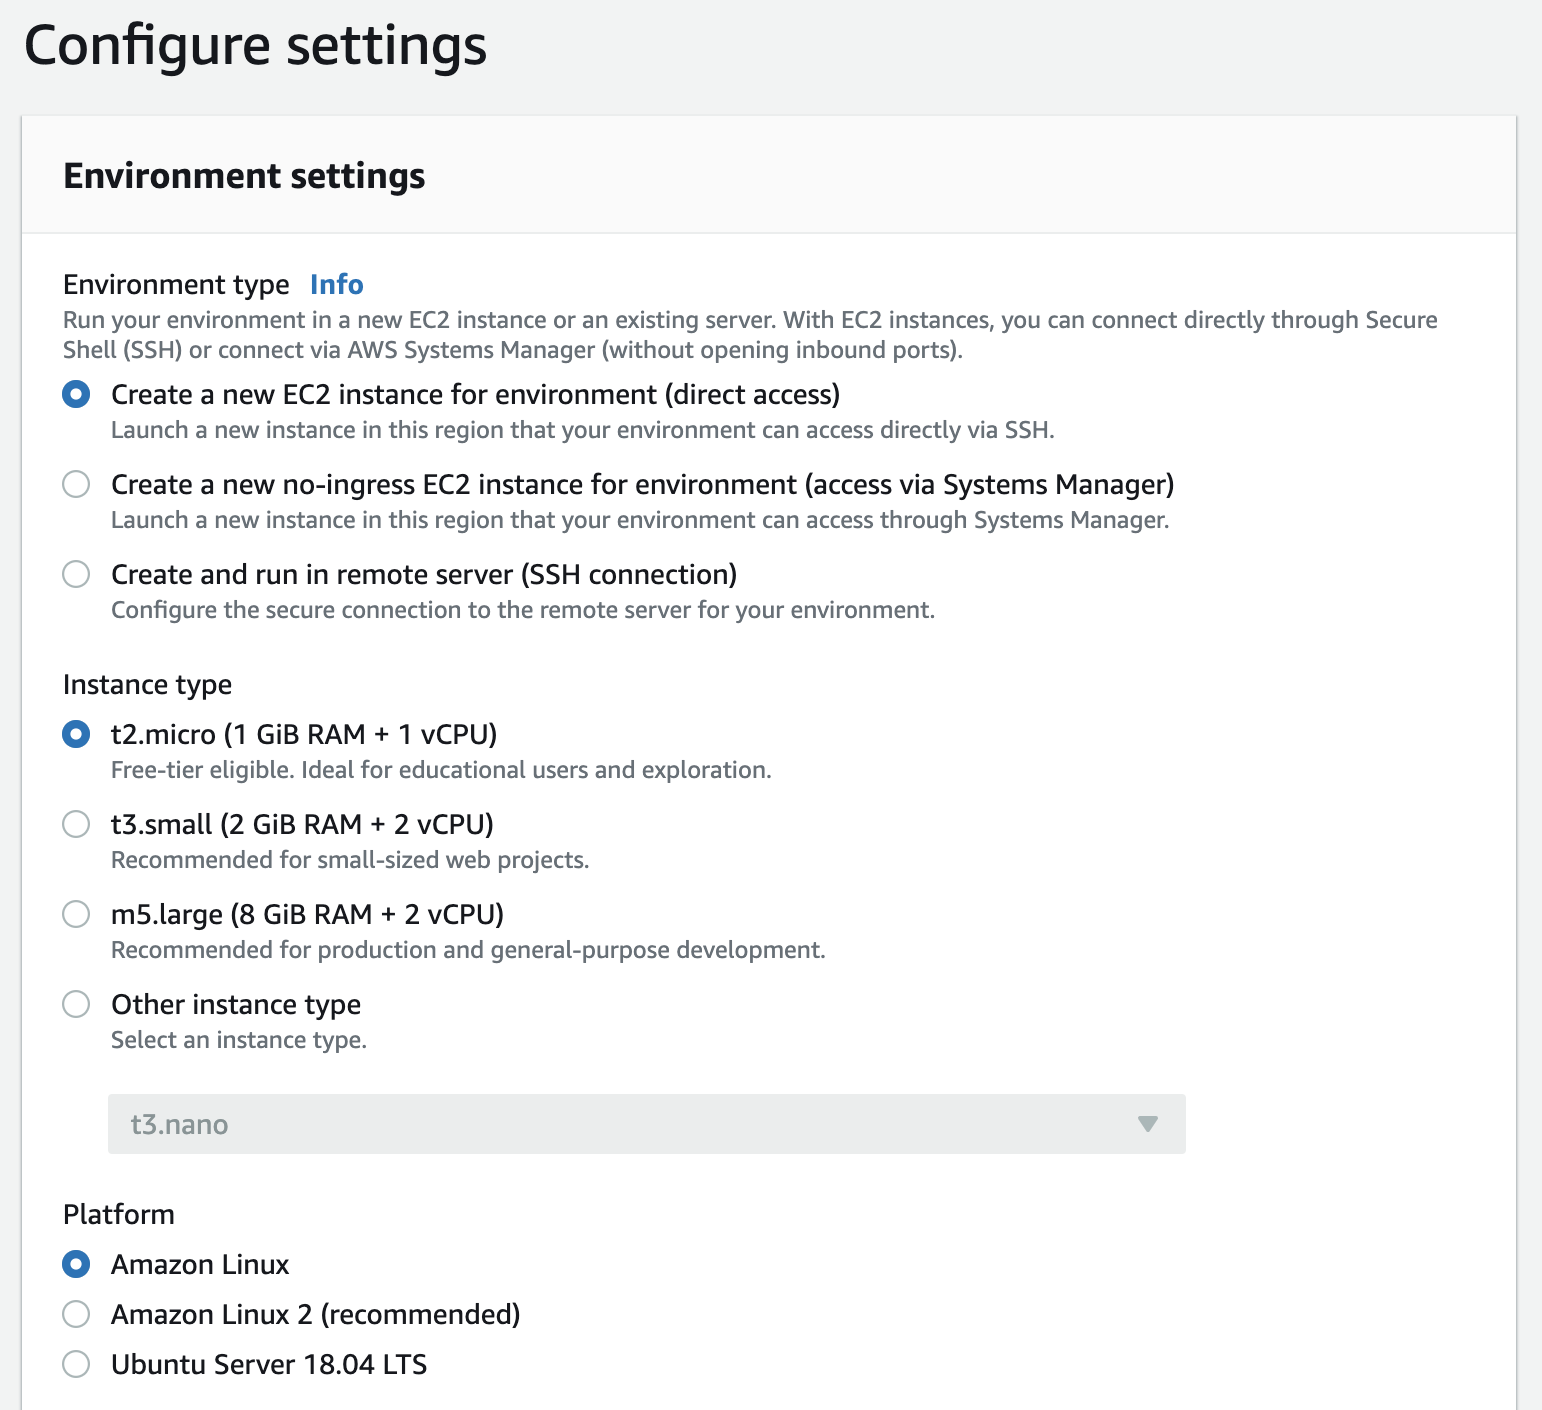
- For the environment, select
Create a new EC2 instance for environment (direct access).
This means that you'll have an EC2 instance running your environment with a public IP address giving you public access to your serverless database (with authorization of course).
- For the instance type, choose
t2.micro (1GiB RAM + 1vCPU)and for platform, chooseAmazon Linux:
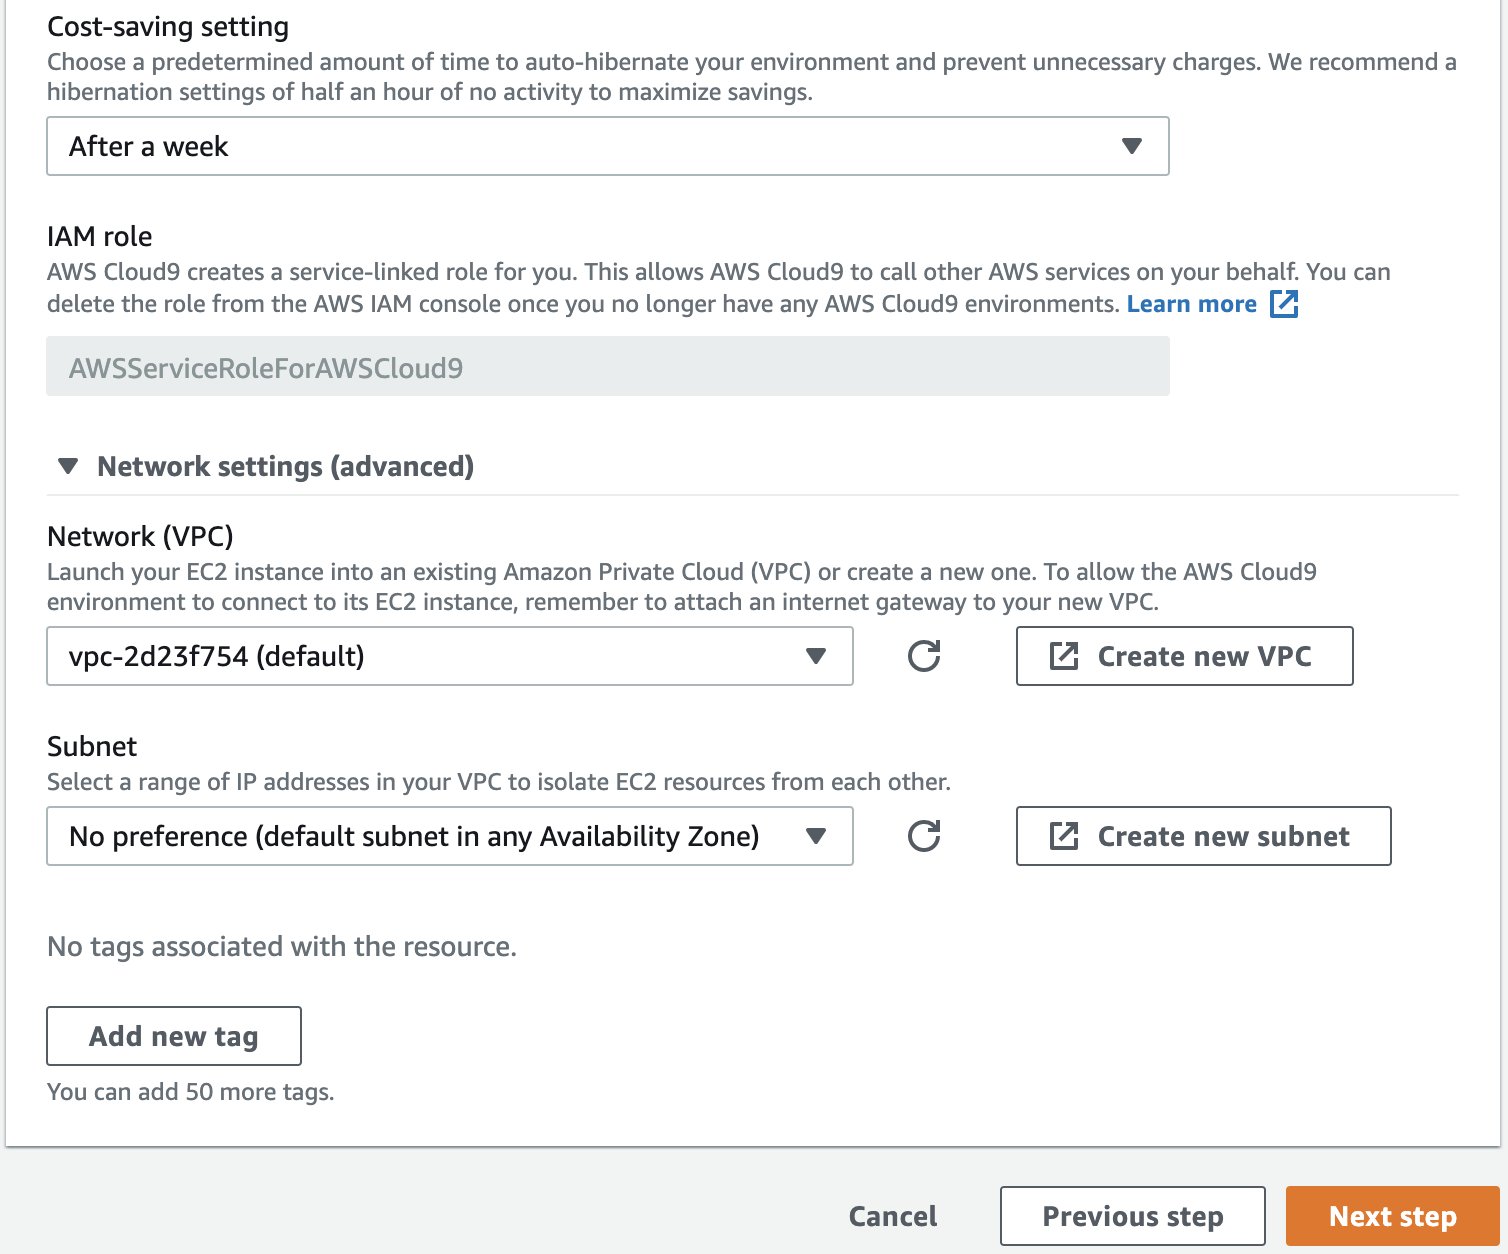
- For Cost-saving settings, choose
After a weekorAfter a day. This will cause the EC2 to turn off after a week or day of not being used.
If the EC2 does turns off, it will have a different public IP address once it turns back on. For this reason, this setting is pretty good for development, but very poor for production use. For production use, select Never
- Open the Network settings toggle and confirm that Network (VPC) matches the VPC property of the Aurora Serverless cluster (if you left the cluster as the default VPC, leave this one as the default VPC as well)
- Leave the Subnet option as
No preferenceand click Next step to continue.
- Click Create environment to finish configuration:

It will take a minute to set up, but soon you should see a terminal!
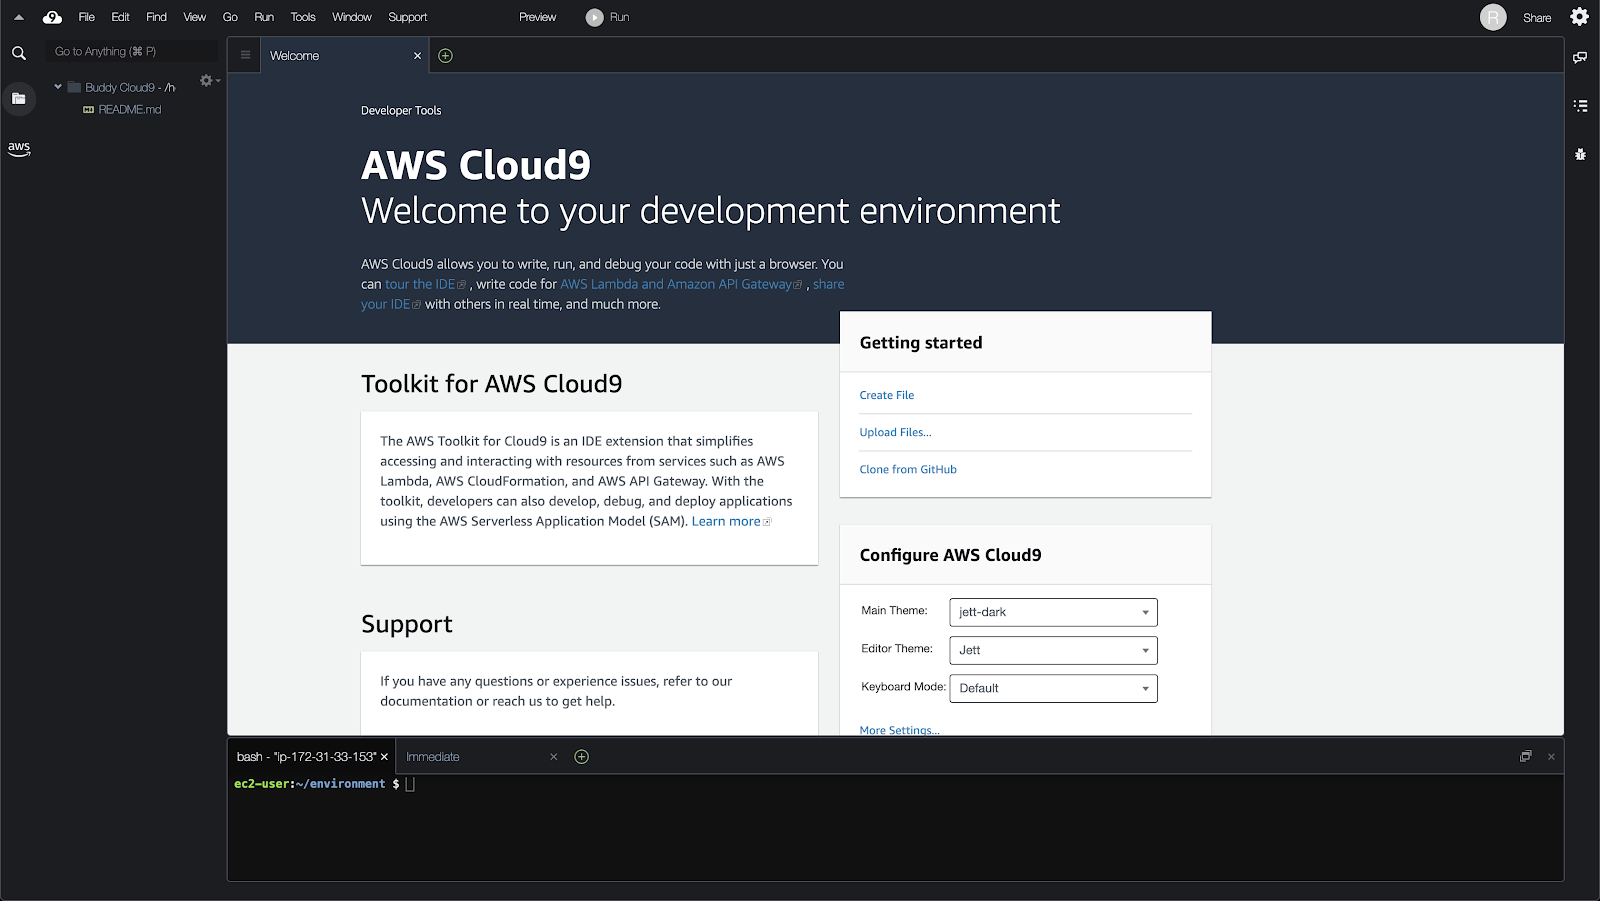
However, if you were to try accessing your database via MySQL, it won't work quite yet. There's one more step to get your Cloud9 connected to your database cluster.
5. Config: AWS VPC
Go to your AWS management console and fire up VPC. Follow these steps to configure your VPC correctly:
Configuring AWS Aurora security group
- In the sidebar on the left, click on Security Groups:
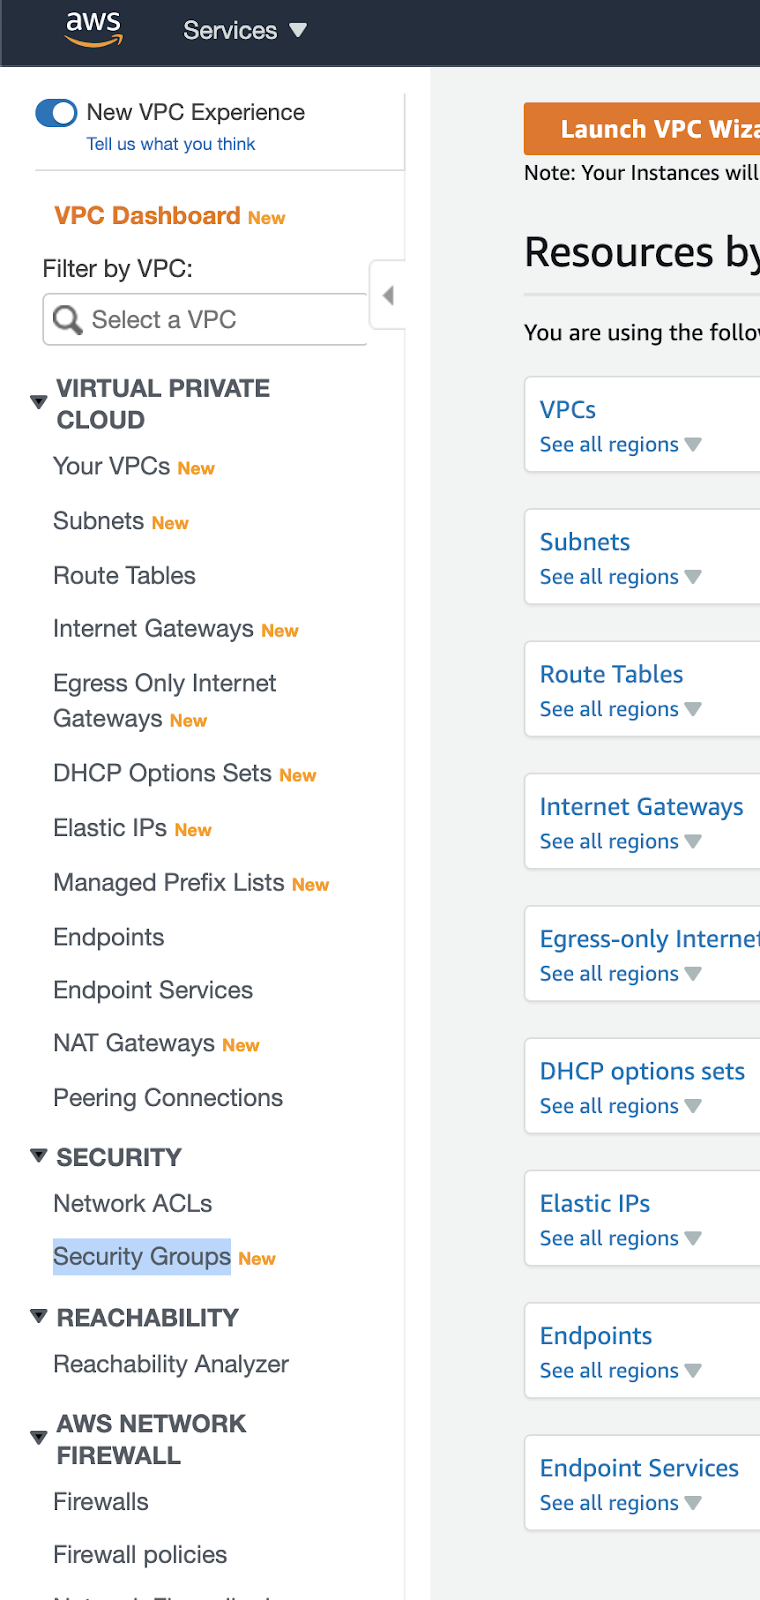
- On the list of security groups, find the one with
cloud9in the name. Copy and note down this security group ID as we will need it later. - Next, click on the ID of the group that matches the security group of your Aurora Serverless database cluster (not the one with
cloud9in the name!):

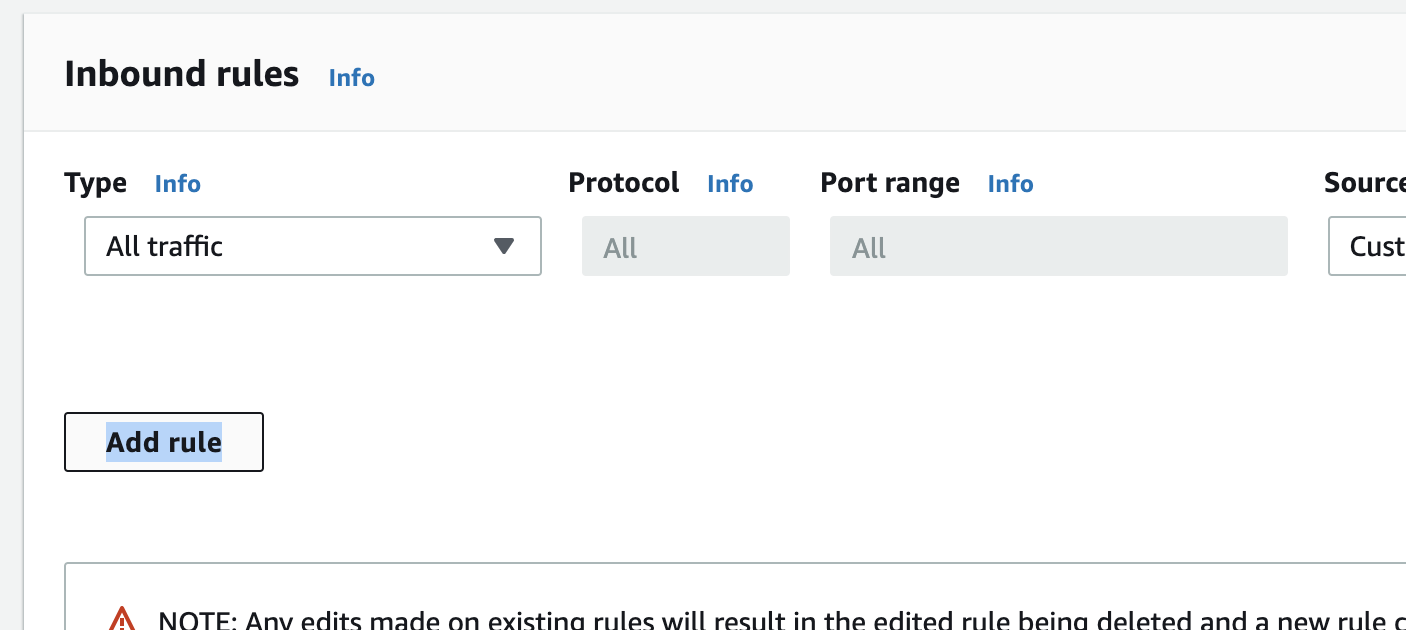
- Scroll down and click Edit inbound rules:

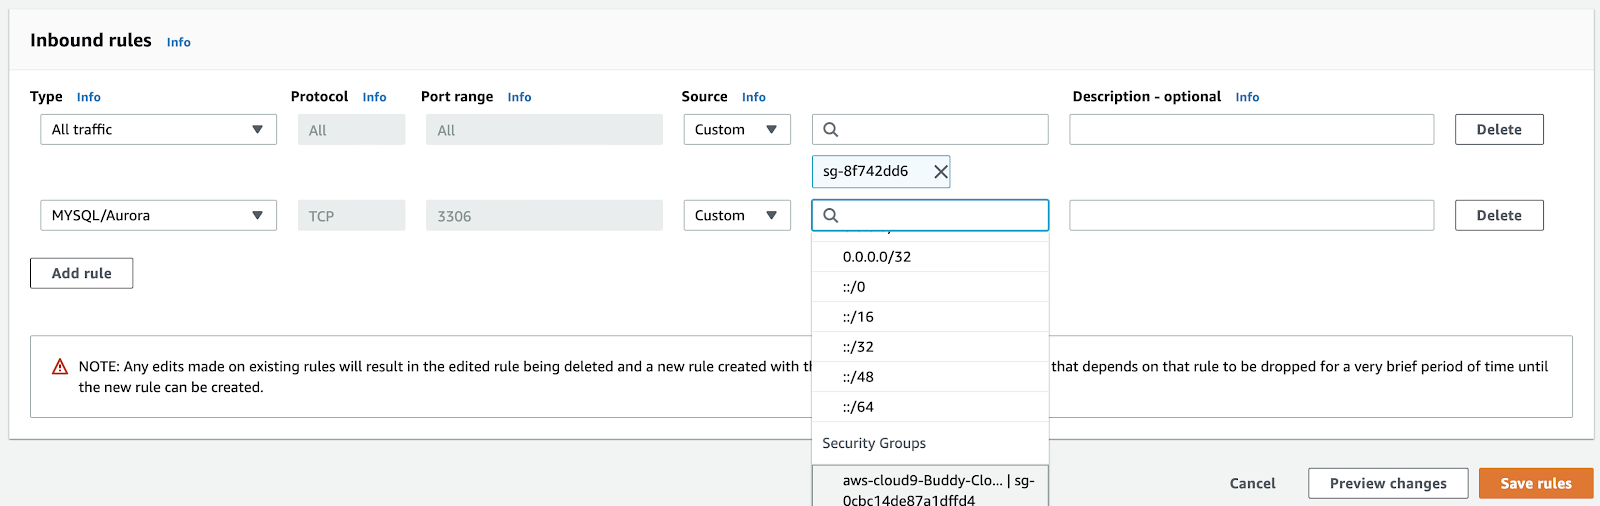
- Next, click "Add rule":
- For Type, select
MySQL/Aurora. - For Source type, select the one that says
Cloud9in the name. The ID should match the one you wrote down in step 2:
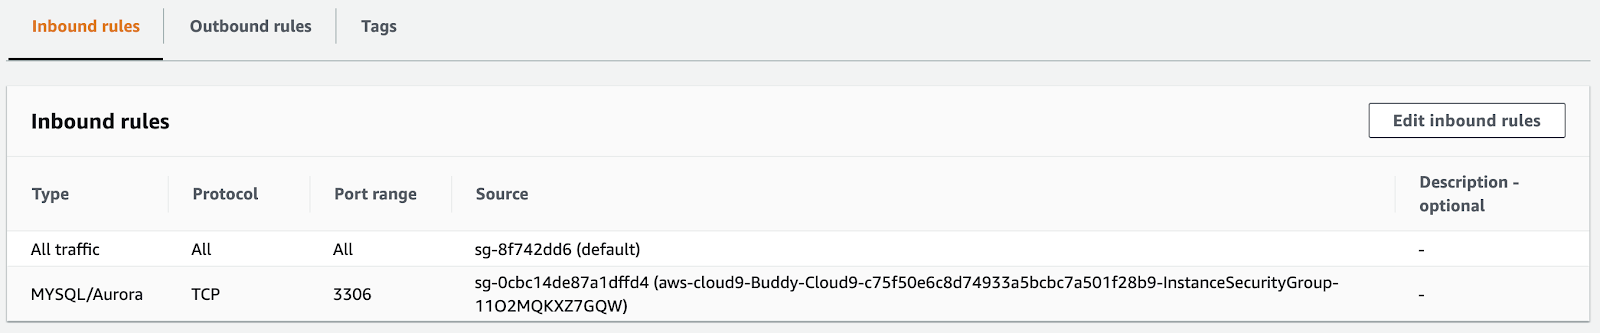
Once saved, the inbound rules configuration should look like this:
Configuring AWS Cloud9 security group
- Go back to the list of security groups and click the one with
Cloud9in the name:

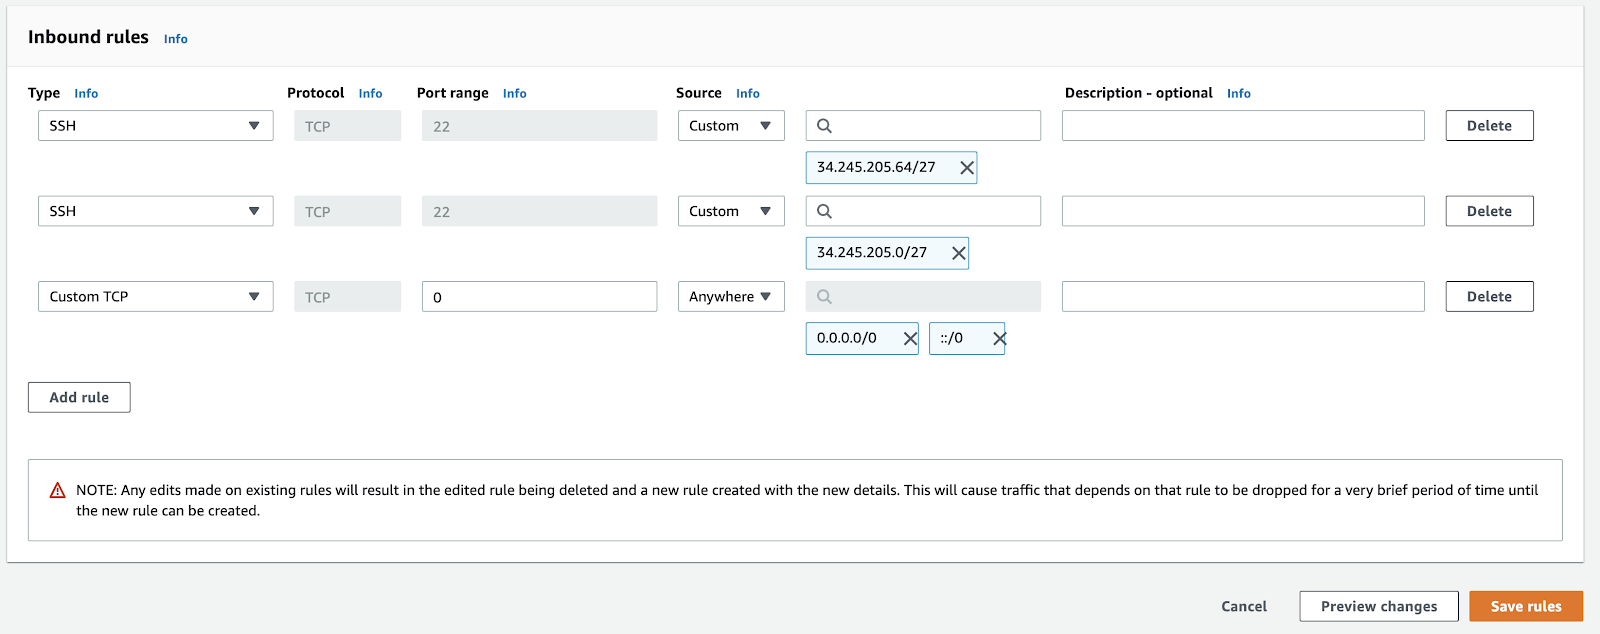
- Scroll down and click Edit inbound rules:

- Click Add rule to begin configuration.
- For Type, select
SSH. - For Source, choose
Anywhere. - When ready, click Save rules at the bottom of the page:
6. Verifying serverless configuration
Before we go any further, let's make sure that everything has gone well so far.
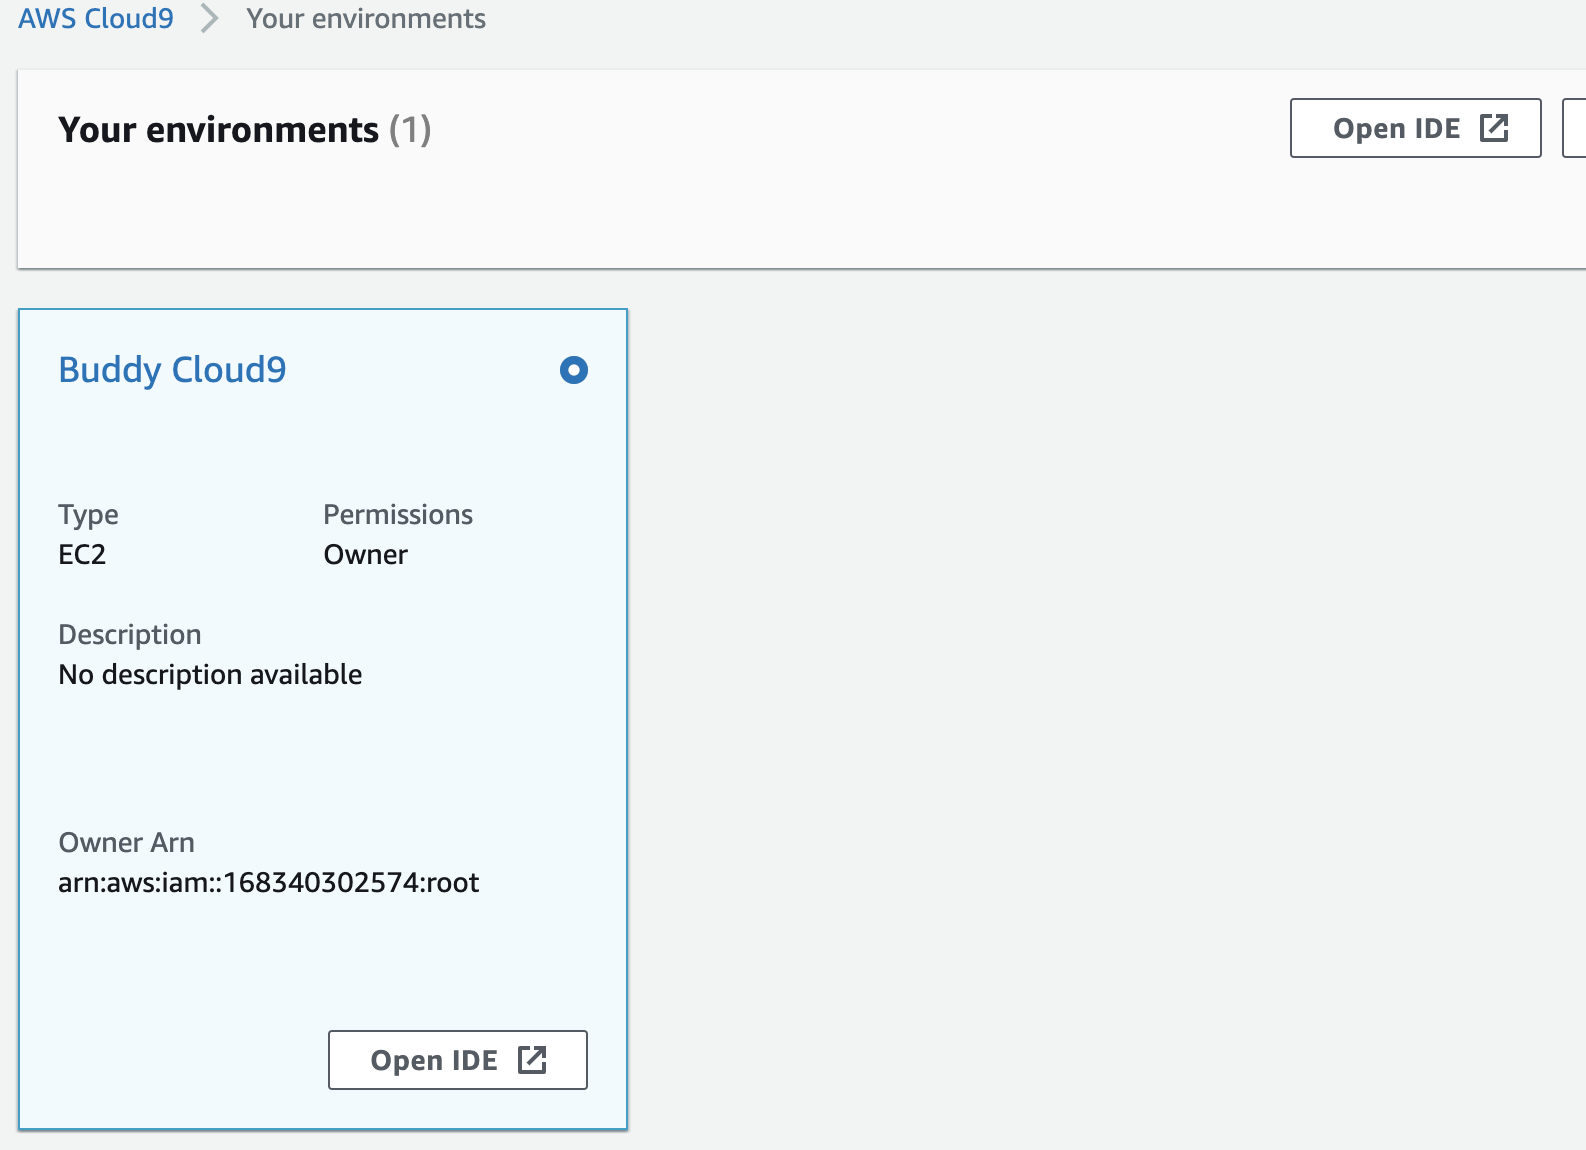
- Go to your AWS management console and open up Cloud9.
- Scroll down to the Cloud9 environment that you created earlier on and click Open IDE:
- In another tab, open RDS and click on your database cluster.
- Scroll down and copy the "Endpoint" value
- Go back to your Cloud9 tab and paste the following:
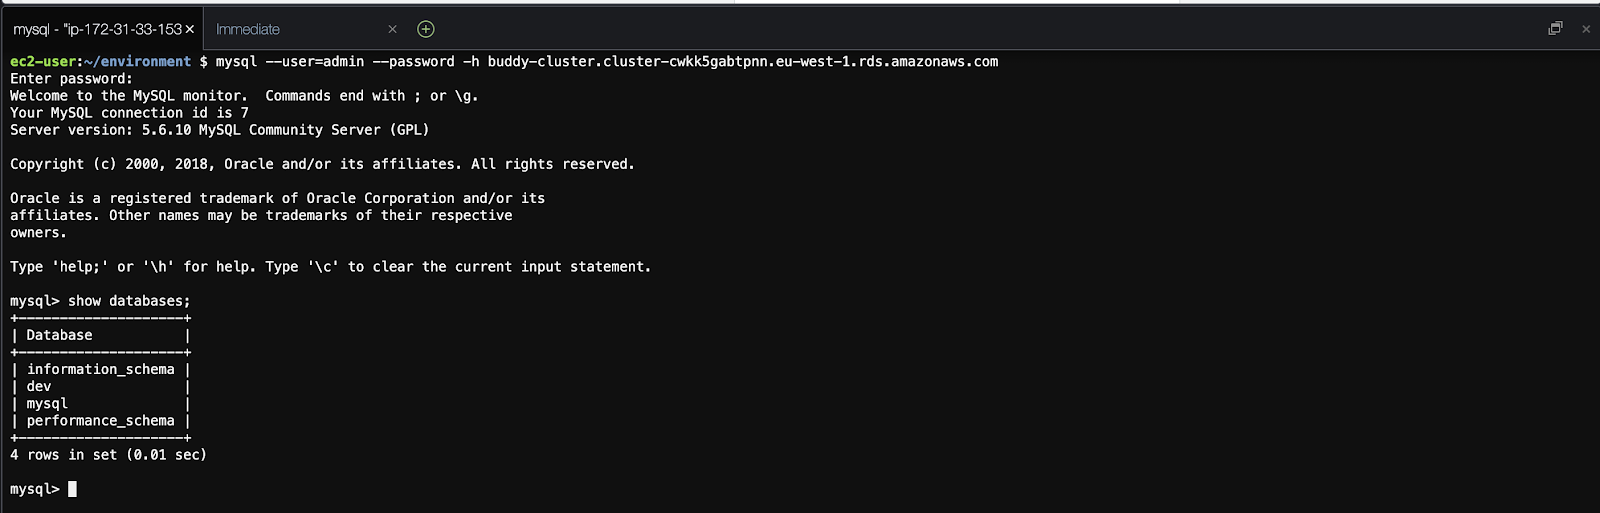
mysql --user=admin --password -h remove-this-paste-your-endpoint-value-here. - Next, enter your password that you set in the database creation steps:
It may take a few minutes to fully connect – this is because the database cluster needs to wake up. In fact, every time it falls asleep, this is the preferred way to wake it up.
You may also receive an email from AWS saying that “your request for accessing AWS resources has been validated”.
Soon you should see a typical MySQL CLI. Try entering $ show databases; to make sure that you see your database dev that you specified during the creation process. If you don't, you can also run $ create database dev; at this time.
7. Config: Node.js (Part 1)
For our NodeJS project, we'll use a simple API that fetches from our database. We'll run tests using Jest and use Sequelize for managing our database access. We won't go through building the NodeJS project here, but we have a repo ready for use! For more details on Sequelize, check out their documentation.
- Fork this repository: https://github.com/buddy-works/nodejs-aurora-serverless-article. That way it's already in your GitHub account, and it'll simplify getting it into Buddy later.
- Clone the repo to your local environment.
- Run
npm install
npm test
You will notice that the first test passes, but the second one doesn't. That's because your local server is unable to access your database – this is what we're going to solve now.
8. Connecting to AWS Cloud9
To connect our local setup to the EC2 instance hosting your Cloud9 environment, there is one more step. Open your AWS management console and go to Cloud9. Follow these steps to set up SSH access:
- Click Open IDE on your Cloud9 environment that you created earlier.
- On your local machine, copy your public SSH key. If you're on a Mac, run:
pbcopy < ~/.ssh/id_rsa.pub
- In your Cloud9 environment, run:
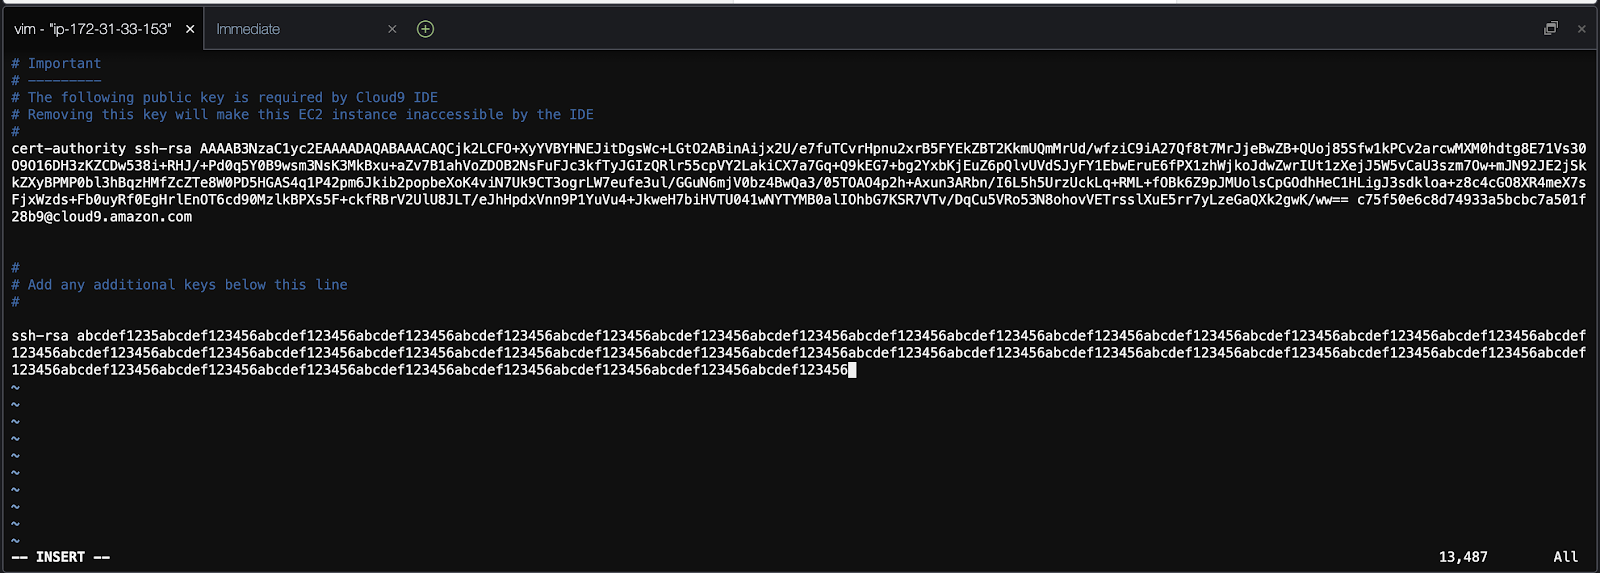
vim ~/.ssh/authorized_keys
and paste your public key there:
- Go grab your database cluster endpoint value that you noted down earlier (should start with
buddy-cluster.cluster-)

- Go grab the public IP address of your EC2 instance:

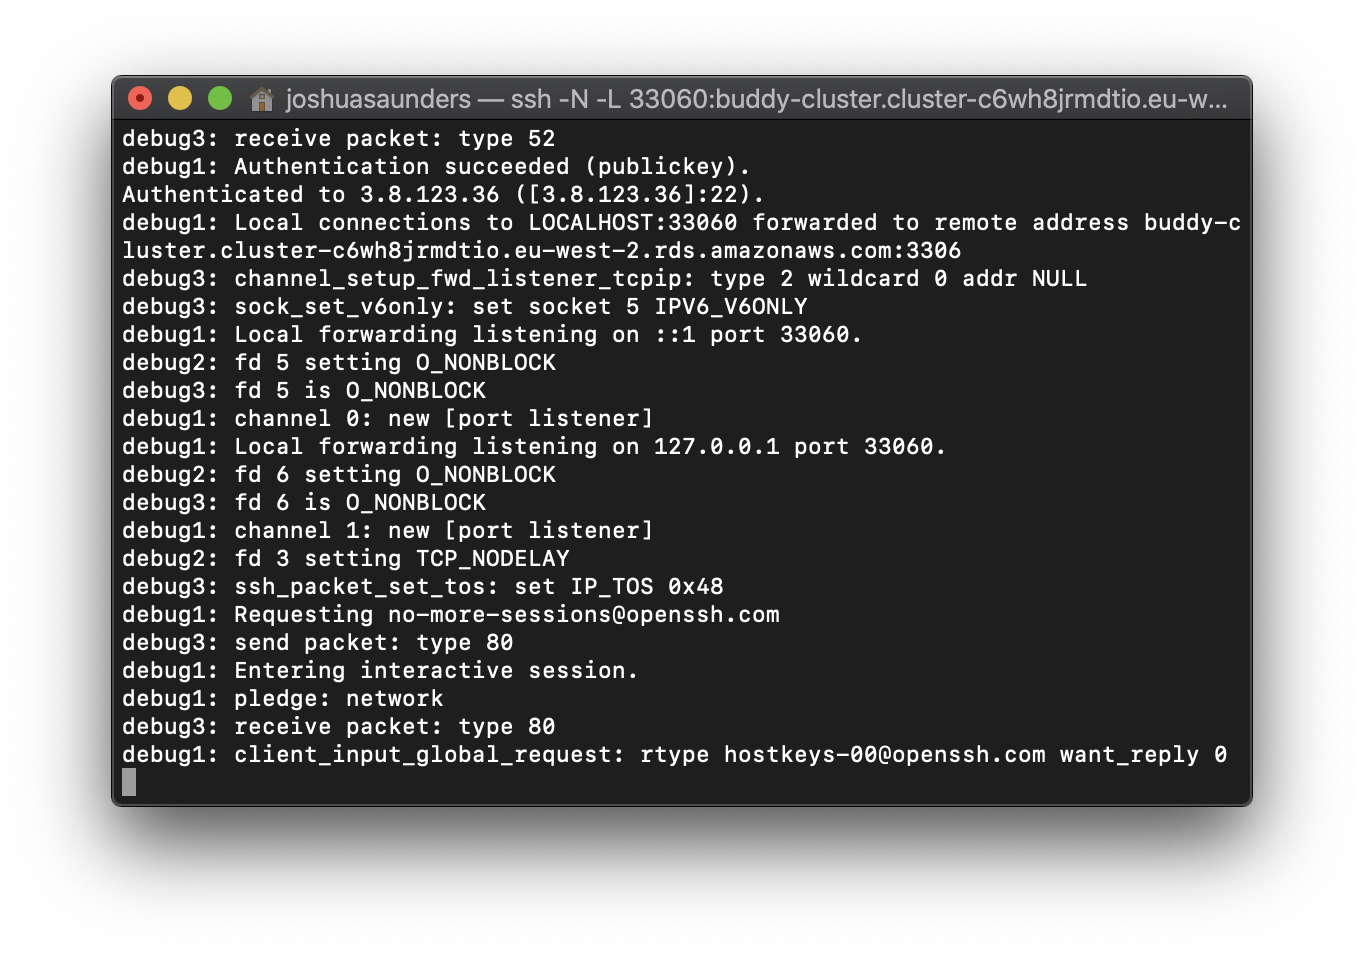
Finally, it's time for the 🦄 magic command 🦄. Run the following (inserting the relevant values and removing the angled brackets):
ssh -N -L 33060:<DB_CLUSTER_ENDPOINT>:3306 ec2-user@<PUBLIC_IP_ADDRESS> -vvv
In summary, this command forwards your local port localhost:30060 to your EC2's 3306 port, which is where your database lives:
9. Config: Node.js (Part 2)
Let's finish up getting our local project connected to the database.
- Run the SSH tunnel command if you haven't already.
- Open up the
.envfile and update the values according to what you created, but set the host to127.0.0.1and the port to33060. - Run
npm test
You should have all your tests passing now!
10. Config: Buddy CI/CD
Now that we have everything working locally, we can automate building and testing with Buddy CI/CD. This way you will no longer have to SSH to the server manually every time you want to run your integration/E2E tests with your database—Buddy will handle all of that for you.
Buddy notably sets itself apart in this process by making available its public SSH key, which is much harder to accomplish in other CI/CD platforms.
Follow these steps to synchronize Buddy with your Git repository:
- Sign up to Buddy with your GitHub account – or whatever Git provider you use to host your project
- Click Create a new project and select
GitHubas the hosting provider - Choose the repository that you forked
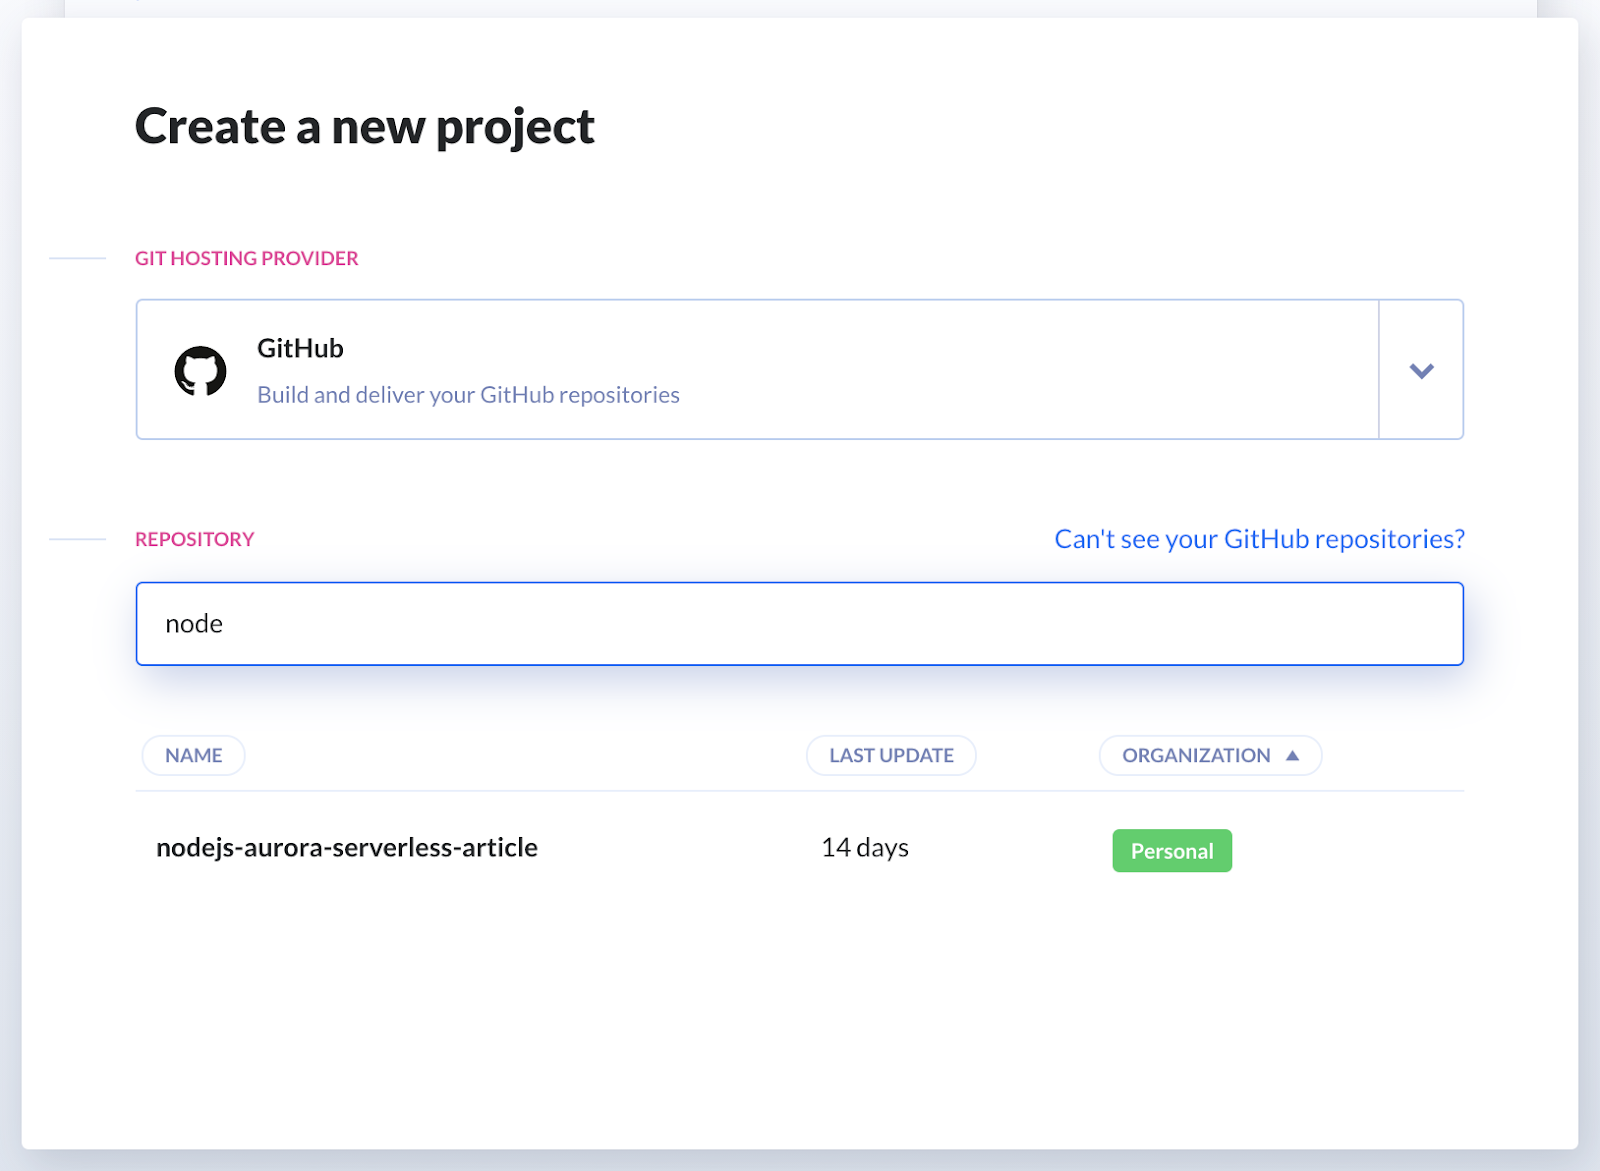
You will notice that Buddy automatically detected your project as a Node project. Nice! Now we need to configure a delivery pipeline:
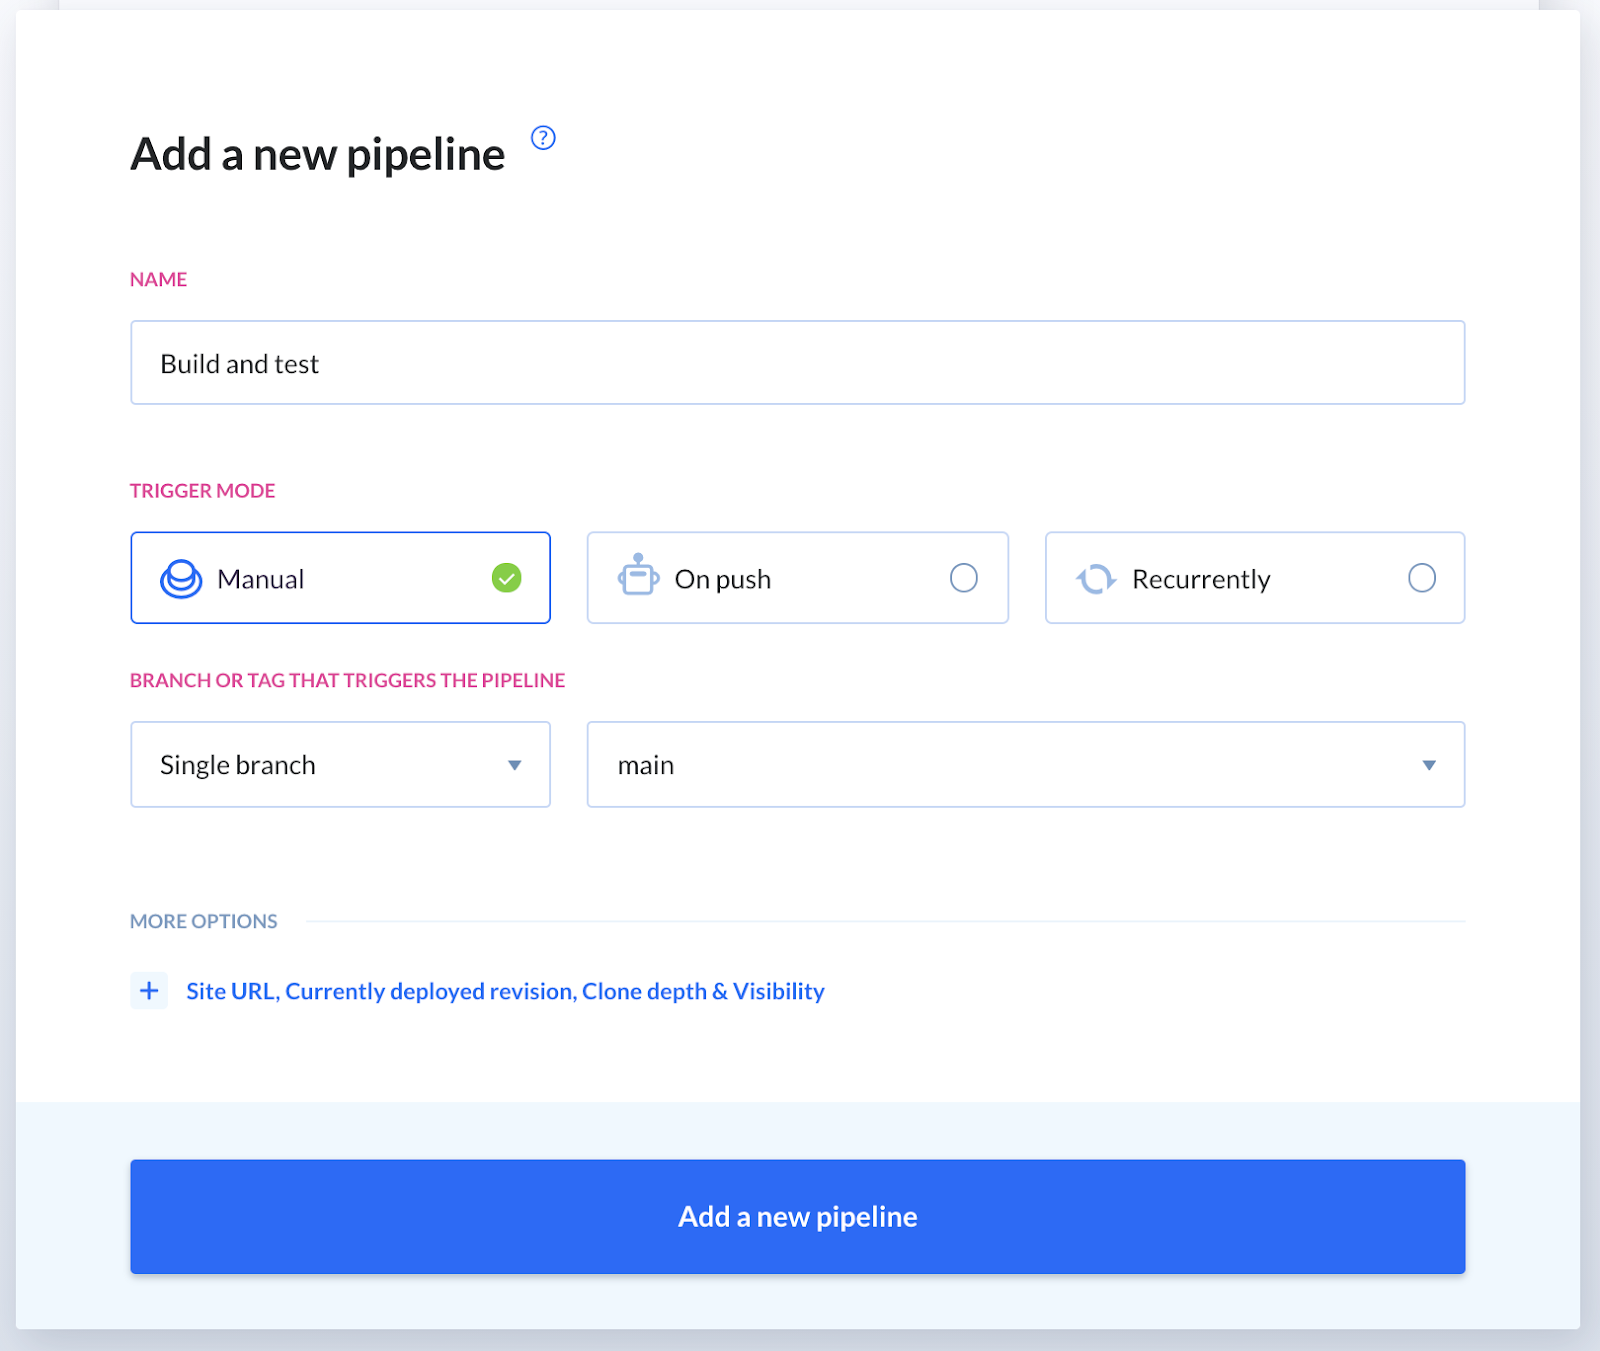
- Click Add a new pipeline.
- Give it a telling name, for example
Build and test. - Choose Manual for the trigger mode.
Setting the mode to On push will force Buddy to trigger the pipeline on every push to the selected branch.
- Leave the branch defaults as they are.
- When ready, click the button at the bottom to confirm.
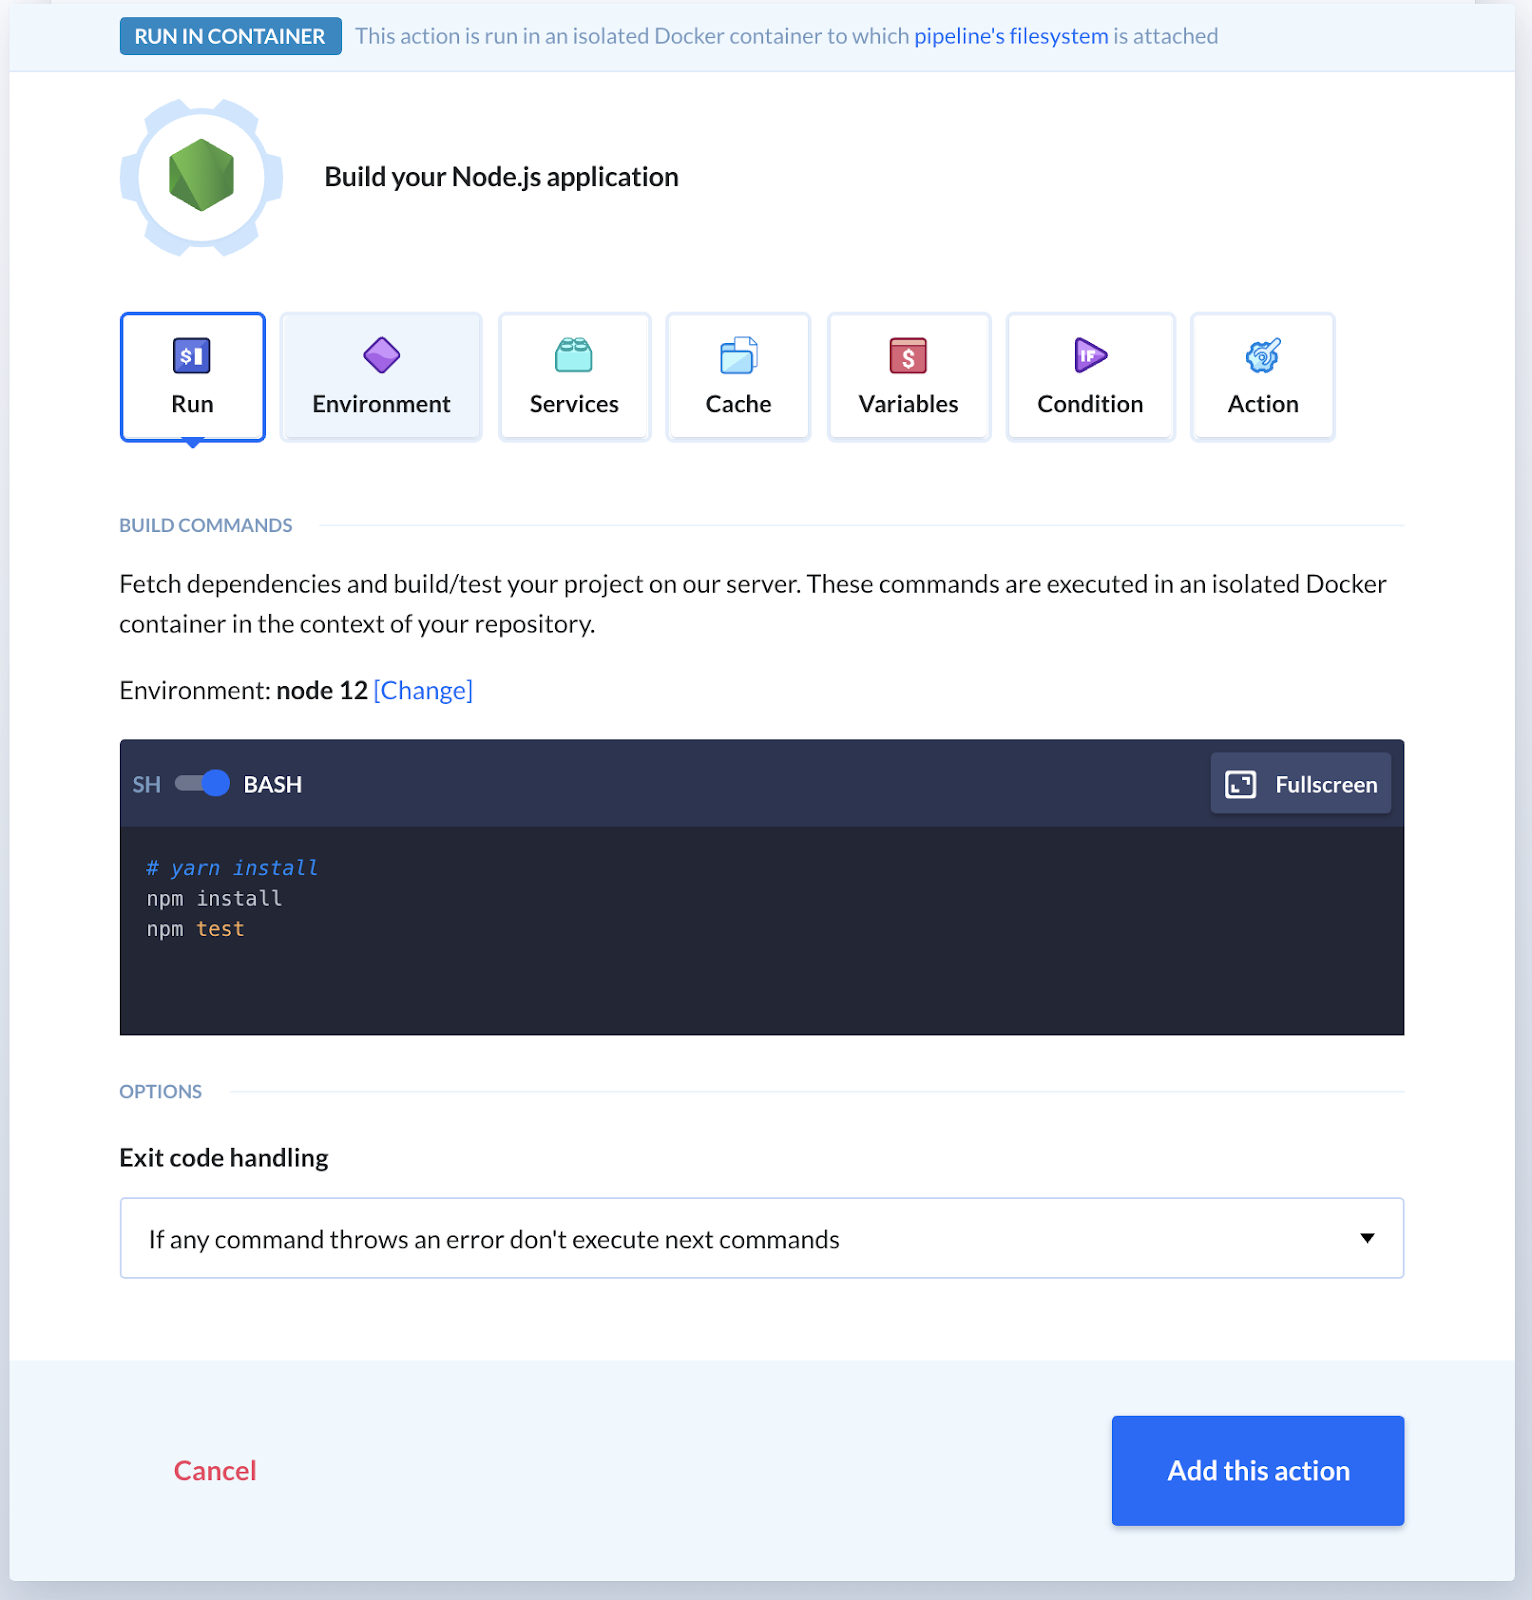
When the Actions screen comes up, choose Node.js (this should be detected by Buddy):

Now, this is where the full power of the services comes to life. In the current tab you see a script section where you can write out arbitrary commands. The Node action comes with Node, npm and yarn all included by default.
This script will run on every pipeline run. On the Environment tab, you can set up a script that will run once, persist it to an image, and load that image up every time the pipeline runs. This is extremely useful for time-consuming tasks. Installing Cypress for JavaScript end-to-end tests, for example, takes a very long time to set up the first time. However, once its installed, Buddy caches it in the container making it available for future use. Another example would be downloading, installing and setting up Android SDKs.
Click Add this action once you’re done tinkering around with the settings.
11. Testing pipeline
Let's see if everything works as expected. Click the Run pipeline button in the top right corner and confirm with Run now:
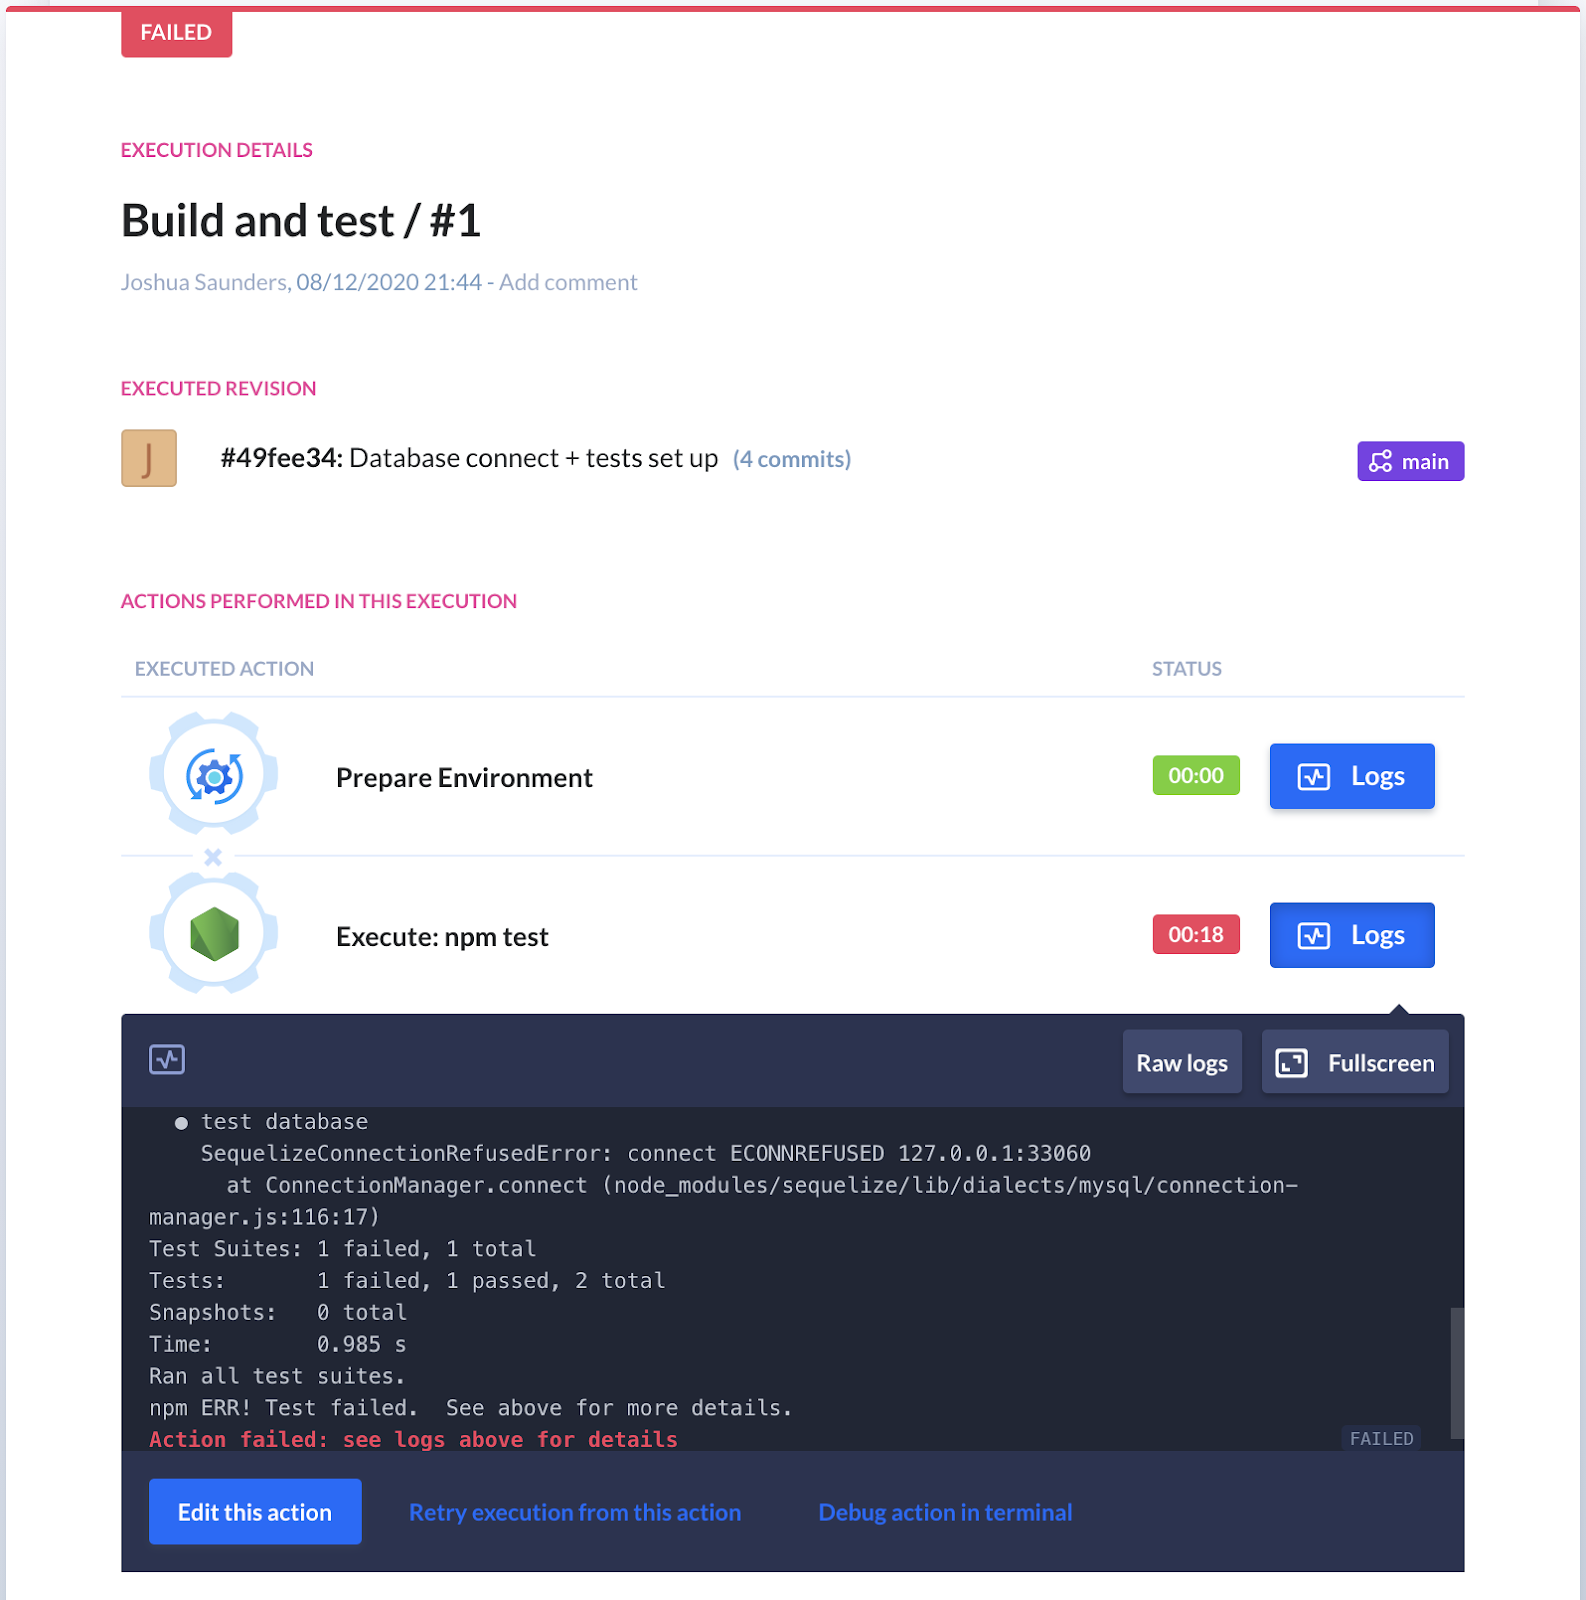
Once in progress, click the pipeline name to open execution details. You will notice that each action produces logs in real-time that you can use to debug possible issues later on.
And yes – unfortunately, you'll now see that you're getting the same errors as when you ran the tests locally for the first time. Let's get an SSH tunnel running on the build:
- Click Project settings in the bottom-left corner.
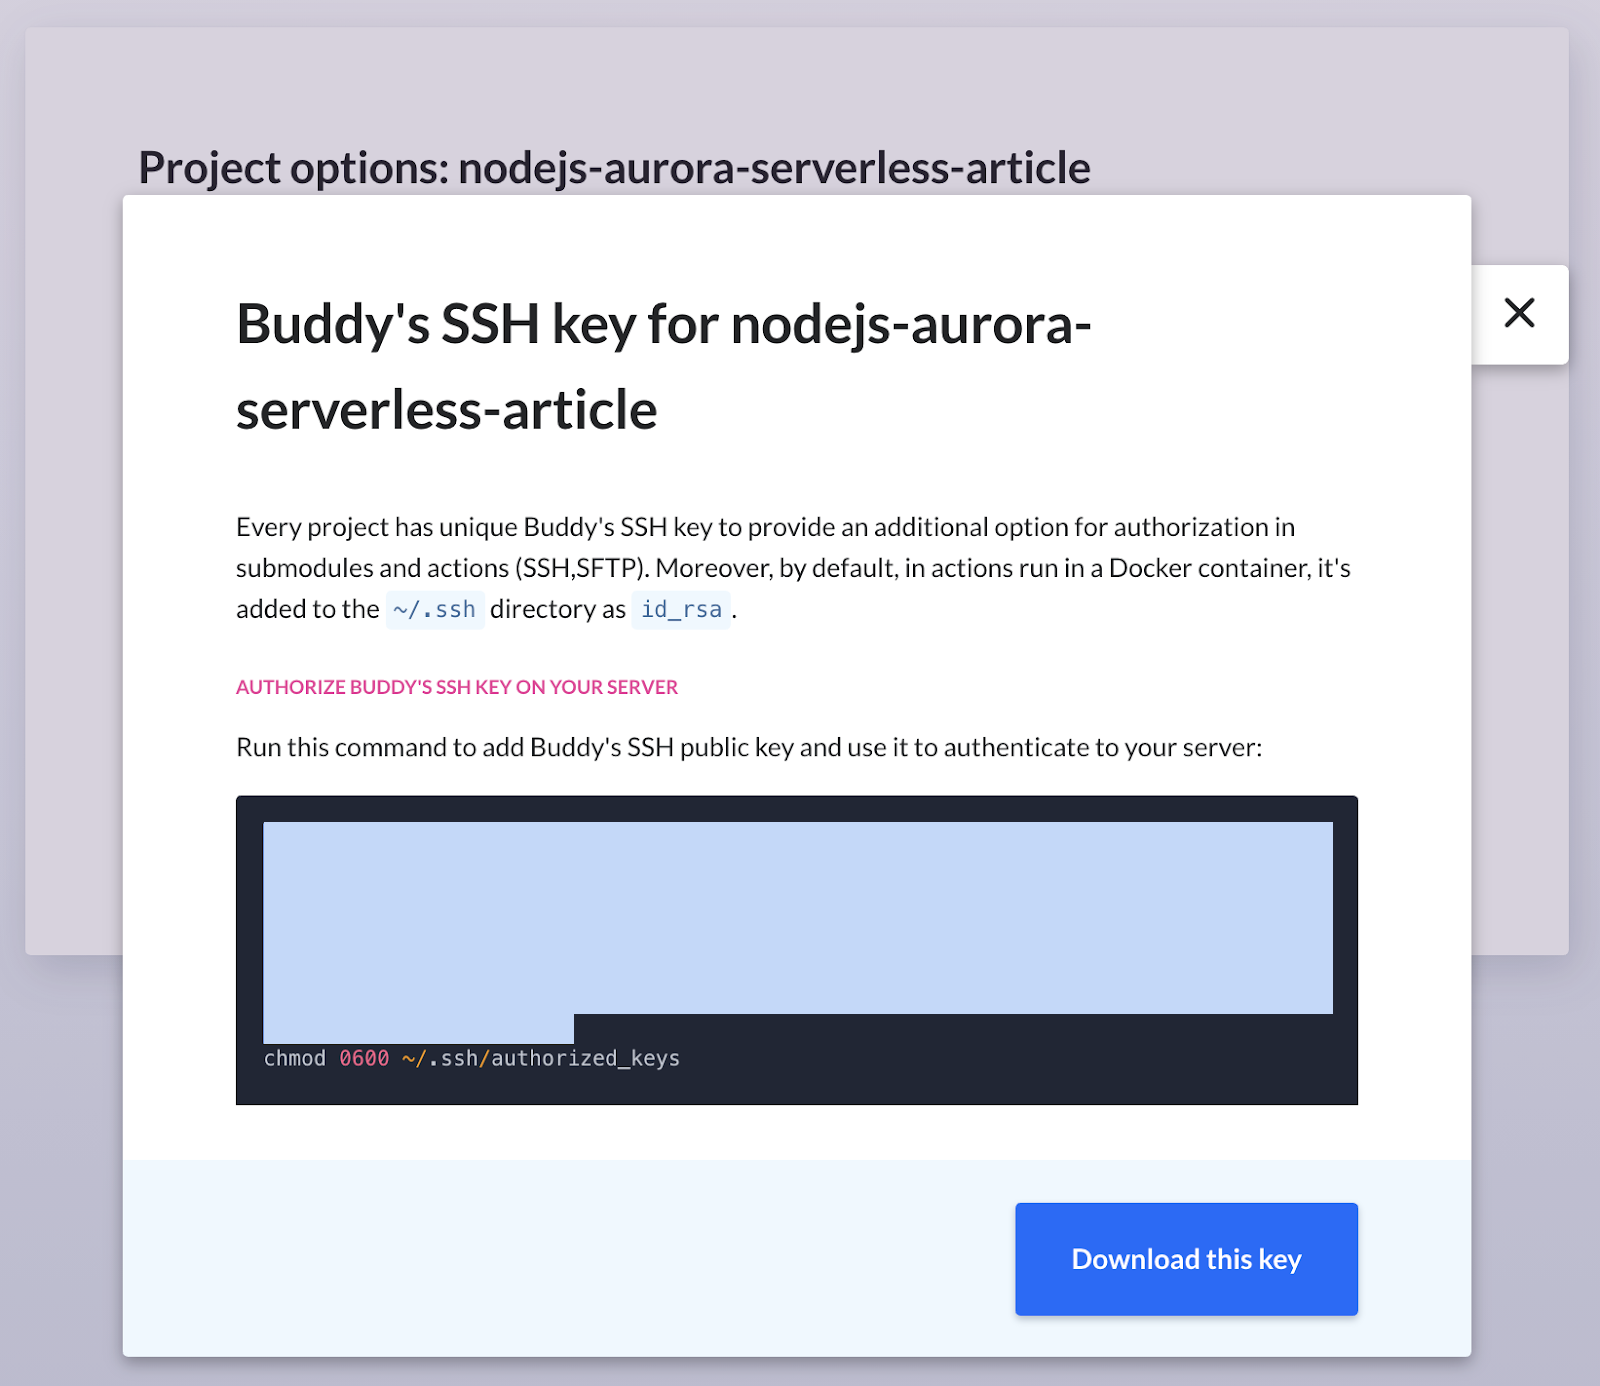
- In the right column with options, click Buddy Public Key.
- Copy the contents of the code box (you can ignore the
chmodpart):
- Go to your Cloud9 environment, paste the contents and hit enter.
- Go back to your pipeline in Buddy and switch to the Actions tab
- Click the Node action and add a new line above
npm install:
ssh -N -L 33060:<DB_CLUSTER_ENDPOINT>:3306 ec2-user@<PUBLIC_IP_ADDRESS> -o StrictHostKeyChecking=no &
Since we're in CI/CD, we'll use -o StrictHostKeyChecking=no to allow the build to automatically select yes when checking known_hosts. The & runs our tunnel in the background so we can continue to the next line without waiting (since the ssh command doesn't terminate).
Underneath that line, put sleep 12s to make sure enough time elapses for the SSH tunnel to be ready. There are more elegant ways to handle this, but for this exercise, it's definitely good enough.
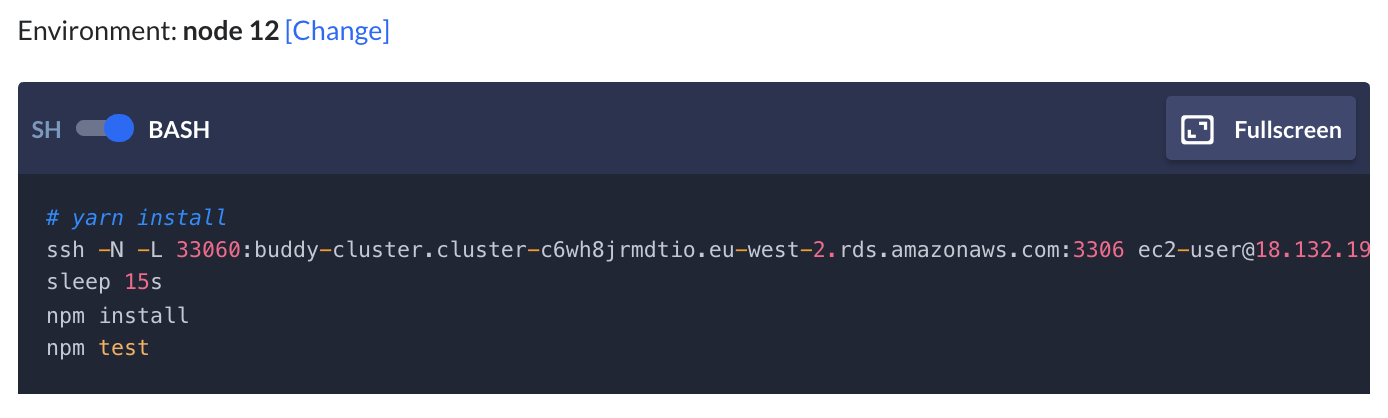
The full command configuration should look like this:
ssh -N -L 33060:<DB_CLUSTER_ENDPOINT>:3306 ec2-user@<PUBLIC_IP_ADDRESS> -o StrictHostKeyChecking=no &
sleep 15a
npm install
npm test
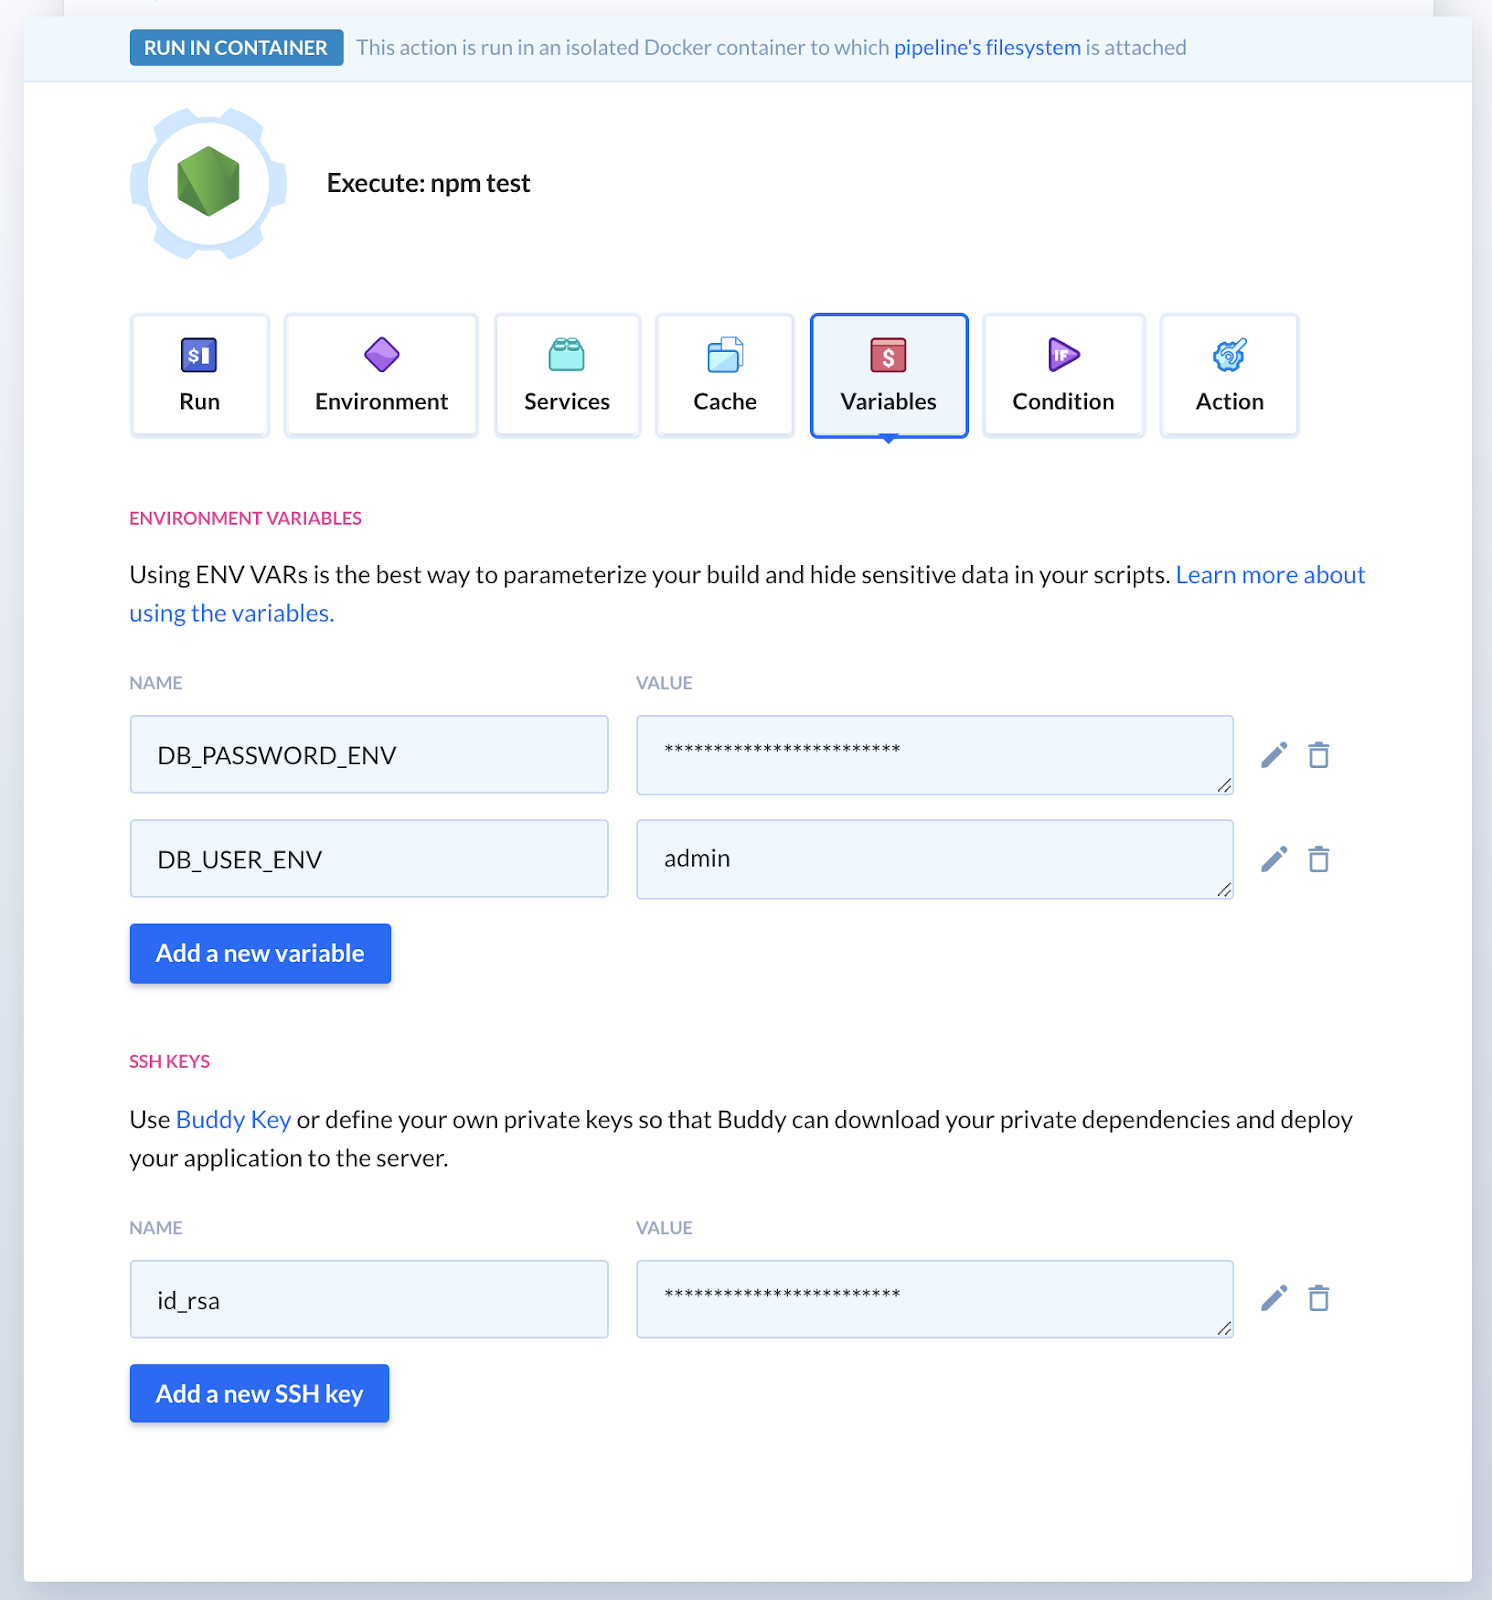
Lastly, we need to pass the database username and password using environment variables. Follow these steps to get them in:
- Click the Variables tab.
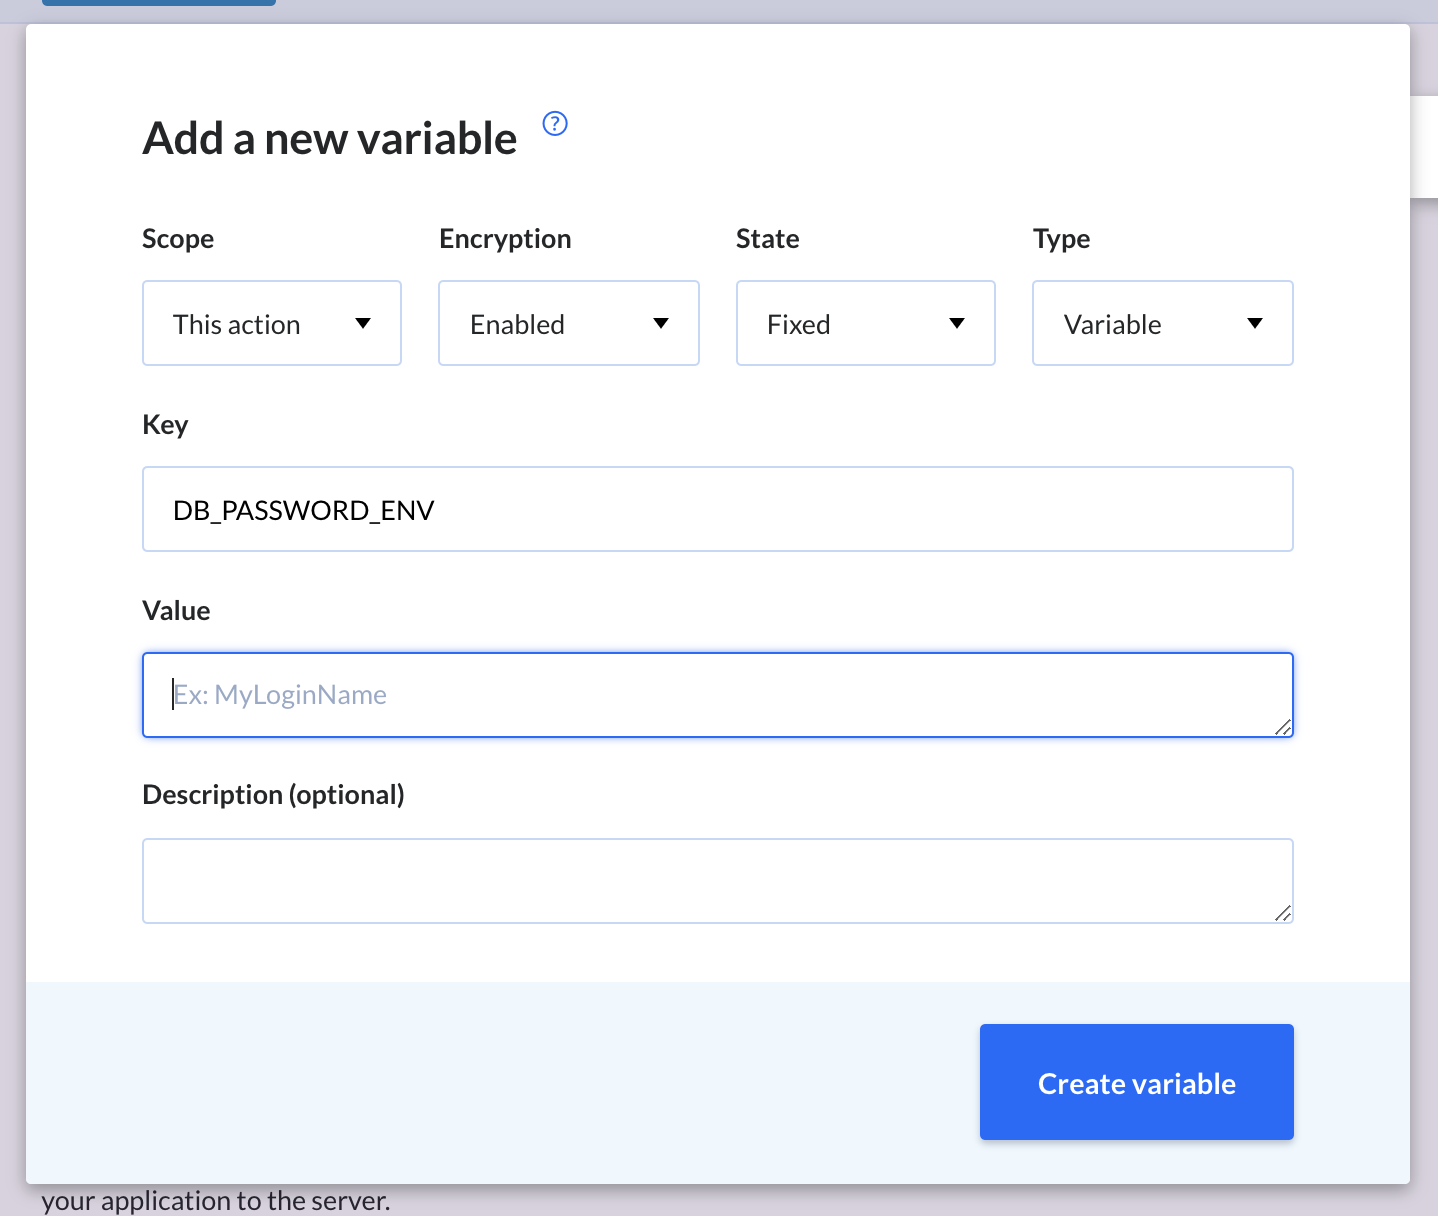
- Click Add new variable.
- Add a variable
DB_USER_ENVwith your database's username. - Add another variable
DB_PASSWORD_ENVwith your database's password (make sure to enable encryption to hide your credentials!):
- In the action details, add
echo "DB_USER=$DB_USER_ENV" >> .envandecho "DB_PASSWORD=$DB_PASSWORD_ENV" >> .envbelowsleep 15s:
echo "DB_USER=$DB_USER_ENV" >> .env
echo "DB_PASSWORD=$DB_PASSWORD_ENV" >> .env
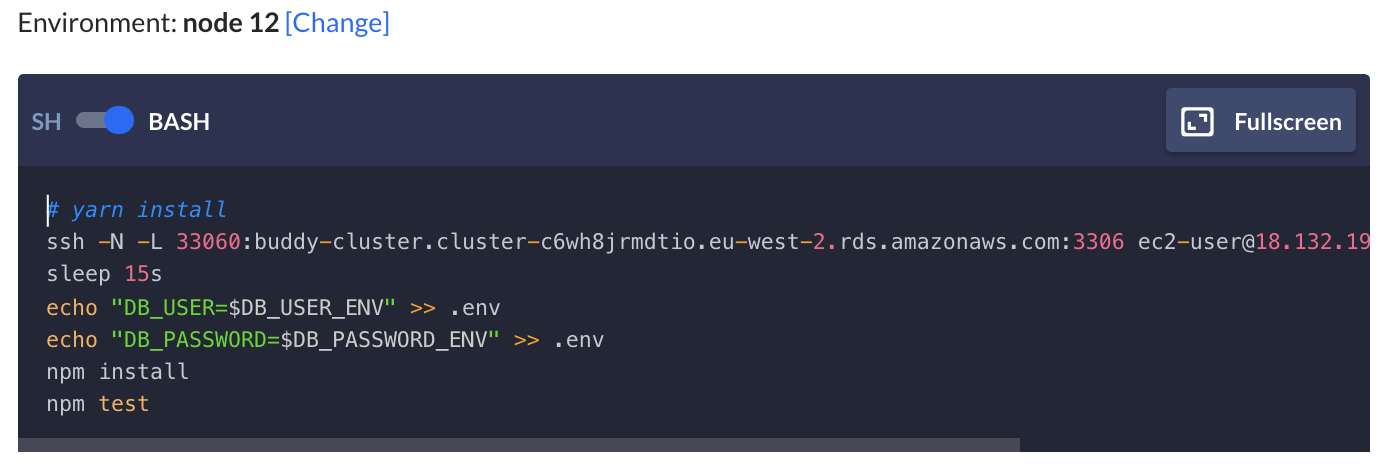
The final command configuration should look like this:
ssh -N -L 33060:<DB_CLUSTER_ENDPOINT>:3306 ec2-user@<PUBLIC_IP_ADDRESS> -o StrictHostKeyChecking=no &
sleep 15a
echo "DB_USER=$DB_USER_ENV" >> .env
echo "DB_PASSWORD=$DB_PASSWORD_ENV" >> .env
npm install
npm test
- Click Save action when ready.
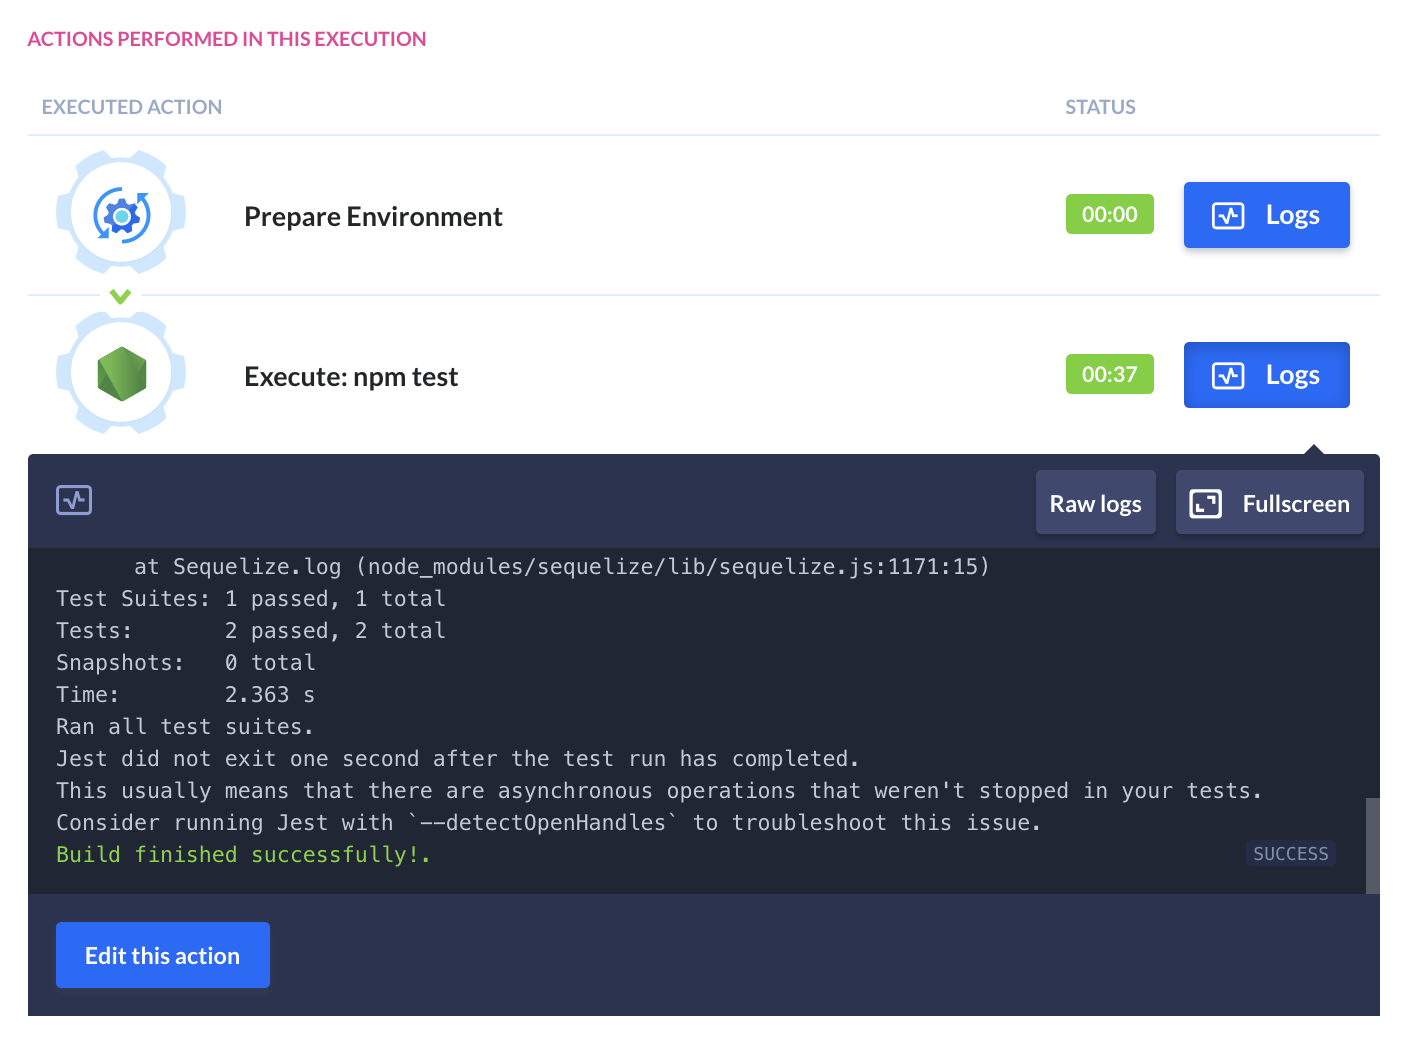
Finally, click Run pipeline in the top left corner – now your build will pass!
In case your database fell asleep, run the action again in about 30 seconds and it'll pass.
12. Summary
Having a reliable and consistent connection to live databases in your builds is of utmost importance to maintain confidence from your passing tests—and is much better than mocking it out. Getting connected to a serverless database is an uphill battle at first, but once you get it once, you're good to go. The icing on the cake is adding a CI/CD tool like Buddy as a means of automation, not only for serverless management, but also for deployments, staging, team communication, monitoring – basically anything that can be put on auto-pilot.